































Table of Contents
- Key Points
- Getting Started with ACE++ Face Swapping
- Advanced ACE++ Editing Techniques
- How to Unleash the Power of AI Face Swapping
- Pricing
- Weighing the Benefits: Pros and Cons of ACE++
- Core Features
- Creative Use Cases for ACE++ Face Swapping
- Frequently Asked Questions
- Related Questions



Getting Started with ACE++ Face Swapping
Understanding AI Face Swapping with ACE++
Artificial intelligence is revolutionizing photo editing, and ACE++ face swapping stands at the forefront of this innovation. Unlike basic face-swapping tools, ACE++ leverages advanced algorithms to understand natural language prompts, allowing for more nuanced and creative image manipulation. This means you can go beyond simple face replacements and start altering attributes, styles, and even the emotional expressions of your subjects. By combining face swapping with natural language processing, ACE++ empowers you to generate truly unique and personalized images.
Key Features of ACE++:
- Natural Language Prompting: Use intuitive text commands to guide the AI's editing process.
- Face Retention: Ensure the identity of the face is preserved during the swap.
- Attribute Manipulation: Change attributes like hat color, logo style, and even emotional expression.
- Workflow Integration: Seamlessly integrate ACE++ into existing ComfyUI workflows for advanced photo editing.
This guide provides step-by-step instructions to help you harness the full potential of ACE++ and create compelling visual content. Let's dive into how to get started!

Installing ComfyUI and Required Models
Before you can start creating incredible face swaps, you'll need to set up your environment. ACE++ is designed to work with ComfyUI, a powerful and modular visual programming environment for Stable Diffusion. Here's how to get everything installed:
Step 1: Installing ComfyUI
If you don't already have ComfyUI installed, visit the official ComfyUI GitHub page and follow the installation instructions for your operating system.
Step 2: Downloading the Workflow
To get the ACE++ workflow, you can visit the provided Patreon link. Do not worry it is not behind a paywall!
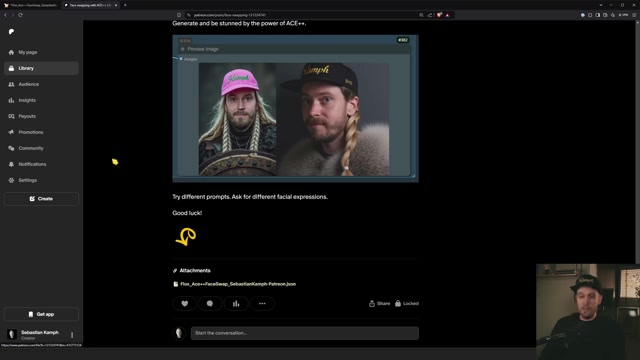
Download the workflow file, which typically has a .json extension, from the Patreon post. The link is available in the description. Now it's time to get started with ACE++!
Step 3: Installing Missing Custom Nodes
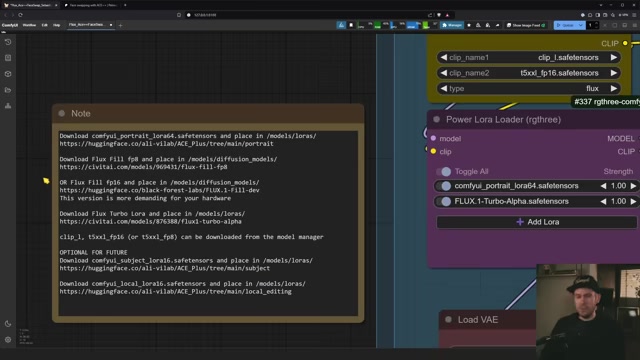
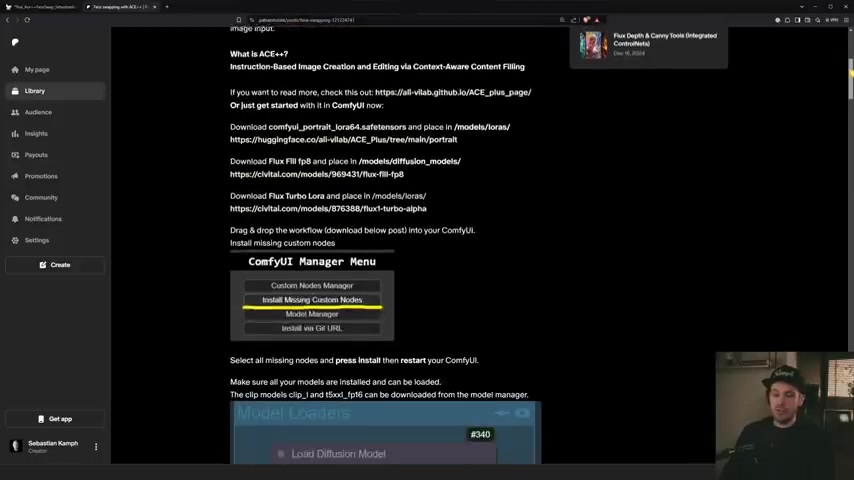
Drag and drop the workflow file into the ComfyUI interface. This will load the workflow, but you might encounter red nodes indicating missing custom nodes. You can automatically resolve it going into your manager and selecting Install missing costum nodes to download it. Then restart your comfy.
Step 4: Installing Essential Models
ACE++ relies on several models to function correctly. You can find the download links for these models in the description or the workflow file itself.
Here’s a list of some of the essential models you will need:
- Flux-Fill fp8: Download this model.
- CLIP L: This can be ComfyUI’s portrait.
- Text Encoders: This one will be the FP16 safetensors clip.
- VAE: It should be ae safetensors clip.
Place each downloaded model in the appropriate folder within your ComfyUI installation.
- Lora files go into the
/models/loras/directory. - Diffusion models go into the
/models/diffusion_models/directory. - VAEs go into the
/vae/directory.
| Model | Directory |
|---|---|
| Flux-Fill fp8 | /models/diffusion_models/ |
| CLIP L | /clip/ |
| Text Encoders FP16 safetensors | /text_encodes/ |
| VAE ae safetensors | /vae/ |
After installing the missing custom nodes and models, restart ComfyUI to apply the changes. The red nodes should disappear, indicating that all dependencies are now correctly installed and ready to use.
Advanced ACE++ Editing Techniques
Mastering Prompts for Creative Control
ACE++ leverages natural language prompts to provide unparalleled control over image editing. By crafting the right prompts, you can subtly influence the AI's modifications and achieve stunning results. ACE++ excels in attribute manipulation. The best way to get that is creating amazing prompts!
Examples of Effective Prompts:
- Changing Hat Color: “Retain face. Change the hat to pink.”
- Adding Styles: “Retain face. Add cyberpunk style.”
- Modifying Facial Expressions: “Retain face. The man is smiling.”
- Combining Instructions: “Retain face. Keep the black hat and yellow text logo”
Experiment with different combinations of prompts to see how ACE++ responds. The key is to be clear and concise in your instructions.
Tips for Prompt Engineering:
- Specificity: The more specific you are, the better the AI can understand your intention.
- Experimentation: Don't be afraid to try different phrasings and combinations of prompts.
- Iterative Approach: Refine your prompts based on the results you achieve.
When ACE++ recognizes your prompts, it will return some amazing results, creating and/or enhancing photos according to your needs.
Face Customization
While ACE++ excels at retaining facial features and attributes, customization options allow you to fine-tune the results even further.
- Masking: Precise masking can be used to isolate certain parts and make more precise editing.
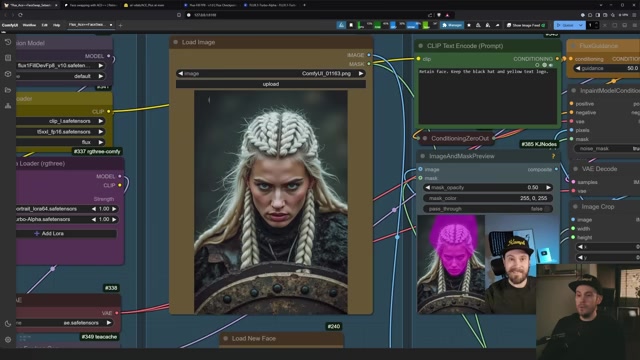
By experimenting with customization you can get the hang of ACE++. Every result will be better than you expected.
Fixing Red Nodes and other ComfyUI problems
It is really common that some of the costum nodes or the AI just doesnt work. Well, dont worry, i will give you some tips that will solve most of the issues.
- If it is a red costum nodes problem, go to your manager and select Install missing costum nodes to download it.
- Reinstall all costum nodes.
- Restart the AI and your PC.
These are all steps that you can use to get ACE++ and ComfyUI going. I encourage you to try all of the things that i mentioned to you for the best results, happy generations!
How to Unleash the Power of AI Face Swapping
Detailed Steps for Seamless Face Swaps
ACE++ makes face swapping incredibly easy. Here are the steps to start:
Step 1: Upload Images
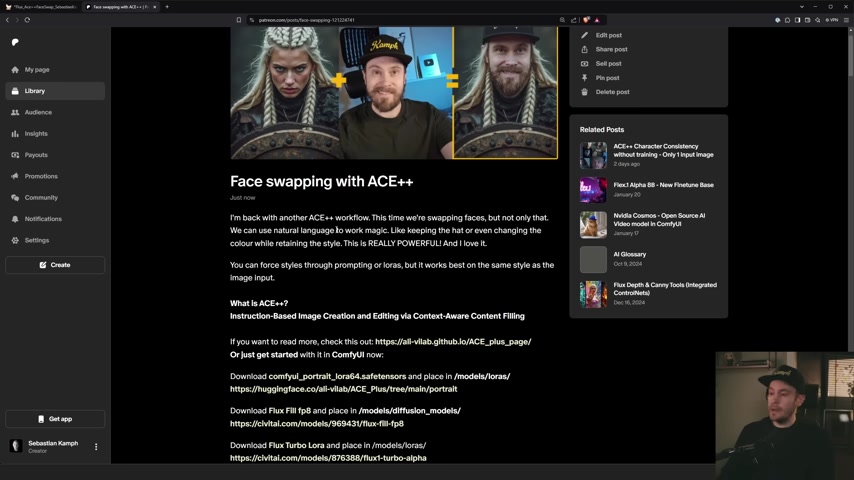
Load the images you want into ComfyUI. Upload two images: one with the base image and the other with the face you want to swap. Ensure the images are clear and well-lit for optimal results.
Step 2: Load New Face
Make sure you have the images located on the correct load images box, the Load New Face one is going to take the face you want to use, and the Load Image is going to load the base image.
Step 3: Open on Mask Editor
To improve the detection i like to use the Open in Mask Editor, to make sure that the FaceSwap is 100% accurate, make sure to use the same editor that is showing in the ComfyUI.
Step 4: Create a Prompt
Create a prompt to edit some atributes on the new image, or just retain face, all depends on what you need.
Step 5: Run it!
This step will mix both faces and create your image, it will take some time but if you did all the steps correctly you should have a amazing Image!







Most people like


































Report
Please select a reason for reporting
- 13 Reasons to Switch from Snapchat to Text Messaging
- 7 Powerful Speech to Text Apps to Boost Productivity
- 10 Best Speech to Text Tools for Effortless Transcription
- 13 Free Tools to Easily Transcribe Audio to Text
- 15 Surprising Ways Google's Speech-to-Text Boosts Productivity
- 7 Best Free Online Audio to Text Transcription Tools
- 9 Tips to Transcribe Speech to Text Faster and Better
- 13 Best Speech to Text Software for Windows 10 in 2023
- 7 Tips for Choosing the Best Transcriber for Audio to Text
- 11 Reasons Why Dragon Speech-to-Text Apps are Game-Changers
- 6 Secrets to Enhance Your Speech to Text Transcription
- 6 Brilliant Ways to Boost Productivity with Talk-to-Text on Your MacBook
- 6 Ways Transcription Software Converts Audio to Text
- 8 Tips to Transcribe Speech to Text Like a Pro
- 6 Reasons IBM Watson Speech to Text is a Game-Changer
- 14 Powerful Ways Talk-to-Text Improves Your Workflow
- 12 Top Windows Speech-to-Text Software for Efficient Transcription
- 12 Game-Changing Benefits of Apple's Speech to Text Technology
- 9 Powerful Use Cases for AWS Speech to Text Technology
- 10 Easy Steps to Transcribe YouTube Videos to Text
- transcription audio en texte
- online audio transcription
- free audio file transcription
- free ai audio transcription
- audio transcription service
- audio transcription online free
- audio transcription free online
- audio to transcription software
- audio and transcript
- ai audio transcription free
- voice recording to text converter
- translate voice recording to text
- record voice to text
- audio recording to text converter
- voice recording and transcription
- chatgpt voice to text
- gmail voice to text
- speech to text reader
- speech to text ai free
- speech to talk
- How SEO and Marketing Dashboards Empower Agencies to Drive Results
- How to Use AI Tools to Find Internal Linking Opportunities Across a Business Website
- Discover Your Perfect Haircut with AI Hairstyle Apps
- Free Reputation Calculator Tools: How They're Adapting to Score AI Visibility, Not Just Rankings
- Design Professional Flyers for Free on Your Phone
- Best Free Flyer Maker Apps for Android: Design Like a Pro
- How to Know If Your Business Is Ready for an AI Customer Service Agent
- Revolutionizing Storytelling: From Novels to Screenplays with AI
- Create Engaging Animated Explainer Videos with a Free AI Tool
- Stop Multi-Subscribing: Benchmark Top AI Visual Models in One Canvas
- ASOMobile Helps Teams Benchmark App Store Screenshots Against Competitors
- How to Match LMS Software With Your Organization's Training Plan
- Revolutionizing Email Marketing Agency with AI
- How to Convert BTC to HNT
- Unleashing the Power of AI: Cognizant's Roadmap for Transformation
- Frame to Video Review: A Practical Look at Turning Two Still Frames Into Motion
- NVIDIA NIM: Revolutionizing Supply Chain Data Analysis with AI
- Top AI Tools That Help Brands Stand Out Offline (Not Just Online)
- Top 5 Cold Email Software: Maximize Your Outreach in 2025
- Magic School AI: Revolutionizing Quiz & Assessment Generation

Copyright ©2026 toolify