































Table of Contents
- Key Points
- Understanding AI Segmentation in DSLR Remote Pro
- Setting Up DSLR Remote Pro for AI Segmentation
- Step-by-Step Guide: Creating AI Segmentation Effects
- Pricing of DSLR Remote Pro and Remove.bg
- Advantages and Disadvantages of AI Segmentation
- Key Features of DSLR Remote Pro and Remove.bg
- Practical Applications of AI Segmentation
- Frequently Asked Questions
- Related Questions



Understanding AI Segmentation in DSLR Remote Pro
What is AI Segmentation?
AI segmentation is a powerful tool that allows you to isolate specific elements within an image. In the context of photography, this often means separating a subject from its background. This separation opens up a world of creative possibilities, allowing you to replace backgrounds, insert graphical elements, and create visually striking images. DSLR Remote Pro leverages AI to automate this process, making it accessible to photographers of all skill levels. With AI-powered segmentation, you can achieve professional-looking results without the need for complex manual editing techniques, which ultimately enhance the overall quality and impact of your Photography. The use of AI streamlines the workflow, allowing for greater focus on creative direction and final image presentation. AI segmentation ensures precision and consistency, which are crucial for high-quality photobooth experiences and other commercial applications.
AI segmentation enhances workflows by:
- Reducing manual editing time: Automating background removal and subject isolation frees up time for creative adjustments and client interactions.
- Improving precision: AI algorithms provide more accurate segmentation than traditional manual methods, leading to cleaner and more professional results.
- Enabling creative flexibility: Segmented images allow for the addition of custom backgrounds, graphical overlays, and unique effects, enhancing the overall visual appeal.
Benefits of Using DSLR Remote Pro for AI Segmentation
DSLR Remote Pro is a software solution designed to enhance your photography workflow, particularly in photo booth environments. It's compatible with many DSLR cameras and offers features such as remote camera control, automated photo processing, and seamless integration with printing and sharing options. This Tutorial focuses on a specific feature: AI segmentation. DSLR Remote Pro, equipped with AI segmentation capabilities, enables users to effortlessly separate the subject from the background, add graphical elements, and create captivating visual effects.
Benefits of leveraging AI in DSLR Remote Pro include:
- Efficiency: AI automates the segmentation process, saving you time and effort.
- Precision: Achieve clean, accurate subject isolation for professional results.
- Creative Freedom: Insert graphical elements and custom backgrounds to enhance your images.
Key advantages of using DSLR Remote Pro:
- Remote camera control
- Automated photo processing
- Seamless printing and sharing
- Easy subject isolation with AI
Essential Tools and Software Versions
To fully leverage the AI segmentation features in DSLR Remote Pro, ensure you have the necessary software and tools. The tutorial specifically recommends using the latest version of DSLR Remote Pro, version 3.20.1
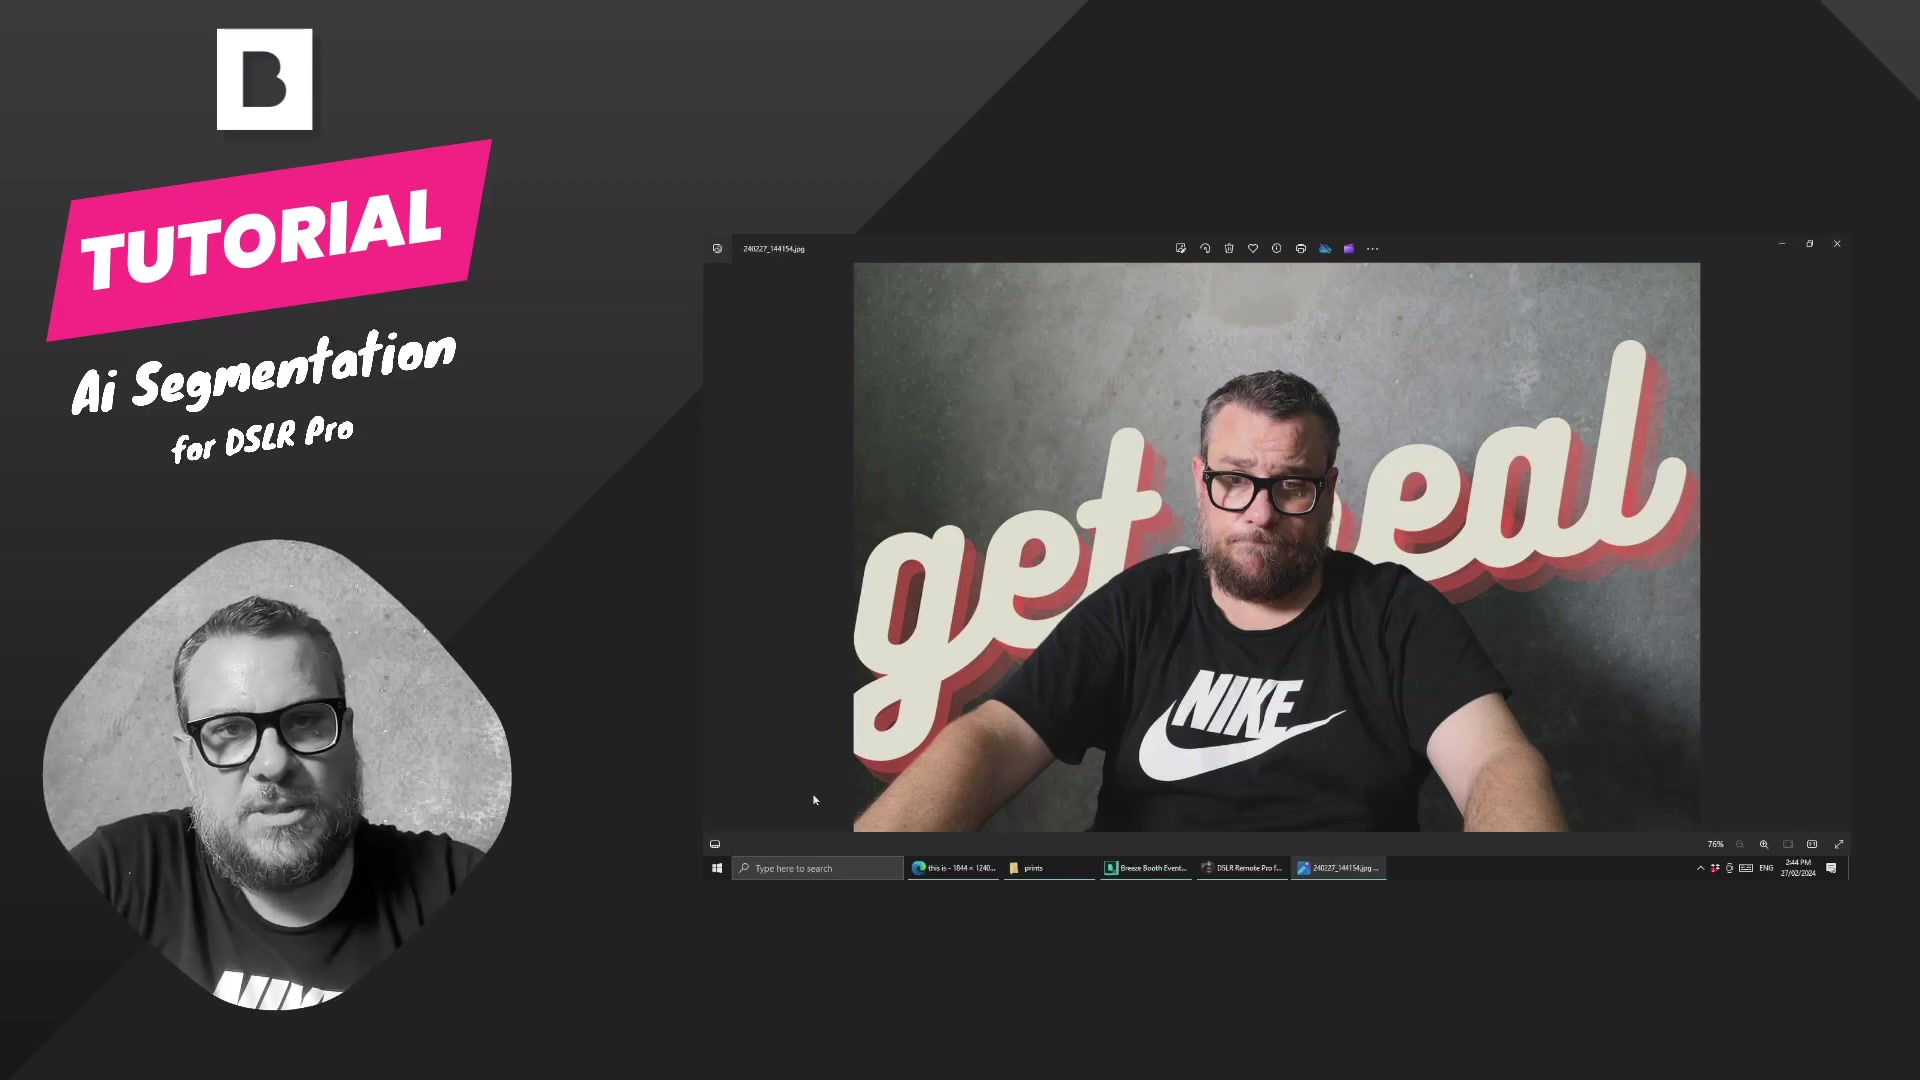
. This version includes enhanced AI capabilities and improved integration with external tools. For Windows users, the tutorial suggests using remove.bg for background removal. While the iPad version of DSLR Remote Pro has built-in background removal, the Windows version relies on external software for this functionality. By having the right tools and software versions, you can streamline your workflow and achieve optimal results. Having the latest version of DSLR Remote Pro ensures you have access to the most recent features and improvements.
Required Tools and Software:
- DSLR Remote Pro (version 3.20.1 or later): For remote camera control and AI segmentation.
- remove.bg: For background removal on Windows systems.
Setting Up DSLR Remote Pro for AI Segmentation
Disabling Image Editor Setup
Before diving into AI segmentation, it's crucial to configure DSLR Remote Pro correctly.
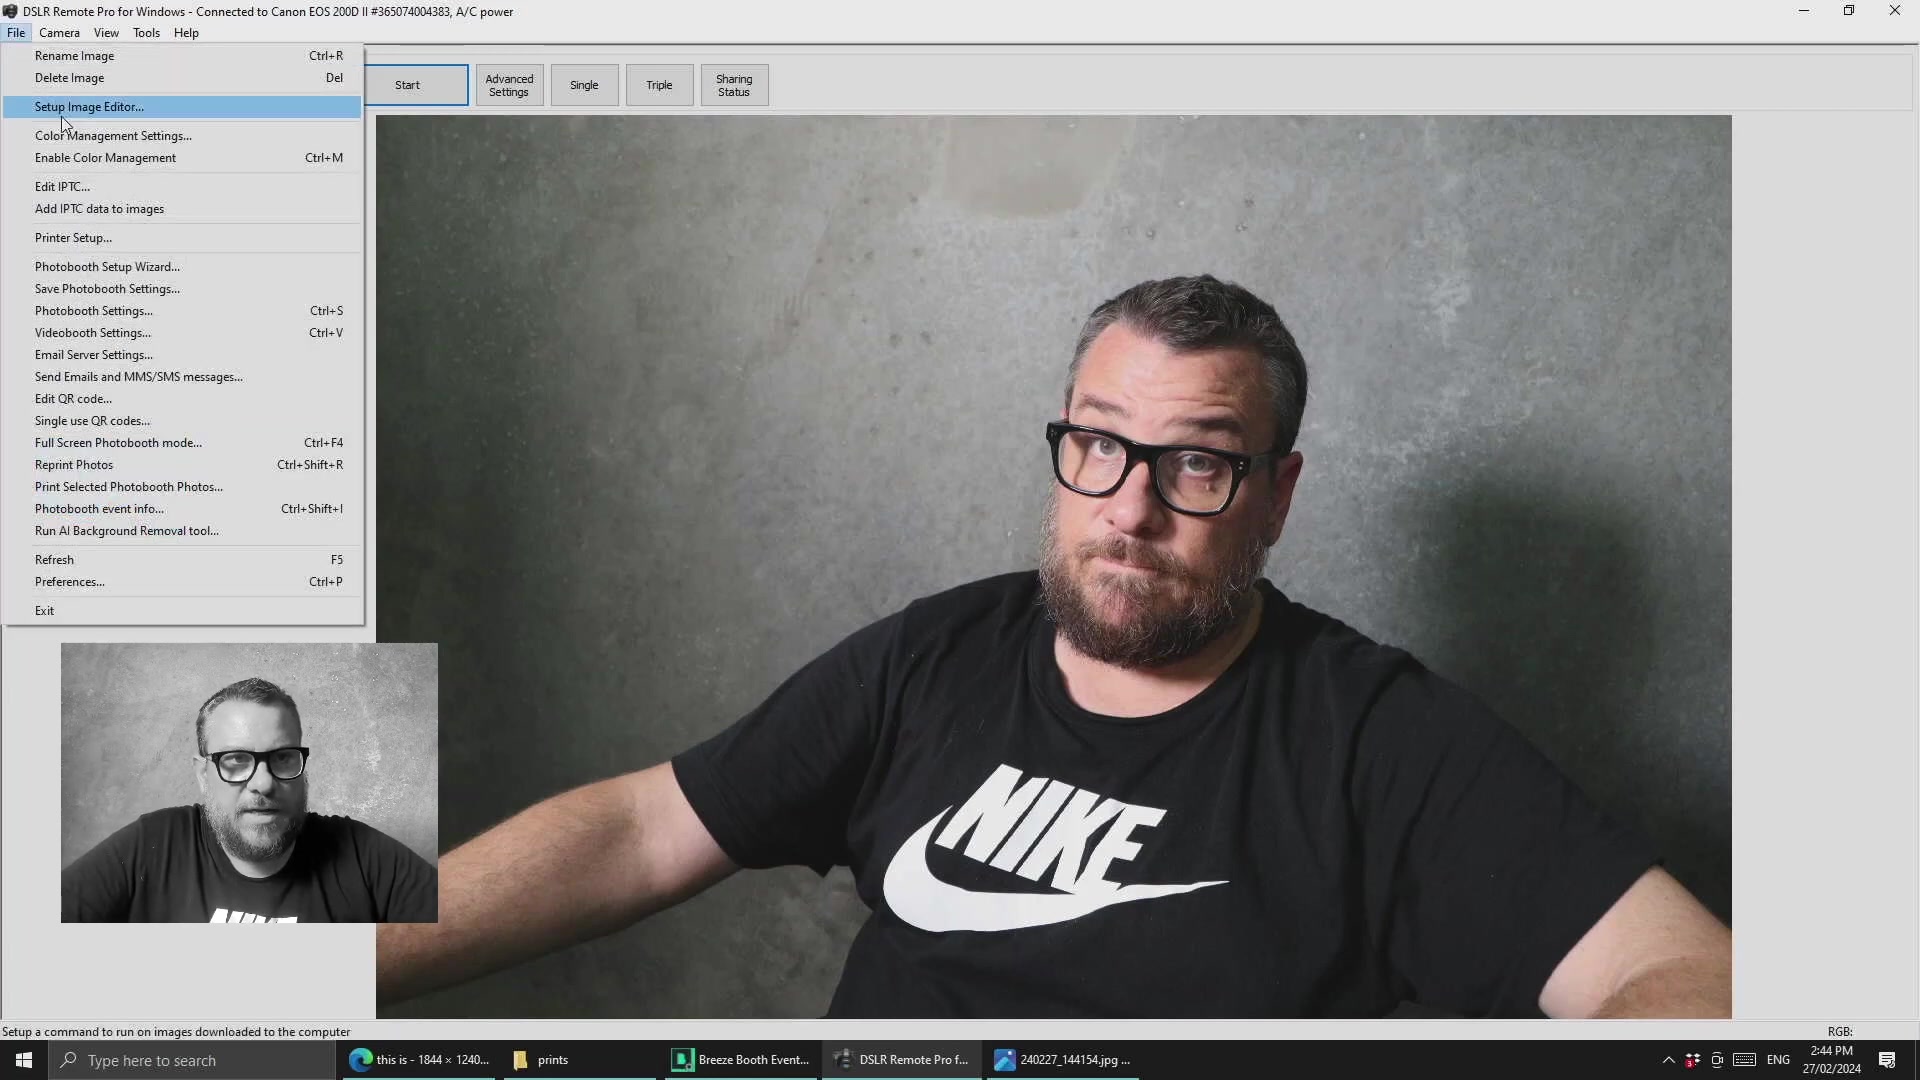
In earlier versions, users often set up an image editor to work with remove.bg. However, the latest version integrates this functionality directly into the profile settings. To avoid conflicts, disable the image editor setup that points to remove.bg.exe. This ensures that DSLR Remote Pro leverages its built-in AI segmentation capabilities effectively.
To disable the image editor setup:
- Go to the image editor settings.
- Ensure the option to 'Use the Windows Explorer Open command' is selected.
- Uncheck or disable the automatic editing of images using remove.bg.exe.
Configuring Post-Process Photo Settings
The latest version of DSLR Remote Pro has integrated AI segmentation directly into the output profile. A new section in the settings enables the post-processing of photos.
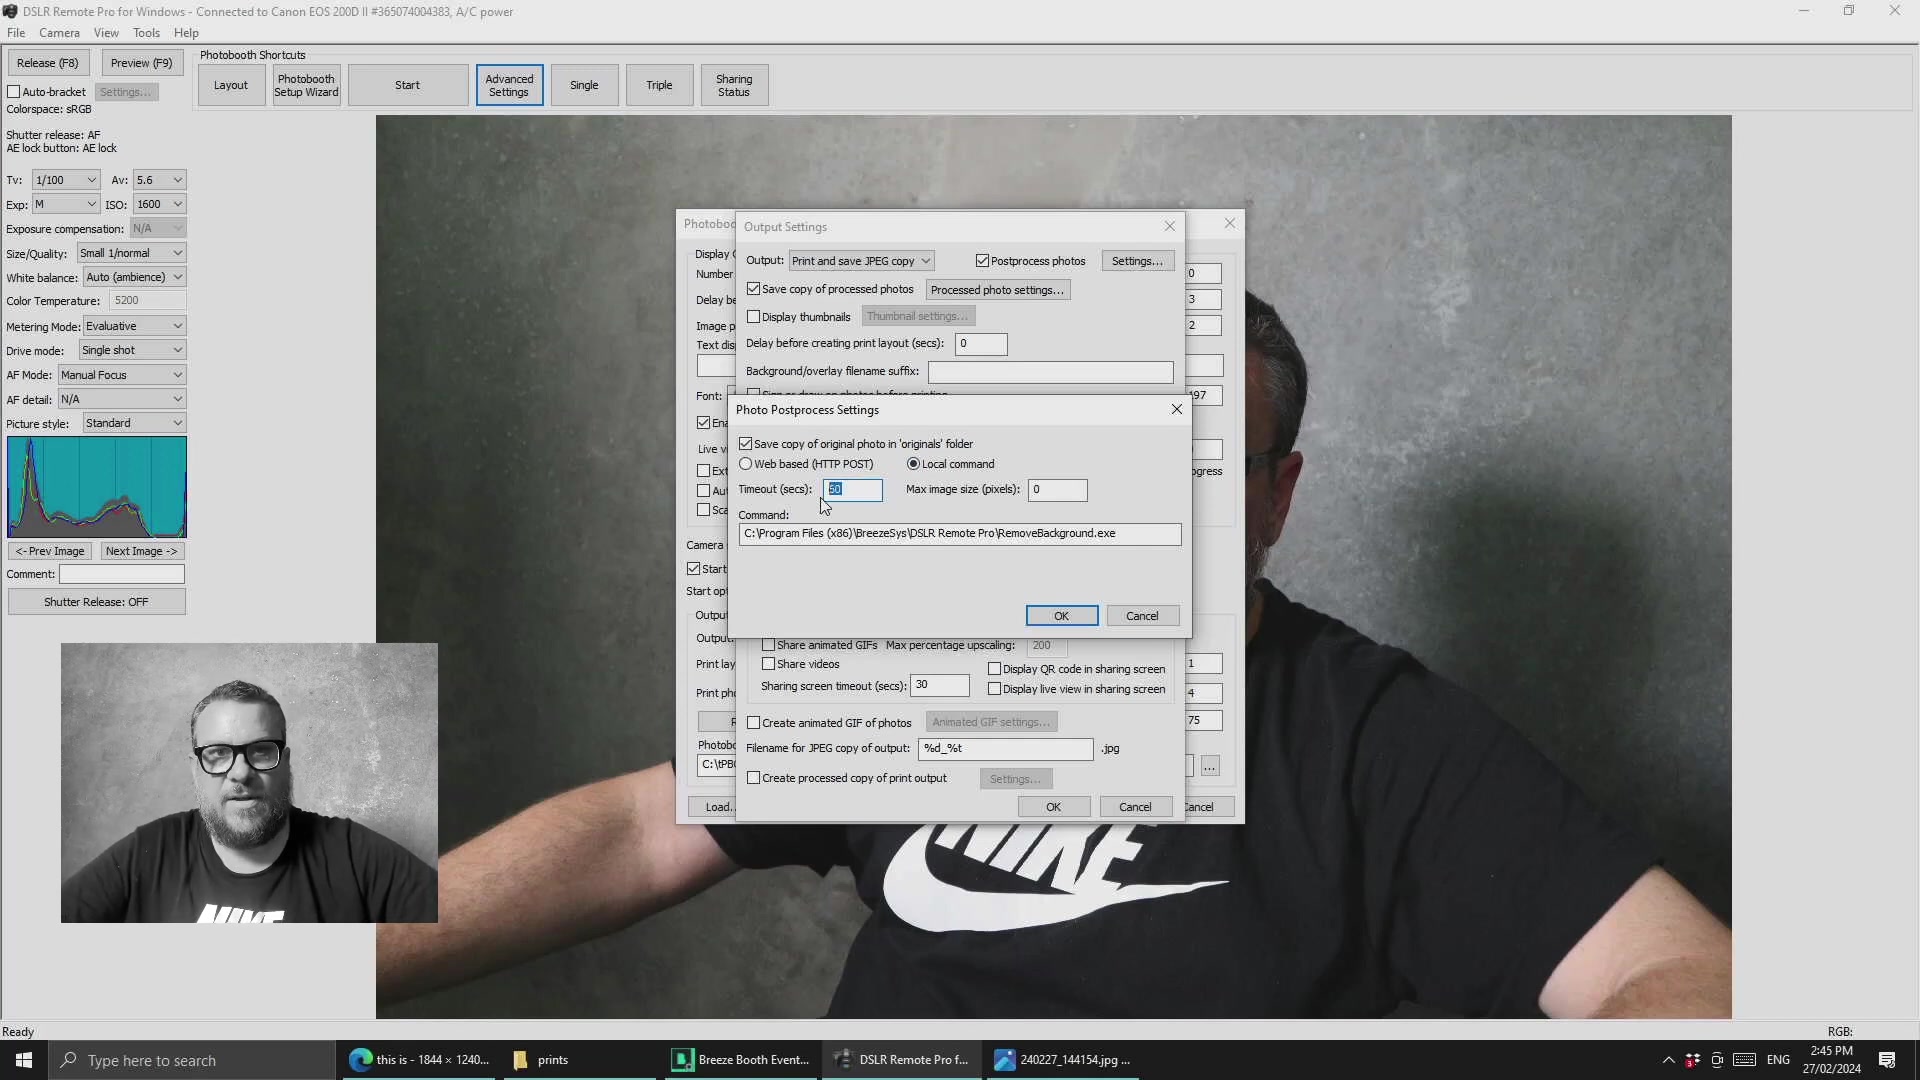
Activating this will allow your images to be processed with AI. To configure these settings, you need to copy the path to the remove.bg.exe file. This path will be used in the DSLR Remote Pro settings to ensure the software can access and utilize the background removal tool. In the advanced settings, specifically in the output settings section, there is a new option called 'Post-process photos'. Ensure this option is enabled.
Here’s how to configure the post-process photo settings:
- Navigate to 'Advanced Settings' or 'Output Settings'.
- Enable 'Post-process photos'.
- Choose 'Local Command'.
- Paste the path to 'remove.bg.exe' into the command field.
- Set the timeout (in seconds) to allow sufficient time for processing (e.g., 60 seconds).
Step-by-Step Guide: Creating AI Segmentation Effects
Step 1: Setting Up the Layout
The first step in creating AI segmentation effects is to set up your layout correctly
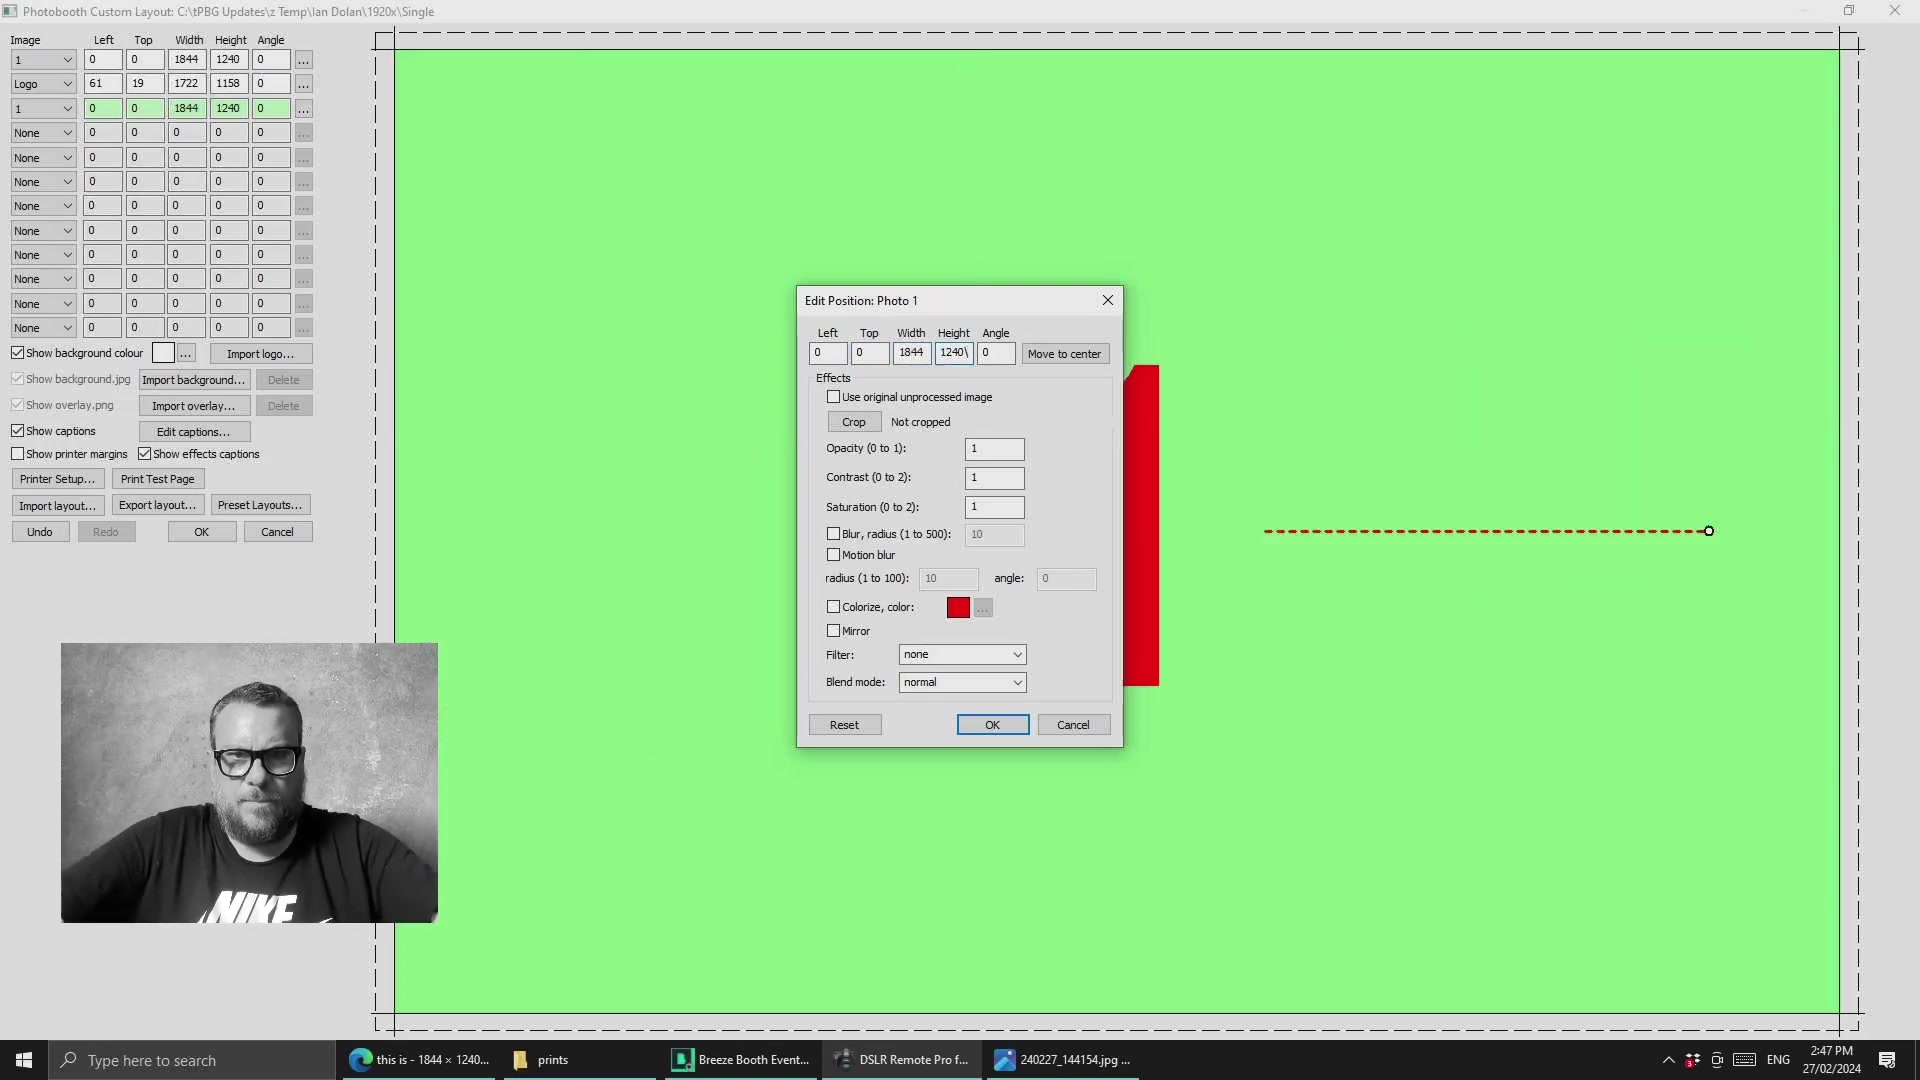
. Start by deleting any existing layers to begin with a blank canvas. This ensures that you have a clean slate to work with and avoid any conflicts with previous settings. Then, add the first photo, which will serve as the original background image. This layer is essential as it provides the base for your final image.
- Delete Existing Layers: Ensure a clean slate by removing any existing layers in the layout.
- Add Original Background Image: Incorporate the first photo, which will be the foundation of your design.
Step 2: Configuring the Background Image
The next step is to configure the background image to fill the entire canvas
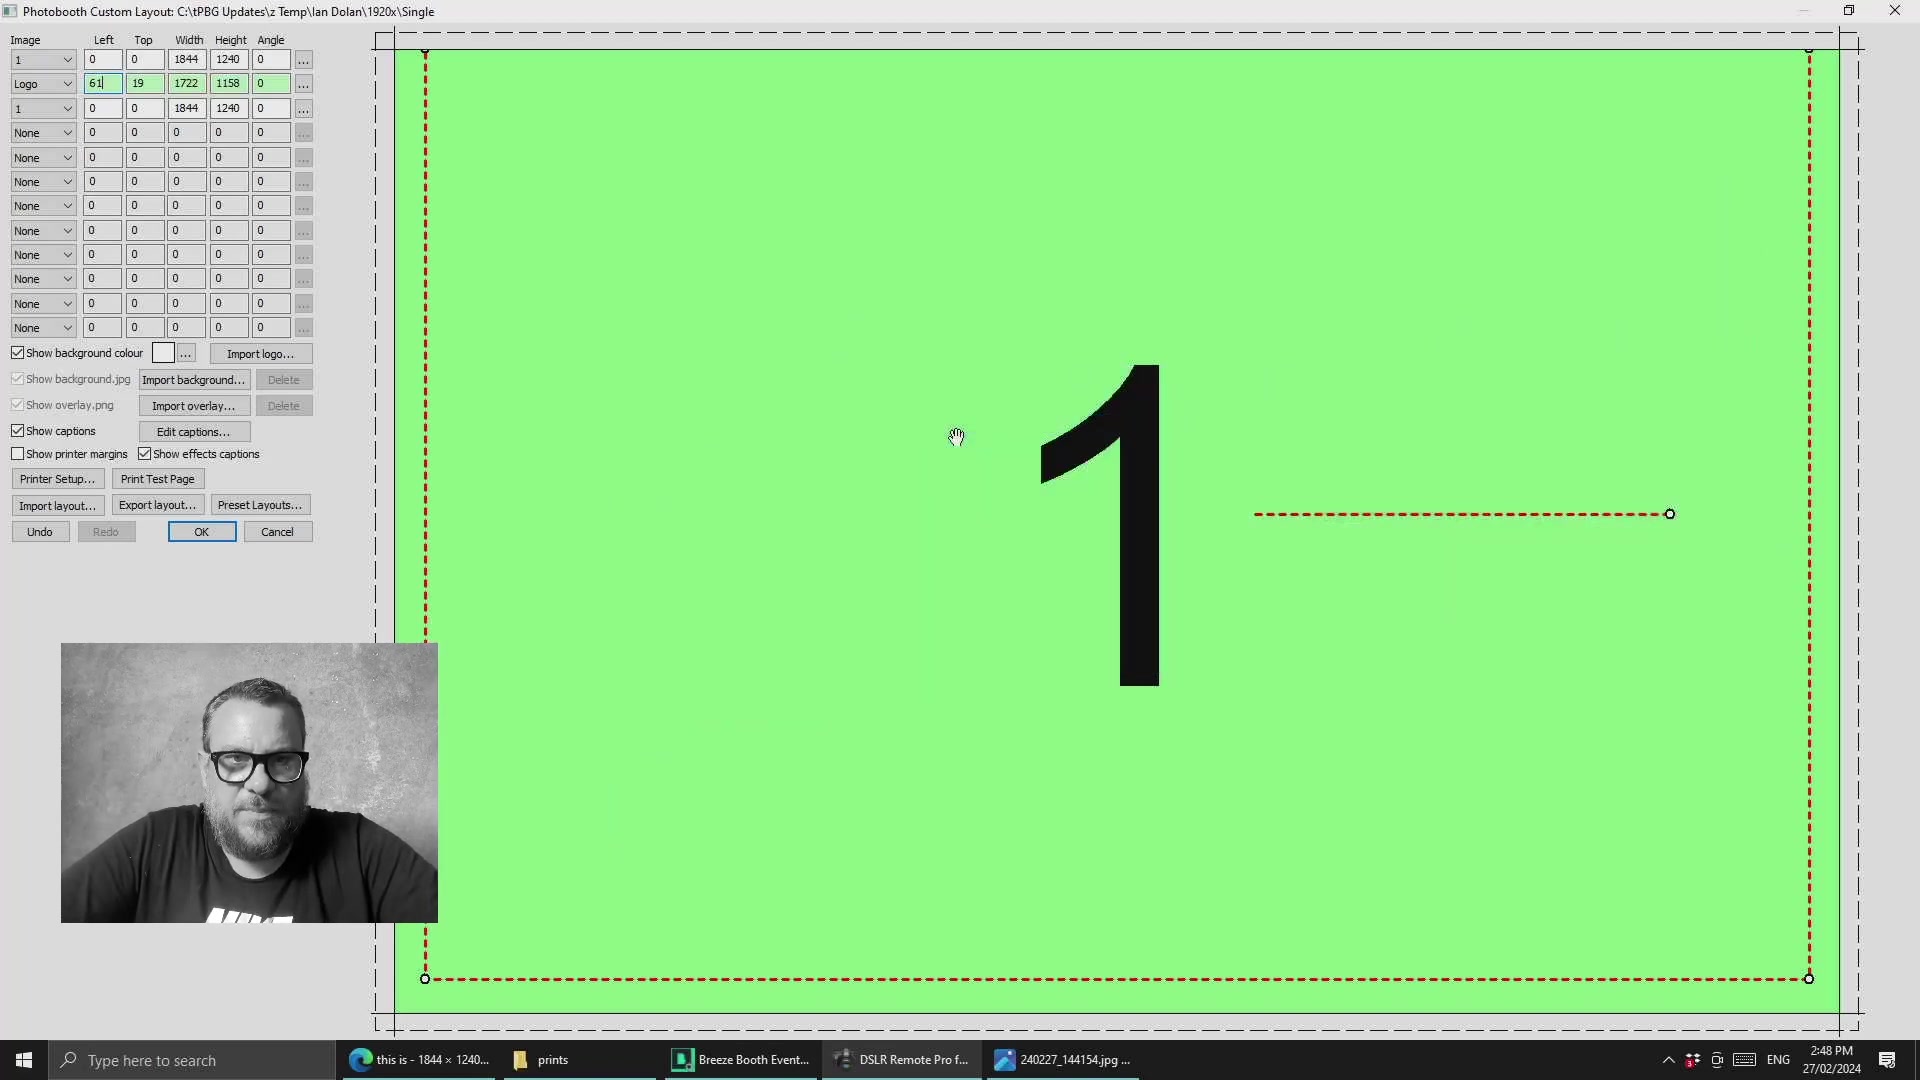
. Right-click on the background image layer and select 'Edit photo position and effects'. Set the image dimensions to match the canvas size (e.g., 1844 x 1240). This ensures that the background image covers the entire area and provides a seamless base for your design. Also, tick the option to use original unprocessed image.
To configure the background image:
- Edit Photo Position: Right-click on the background image layer and select 'Edit photo position and effects'.
- Set Image Dimensions: Match the image dimensions to the canvas size (e.g., 1844 x 1240).
- Use Original Unprocessed Image: Tick the option to use the original unprocessed image.
Step 3: Adding a Graphical Element
Now, import a logo or graphical element that you want to insert between the background and the subject . This element could be anything from a brand logo to a decorative graphic. After importing, adjust the size and position of the graphical element to achieve the desired effect. This allows you to add depth and visual interest to your final image. It is common to use a PNG file format here to preserve transparency.
Here’s how to add a graphical element:
- Import a Logo or Graphical Element: Import the desired graphic from your files.
- Adjust Size and Position: Customize the placement and dimensions to suit your design.
Step 4: Adding the AI-Processed Image
The final step is to add the AI-processed image, which will be the subject with the background removed . Import the same image again, but this time, do not tick the 'Use original unprocessed image' option. Instead, allow DSLR Remote Pro to apply the AI background removal. Set the dimensions of this layer to be identical to the background image. This ensures seamless alignment and a professional-looking result.
To add the AI-processed image:
- Import the Image Again: Import the same image that you used for the background.
- Do Not Use Original Image: Ensure that you do not select the 'Use original unprocessed image' option.
- Set Image Dimensions: Match the dimensions to the background image (e.g., 1844 x 1240).
Step 5: Ensuring Proper Layer Order
The last thing to do in the layout settings is to ensure the graphical element doesn't display logos over the overlay, and it is appearing between the background and AI processed subject . Go back and right-click on the graphical element and make sure 'Display logos over overlay' is not checked. This confirms the layer order is as expected. The layering is structured as below:
- Original background image
- Graphical element
- AI-processed subject





Most people like




























Report
Please select a reason for reporting
- 13 Reasons to Switch from Snapchat to Text Messaging
- 7 Powerful Speech to Text Apps to Boost Productivity
- 10 Best Speech to Text Tools for Effortless Transcription
- 13 Free Tools to Easily Transcribe Audio to Text
- 15 Surprising Ways Google's Speech-to-Text Boosts Productivity
- 7 Best Free Online Audio to Text Transcription Tools
- 9 Tips to Transcribe Speech to Text Faster and Better
- 13 Best Speech to Text Software for Windows 10 in 2023
- 7 Tips for Choosing the Best Transcriber for Audio to Text
- 11 Reasons Why Dragon Speech-to-Text Apps are Game-Changers
- 6 Secrets to Enhance Your Speech to Text Transcription
- 6 Brilliant Ways to Boost Productivity with Talk-to-Text on Your MacBook
- 6 Ways Transcription Software Converts Audio to Text
- 8 Tips to Transcribe Speech to Text Like a Pro
- 6 Reasons IBM Watson Speech to Text is a Game-Changer
- 14 Powerful Ways Talk-to-Text Improves Your Workflow
- 12 Top Windows Speech-to-Text Software for Efficient Transcription
- 12 Game-Changing Benefits of Apple's Speech to Text Technology
- 9 Powerful Use Cases for AWS Speech to Text Technology
- 10 Easy Steps to Transcribe YouTube Videos to Text
- transcription audio en texte
- online audio transcription
- free audio file transcription
- free ai audio transcription
- audio transcription service
- audio transcription online free
- audio transcription free online
- audio to transcription software
- audio and transcript
- ai audio transcription free
- voice recording to text converter
- translate voice recording to text
- record voice to text
- audio recording to text converter
- voice recording and transcription
- chatgpt voice to text
- gmail voice to text
- speech to text reader
- speech to text ai free
- speech to talk
- Create Engaging Animated Explainer Videos with a Free AI Tool
- Stop Multi-Subscribing: Benchmark Top AI Visual Models in One Canvas
- Best Seedance 2.5 API Provider: Every Price on the Market, Checked at Source
- AI OnlyFans: How to Generate $30,000/Month (Legally)
- Transform Your Script into an Engaging Video with AI Video Maker!
- AI Marketing Automation: A Comprehensive Guide for Small Businesses
- Midjourney Alternative for Anime Art Creators: Why PixAI May Be Better for Character Workflows
- 10 Things Most People Get Wrong About AI Image Search
- AI Girlfriend Apps: Top Choices Redefining Relationships 2025
- How to Reduce Quoting Errors in Salesforce with AI-Assisted Quote Creation
- AI Resume Builders: EnhanceCV, ResumeNerd AI, & Teal Compared
- ResumeAI: Crafting ATS-Optimized Resumes with AI
- AI in Resume Writing: A New Era for Job Seekers
- AI Resume Tools: Streamline Your Job Search and Land Your Dream Role
- AI Resume Optimization: The Right Way to Land Interviews
- Crafting a Killer Resume with AI: A Step-by-Step Guide
- Crafting a Winning Resume: AI Tools and Expert Tips
- AI Job Search: Level Up Your Career with AI Automation
- Empower Your Career Journey: Dynamic Resumes with AI
- AI Resume Builder: Create Professional Resumes Effortlessly

Copyright ©2026 toolify