































Table of Contents
- Key Points
- Introduction: Copying a $19,000/Month Website with AI
- Maximizing SEO for Your JPEG Compression Website
- Step-by-Step Guide: Cloning a JPEG Compression Website
- Pros and Cons: Building a JPEG Compression Website with AI
- Use Cases: Who Benefits from a JPEG Compression Website?


Introduction: Copying a $19,000/Month Website with AI
The Power of AI in Website Cloning
Imagine replicating a website that consistently earns $19,000 every month without writing a single line of code. This is now achievable with the power of artificial intelligence (AI). The landscape of web development is rapidly changing, making it possible for anyone, regardless of their technical skills, to create and monetize websites.

This article provides a detailed guide on how to use AI to copy a successful website, specifically a JPEG compression tool. With the right AI Tools, you can replicate this model and start generating revenue in a short amount of time.
Key Benefits of Using AI for Website Cloning:
- Speed and Efficiency: Launch a functional website in less than a day.
- No Coding Required: Build and manage your website without any programming skills.
- Profitability: Tap into a proven business model generating substantial monthly income.
- Accessibility: Open to anyone, regardless of technical expertise.
By leveraging AI, you can bypass the traditional complexities of web development and focus on scaling your business. Let's explore how it works.
Why Simple Websites are the Most Profitable
It's a common misconception that complex and feature-rich websites are the most profitable. In reality, many of the highest-earning websites are remarkably simple. These sites often focus on providing a specific service or tool, making them highly valuable to a targeted audience.

Consider the example of an image compression tool. These tools provide a straightforward solution to a common problem: reducing the file size of images without sacrificing quality. This simplicity makes them incredibly popular, attracting millions of visitors each month. The website compressjpeg.com, for example, is a very basic and simple to use website that has almost 1.9 million visits per month, which earns at least $19,000 per month.
Key Advantages of Simple Websites:
- User-Friendly: Easy to navigate and use, attracting a wider audience.
- Cost-Effective: Lower development and maintenance costs.
- Targeted Focus: Addresses a specific need, increasing conversion rates.
- Scalability: Easier to scale and adapt to changing market demands.
This article focuses on replicating a successful image compression tool because it exemplifies the power of simplicity in online business.
Step-by-Step Guide: Cloning a JPEG Compression Website
Step 1: Initial Setup and Upload Interface
The foundation of any successful website is a clean and intuitive upload interface. This is the first point of interaction for your users, so it needs to be easy to use and visually appealing. The goal is to create a minimal interface where users can effortlessly upload their JPEG images for compression.
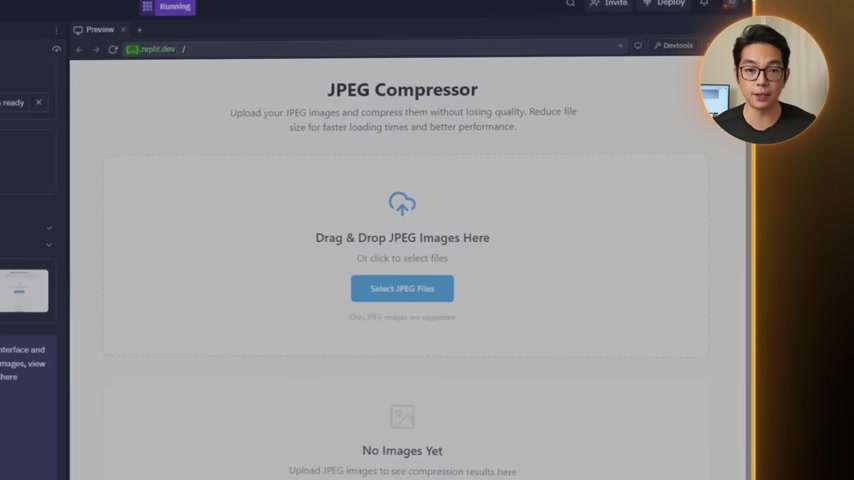
To achieve this, Prompt your AI Tool with the following instruction:
"Create a simple web app with a clean UI that lets users upload JPEG images for compression. Start with a drag-and-drop upload interface that supports multiple JPEG files and shows basic previews."
The AI should generate a full HTML, CSS, and JavaScript layout, complete with:
- A drag-and-drop zone for easy file uploads.
- A fallback upload dialog for manual file selection.
- A list of uploaded files with names and file sizes.
- Validation logic to ensure only JPEG files are accepted.
This initial setup provides a solid base for adding more complex features later on.
Example:
[Describe or show a simple image upload interface with a drag-and-drop zone.]
Step 2: Fixing Upload Preview and Download Issues
After setting up the basic upload interface, it's essential to test its functionality. You'll likely encounter some issues that need to be addressed. Two common problems are:

- Image previews not displaying correctly.
- No download option after compression.
To fix these issues, provide the AI tool with a summary of the problems:
"I am unable to see the previews and also unable to download images."
The AI should then update the front-end and back-end logic to resolve these issues. This includes:
- Implementing the File Reader API to display image thumbnails instantly after file selection.
- Adding download buttons that link to the correct image blobs.
- Preserving the original file names for downloaded images.
These fixes enhance the user experience and ensure the core functionality of the website.
Example:
[Show an example of a website with fixed upload previews and download options.]
Step 3: Expanding Upload Features
With the core upload functionality working, it's time to expand the features and enhance the user experience. This involves adding:
- Support for multiple file uploads.
- A file size limit to prevent overload.
- Visual feedback during drag-and-drop operations.
To implement these features, prompt the AI tool with:
"We already have an image upload system, but we need to have all these features: -Drag-and-drop interface for uploading images -File selection via browser dialog -Multiple file upload support -Size limit for uploads We already have some of these features, just add the ones not already implemented. If possible, improve the features already implemented."
These additions make the website more user-friendly and robust, capable of handling a wider range of user needs.
Example:
[Show an example of a website with expanded upload features, such as drag-and-drop, file size limits, and multiple file upload support.]
Step 4: Implementing Image Compression Technology
The heart of the website is the image compression technology. This feature saves space, loads pages faster, and makes the entire tool useful. You need a reliable algorithm that reduces file sizes without significant quality loss.

To implement this, prompt the AI tool with the following:
"Next, we need to focus on the Image Compression Technology. We need to have: -JPEG compression algorithm implementation -Adjustable compression quality settings -Optimization for web usage"
The AI should add JPEG compression using either HTML5 Canvas or a lightweight library like CompressorJS. It should also provide adjustable compression quality settings and optimization for web usage.
Example:
[Show a website with adjustable compression settings and optimization options.]
Step 5: Batch Processing and Queue Management
To handle larger batches of images, you need to implement a proper queue management system. This prevents the browser from freezing and ensures smooth processing.

Prompt the AI tool with:
"Good Job. Next, we need to focus on Batch Processing. The app already has the ability to compress multiple images simultaneously, but it should also have a proper Queue management for large batches."
The AI should introduce a proper queue system to handle the load, processing images one by one asynchronously. It should also add a progress indicator to track the progress of the batch.
Example:
[Show a website with a proper queue management system and progress indicators.]
Step 6: Preview Functionality and Visual Assessment
To ensure user satisfaction, you need to provide better visual feedback on the compression process. This includes:
- Adding a dragable slider that lets users compare the original and compressed versions side by side.
- Adding toggle buttons to quickly flip between the two versions.
- Showing the compression ratio and file size saved in both kilobytes and percentages.
Prompt the AI tool with:
"Next, we will focus on Preview Functionality. We already have Before/after comparison of images and file size reduction statistics... but next we need to add a proper visual quality assessment."
These additions make it easier for users to evaluate the quality of the compression and ensure they are satisfied with the results.
Example:
[Show a website with improved preview functionality, including a dragable slider and visual quality assessment tools.]
Step 7: User Authentication + Landing Page and UX Enhancements
With the core features in place, it's time to focus on user authentication and the landing page experience. This includes:
- Adding a user-friendly signup and login system.
- Creating a landing page with a clean interface, intuitive UX, minimal design, and clear instructions.
Prompt the AI tool with:
"Next, add User Authentication. Make sure to also add a landing page with a simple clean interface, intuitive user experience, minimalist design, and clear instructions and feedback."
These enhancements make the website more professional and user-friendly, encouraging more users to sign up and use the tool.
Example:
[Show a website with user authentication and a well-designed landing page.]
Step 8: Google AdSense Monetization
To make the website financially sustainable, integrate Google AdSense. This allows you to generate passive revenue from free-tier traffic without sacrificing usability or user trust.

Prompt the AI tool with:
"Next, we need to connect to Google Adsense and have Google Ads. Add placements and make sure that add placeholders look exactly like google ads."
Be sure to position the ads carefully, placing them in the sidebar and footer to avoid overwhelming the main workspace.
Example:
[Show a website with Google AdSense ads placed in the sidebar and footer.]
Step 9: Stripe for Premium Unlimited Compression
Finally, to monetize power users, integrate Stripe for premium subscriptions. This allows users to pay for unlimited compression and access premium features.

Prompt the AI tool with:
"Next, add Stripe subscriptions for premium features (unlimited compression)"
The AI should add one-click checkout with pricing tiers defined on the Stripe dashboard. It should also handle confirmation emails and receipts, and activate the subscription automatically via webhook.
Example:
[Show a website with Stripe integration for premium subscriptions.]








Most people like


































Report
Please select a reason for reporting
- 13 Reasons to Switch from Snapchat to Text Messaging
- 7 Powerful Speech to Text Apps to Boost Productivity
- 10 Best Speech to Text Tools for Effortless Transcription
- 13 Free Tools to Easily Transcribe Audio to Text
- 15 Surprising Ways Google's Speech-to-Text Boosts Productivity
- 7 Best Free Online Audio to Text Transcription Tools
- 9 Tips to Transcribe Speech to Text Faster and Better
- 13 Best Speech to Text Software for Windows 10 in 2023
- 7 Tips for Choosing the Best Transcriber for Audio to Text
- 11 Reasons Why Dragon Speech-to-Text Apps are Game-Changers
- 6 Secrets to Enhance Your Speech to Text Transcription
- 6 Brilliant Ways to Boost Productivity with Talk-to-Text on Your MacBook
- 6 Ways Transcription Software Converts Audio to Text
- 8 Tips to Transcribe Speech to Text Like a Pro
- 6 Reasons IBM Watson Speech to Text is a Game-Changer
- 14 Powerful Ways Talk-to-Text Improves Your Workflow
- 12 Top Windows Speech-to-Text Software for Efficient Transcription
- 12 Game-Changing Benefits of Apple's Speech to Text Technology
- 9 Powerful Use Cases for AWS Speech to Text Technology
- 10 Easy Steps to Transcribe YouTube Videos to Text
- transcription audio en texte
- online audio transcription
- free audio file transcription
- free ai audio transcription
- audio transcription service
- audio transcription online free
- audio transcription free online
- audio to transcription software
- audio and transcript
- ai audio transcription free
- voice recording to text converter
- translate voice recording to text
- record voice to text
- audio recording to text converter
- voice recording and transcription
- chatgpt voice to text
- gmail voice to text
- speech to text reader
- speech to text ai free
- speech to talk
- How SEO and Marketing Dashboards Empower Agencies to Drive Results
- How to Use AI Tools to Find Internal Linking Opportunities Across a Business Website
- Discover Your Perfect Haircut with AI Hairstyle Apps
- Free Reputation Calculator Tools: How They're Adapting to Score AI Visibility, Not Just Rankings
- Design Professional Flyers for Free on Your Phone
- Best Free Flyer Maker Apps for Android: Design Like a Pro
- How to Know If Your Business Is Ready for an AI Customer Service Agent
- Revolutionizing Storytelling: From Novels to Screenplays with AI
- Create Engaging Animated Explainer Videos with a Free AI Tool
- Stop Multi-Subscribing: Benchmark Top AI Visual Models in One Canvas
- DeepL Translator: The AI-Powered Translation Tool
- AI Video Upscaling: Top Tools Compared for Enhanced Quality
- Bridging the Gap: How One Indie Developer Solved the "Art Asset Nightmare" Using AI Style Transfer
- How I Direct Consistent AI Clips: A Hands-On Guide to Multi-Model Generation
- My Honest Review of VideoAI: The Ultimate Character Voice Generator I've Been Using Lately
- Why do so many AI tools underdeliver for online stores?
- My Brand New Logo: AI-Powered Logo Design for Startups
- Create Stunning Logos with Free AI Logo Generator!
- AI Logo Maker: Design a Stunning Logo in Minutes
- Elevate Your Zoom Experience with Enhanced Name Tags by Warmly

Copyright ©2026 toolify