































Table of Contents



Creating User Grids with Bootstrap Styling
Why Use Bootstrap for Table Styling?
Bootstrap provides a sleek, responsive, and consistent way to style HTML tables. Its pre-defined classes make it easy to implement professional-looking data grids without writing extensive custom CSS. For Angular 8 and ASP.NET Core applications, using Bootstrap can save time and effort while ensuring a user-friendly display of information. Bootstrap styling is an essential technique for modern web development, and mastering it can significantly enhance the aesthetics and usability of your projects.
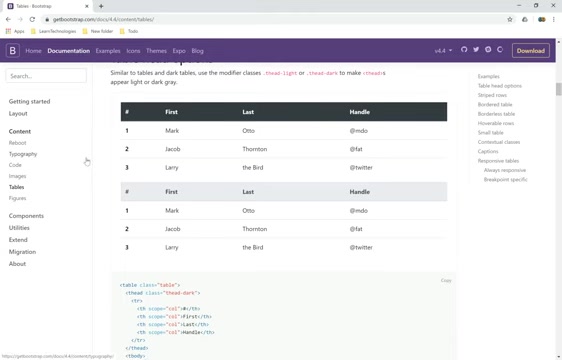
By using bootstrap styling, developers can ensure their web applications have a polished and professional look, which is crucial for user engagement and satisfaction. This is especially important in data-driven applications where tables are the primary means of displaying information.
Setting Up the Angular Component
To begin, we need to set up an Angular component dedicated to managing our users. This component will fetch user data from an ASP.NET Core API and display it in a Bootstrap-styled table. First, ensure you have the Angular CLI installed and create a new component using the following command:
ng generate component manage-usersThis will generate the necessary files, including the component's TypeScript file, HTML template, and CSS file.
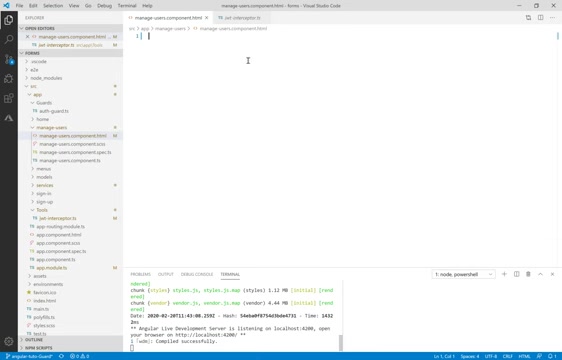
Once created, the next step is to navigate the Bootstrap official website and copy the basic table code:
<table class="table">
  <thead>
    <tr>
      <th scope="col">#</th>
      <th scope="col">First</th>
      <th scope="col">Last</th>
      <th scope="col">Handle</th>
    </tr>
  </thead>
  <tbody>
    <tr>
      <th scope="row">1</th>
      <td>Mark</td>
      <td>Otto</td>
      <td>@mdo</td>
    </tr>
    <tr>
      <th scope="row">2</th>
      <td>Jacob</td>
      <td>Thornton</td>
      <td>@fat</td>
    </tr>
    <tr>
      <th scope="row">3</th>
      <td>Larry</td>
      <td>the Bird</td>
      <td>@twitter</td>
    </tr>
  </tbody>
</table>
Next, update the table headers to reflect the data we want to display, such as 'First Name', 'Last Name', 'Email', and 'Mobile Number'. We'll also add an 'Actions' column for user management options. This involves modifying the HTML template file (manage-users.component.html) to include these specific columns.
Defining the Table Columns
The first step is to define the table columns that will display the user data. These columns include:
-
First Name: Displays the user's first name.
-
Last Name: Displays the user's last name.
-
Email: Displays the user's email address.
-
Mobile Number: Displays the user's mobile number.
-
Actions: Contains buttons for editing and deleting users. In the
manage-users.component.htmlfile, update the<th>elements in the<thead>section to match these columns.
<table class="table table-striped">
  <thead>
    <tr>
      <th scope="col">#</th>
      <th scope="col">First Name</th>
      <th scope="col">Last Name</th>
      <th scope="col">Email</th>
      <th scope="col">Mobile Number</th>
      <th scope="col">Actions</th>
    </tr>
  </thead>
  <tbody>
  </tbody>
</table>
This setup provides a clear structure for our user grid, preparing it for the dynamic data rendering we'll implement next. The 'actions' columns sets the base table layout.
Creating User Service and TypeScript setup
To dynamically populate the table, we need to retrieve user data from an external source, typically an ASP.NET Core API. First, create a user service in Angular using the Angular CLI:
ng generate service usersThis generates users.service.ts and related files. Then, inject the HttpClient into the UserService to make HTTP requests. Update the service to include a method that fetches user data from your API:
import { Injectable } from '@angular/core';
import { HttpClient } from '@angular/common/http';
import { Observable } from 'rxjs';
import { User } from './user.model';

@Injectable({
  providedIn: 'root'
})
export class UsersService {
  private baseUrl = 'https://localhost:4200/api';

  constructor(private http: HttpClient) { }

  getUsers(): Observable<User[]> {
    return this.http.get<User[]>(`${this.baseUrl}/users`);
  }
}
This service provides a getUsers method that returns an Observable of type User[], allowing us to handle asynchronous data fetching. Make sure you have installed HTTPClientModule in the project: npm install --save @angular/http.
To utilize the new injected service, include the following in constructor: private userService: UsersService
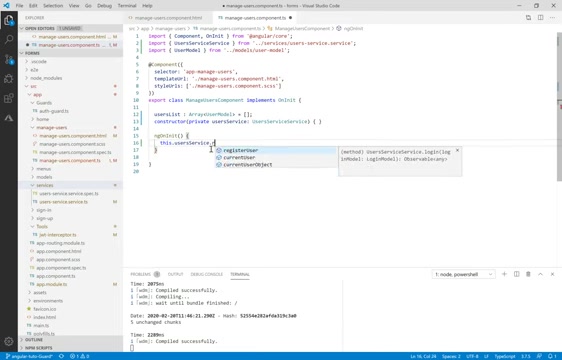
The last step here is to make an action to load Users: this.userService.getUsers()
Loading Users Into the Component
Now that we have the user service set up, we can inject it into our ManageUsersComponent to retrieve user data. Import the UsersService into your component and inject it into the constructor:
import { Component, OnInit } from '@angular/core';
import { UsersService } from '../users.service';
import { User } from '../user.model';

@Component({
  selector: 'app-manage-users',
  templateUrl: './manage-users.component.html',
  styleUrls: ['./manage-users.component.scss']
})
export class ManageUsersComponent implements OnInit {
  users: User[] = [];

  constructor(private userService: UsersService) { }

  ngOnInit() {
    this.userService.getUsers().subscribe(users => {
      this.users = users;
    });
  }
}
This code fetches the user data in the ngOnInit lifecycle hook and assigns it to the users property of the component. Now, we can use this data to populate our table. By doing the above, we have populated users list: users: User[] = [];
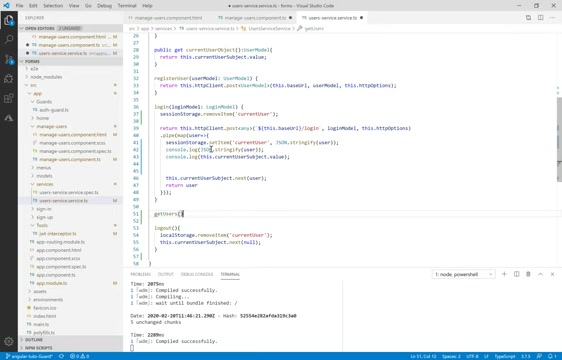
This initializes users list which will later be displayed by following ngFor method.
Populating the Table with User Data
With the user data now available in the component, we can use Angular's *ngFor directive to iterate over the users array and generate table rows dynamically. Update the <tbody> section of your manage-users.component.html file as follows:
<tbody>
  <tr *ngFor="let user of users; let i = index">
    <th scope="row">{{ i + 1 }}</th>
    <td>{{ user.firstName }}</td>
    <td>{{ user.lastName }}</td>
    <td>{{ user.email }}</td>
    <td>{{ user.mobileNumber }}</td>
    <td>
      <button class="btn btn-primary btn-sm">Edit</button>
      <button class="btn btn-danger btn-sm">Delete</button>
    </td>
  </tr>
</tbody>
This code iterates through the users array, creating a new table row for each user. The {{ i + 1 }} expression displays the row number, and the other {{ user.propertyName }} expressions display the corresponding user data.
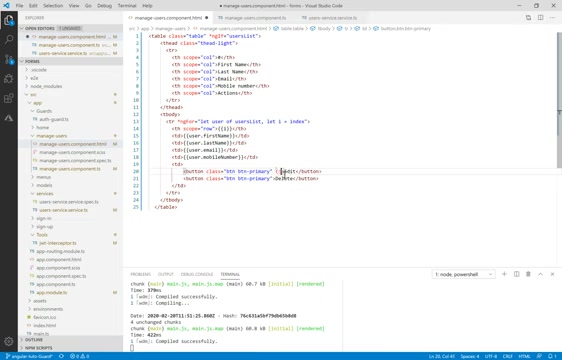
Now, let’s add M-2 class to have margin in both “Edit” and “Delete” buttons
Adding Action Columns (Edit and Delete)
The final touch is to add action buttons to each row, allowing users to edit or delete the corresponding user. We've already included the basic button structure in the previous HTML snippet. Now, let's add some basic styling and functionality. Add an “ngIf” condition in order to prevent errors: *ngIf="userList".This form is now complete: user first, last name, email, mobile number and two actions. [t: 501]This is crucial for implementing any data-driven features and providing a clear path for any functionality related to each user shown.








Most people like


































Report
Please select a reason for reporting
- 13 Reasons to Switch from Snapchat to Text Messaging
- 7 Powerful Speech to Text Apps to Boost Productivity
- 10 Best Speech to Text Tools for Effortless Transcription
- 13 Free Tools to Easily Transcribe Audio to Text
- 15 Surprising Ways Google's Speech-to-Text Boosts Productivity
- 7 Best Free Online Audio to Text Transcription Tools
- 9 Tips to Transcribe Speech to Text Faster and Better
- 13 Best Speech to Text Software for Windows 10 in 2023
- 7 Tips for Choosing the Best Transcriber for Audio to Text
- 11 Reasons Why Dragon Speech-to-Text Apps are Game-Changers
- 6 Secrets to Enhance Your Speech to Text Transcription
- 6 Brilliant Ways to Boost Productivity with Talk-to-Text on Your MacBook
- 6 Ways Transcription Software Converts Audio to Text
- 8 Tips to Transcribe Speech to Text Like a Pro
- 6 Reasons IBM Watson Speech to Text is a Game-Changer
- 14 Powerful Ways Talk-to-Text Improves Your Workflow
- 12 Top Windows Speech-to-Text Software for Efficient Transcription
- 12 Game-Changing Benefits of Apple's Speech to Text Technology
- 9 Powerful Use Cases for AWS Speech to Text Technology
- 10 Easy Steps to Transcribe YouTube Videos to Text
- transcription audio en texte
- online audio transcription
- free audio file transcription
- free ai audio transcription
- audio transcription service
- audio transcription online free
- audio transcription free online
- audio to transcription software
- audio and transcript
- ai audio transcription free
- voice recording to text converter
- translate voice recording to text
- record voice to text
- audio recording to text converter
- voice recording and transcription
- chatgpt voice to text
- gmail voice to text
- speech to text reader
- speech to text ai free
- speech to talk
- How SEO and Marketing Dashboards Empower Agencies to Drive Results
- How to Use AI Tools to Find Internal Linking Opportunities Across a Business Website
- Discover Your Perfect Haircut with AI Hairstyle Apps
- Free Reputation Calculator Tools: How They're Adapting to Score AI Visibility, Not Just Rankings
- Design Professional Flyers for Free on Your Phone
- Best Free Flyer Maker Apps for Android: Design Like a Pro
- How to Know If Your Business Is Ready for an AI Customer Service Agent
- Revolutionizing Storytelling: From Novels to Screenplays with AI
- Create Engaging Animated Explainer Videos with a Free AI Tool
- Stop Multi-Subscribing: Benchmark Top AI Visual Models in One Canvas
- DeepL Translator: The AI-Powered Translation Tool
- AI Video Upscaling: Top Tools Compared for Enhanced Quality
- Bridging the Gap: How One Indie Developer Solved the "Art Asset Nightmare" Using AI Style Transfer
- How I Direct Consistent AI Clips: A Hands-On Guide to Multi-Model Generation
- My Honest Review of VideoAI: The Ultimate Character Voice Generator I've Been Using Lately
- Why do so many AI tools underdeliver for online stores?
- My Brand New Logo: AI-Powered Logo Design for Startups
- Create Stunning Logos with Free AI Logo Generator!
- AI Logo Maker: Design a Stunning Logo in Minutes
- Elevate Your Zoom Experience with Enhanced Name Tags by Warmly

Copyright ©2026 toolify