































Table of Contents
- Key Points
- Introduction to ComfyUI and IPAdapter Masking
- ComfyUI IPAdapter Masking Workflows
- How to Use IPAdapter Masking in ComfyUI
- Pros and Cons of IPAdapter Masking in ComfyUI
- Features of IPAdapter Masking
- Potential Use Cases
- FAQ
- Related Questions


Introduction to ComfyUI and IPAdapter Masking
What is ComfyUI?
ComfyUI is a node-based interface for Stable Diffusion that offers a high degree of flexibility and control over the image generation process. Unlike simpler interfaces, ComfyUI allows users to visually construct complex workflows by connecting various nodes, each responsible for a specific task. These tasks range from loading models and processing text prompts to applying image effects and decoding latent spaces. The node-based approach enables precise customization and experimentation, making ComfyUI a favorite among advanced Stable Diffusion users. Its modular design also promotes community sharing of workflows, fostering a collaborative environment for discovering new techniques and creative solutions.
One of the key benefits of ComfyUI is its ability to leverage various Stable Diffusion extensions and custom nodes. These add-ons expand ComfyUI's functionality, enabling users to incorporate cutting-edge research and specialized tools into their workflows. IPAdapter masking is one such technique that unlocks a new level of control over image composition and style transfer within Stable Diffusion. By selectively masking different regions of an image, users can precisely target areas for stylistic influence or content replacement, leading to highly customized results.

This intricate level of control distinguishes ComfyUI from more streamlined interfaces, positioning it as a platform for serious exploration and artistic innovation.
Understanding IPAdapter and its Significance
The IPAdapter (Image Prompt Adapter) is a powerful mechanism within Stable Diffusion that allows users to guide the image generation process using reference images. It essentially adapts the model's output to incorporate the style, composition, or specific elements Present in the input images. This technique goes beyond simple text prompting, offering a more visually intuitive and nuanced way to influence the AI's creative output.
Masking enhances the IPAdapter's capabilities by enabling selective application of the reference image's influence. Instead of applying the IPAdapter uniformly across the entire canvas, masking allows users to isolate specific regions where the reference image's characteristics should be emphasized. This fine-grained control opens up a wide range of creative possibilities, including:
- Style Transfer: Applying the style of a painting to a specific object within a photograph, while preserving the original object's identity.
- Content Blending: Seamlessly merging elements from multiple images into a single, Cohesive composition.
- Localized Effects: Adding specific effects, such as textures or Patterns, to targeted areas of an image.
Without masking, the IPAdapter's influence can be too broad, leading to unwanted artifacts or a loss of detail in areas that should remain untouched. Masking ensures that the reference image's influence is precisely directed, resulting in more refined and artistically satisfying outcomes.
Furthermore, the concept of CLIP Vision is related and can make your images better. CLIP (Contrastive Language–Image Pre-training) vision models are the models used to train Stable Diffusion. So the stronger the clip vision model you use, the easier you will be able to manipulate what your generated images should look like. So, knowing about clip vision is important for IPAdapter workflows. Understanding these concepts allows you to use these powerful AI Tools.
ComfyUI IPAdapter Masking Workflows
Single Mask Workflow
The single mask workflow is the foundation for many IPAdapter masking techniques in ComfyUI. It involves isolating a specific region of an image using a grayscale mask and applying the IPAdapter's influence only to that masked area.
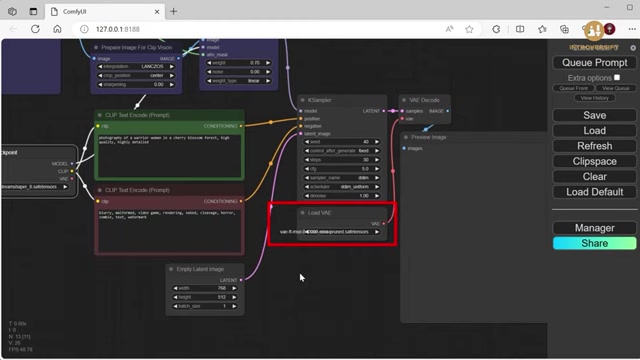
This workflow is ideal for tasks such as style transfer, where you want to apply the style of a reference image to a particular object or region within your source image.
Key Steps:
- Load the Source Image: Begin by loading the image you want to modify into ComfyUI.
- Create a Mask: Generate a grayscale mask that precisely isolates the region you want to target. This mask can be created using image editing software like Photoshop or GIMP, or directly within ComfyUI using nodes for image manipulation. White areas in the mask represent the region where the IPAdapter will be applied, while black areas remain untouched.
- Load IPAdapter Model: Load the desired IPAdapter model into your workflow. Different models are trained on different datasets and may produce varying stylistic effects.
- Apply IPAdapter with Mask: Connect the source image, mask, and IPAdapter model to the appropriate nodes for applying the IPAdapter with the mask. The mask ensures that the IPAdapter's influence is confined to the specified region.
- Adjust Parameters: Fine-tune the parameters of the IPAdapter and other Relevant nodes to achieve the desired visual outcome. Experiment with different settings to control the strength of the style transfer and the overall composition of the image.
- Generate Image: Trigger the image generation process and observe the results. Refine your workflow and parameters as needed to achieve the perfect Blend of source image and reference style.
This workflow is commonly used when you would like to change the background in a photo or change the style of a specific person/object in a photo without impacting other areas of the image. This basic workflow unlocks a lot of potential for image creation.
RGB Mask Workflow
The RGB mask workflow extends the single mask technique by leveraging the red, green, and blue color channels to create more complex compositions.

This approach allows users to blend multiple images based on the color values within a mask, opening up possibilities for advanced compositing and creative effects.
Creating an RGB Mask:
To create an RGB mask, you'll need image editing software like Photoshop. The process involves assigning different colors to different regions, to later be composited, for example:
- Red Channel: Assign the red Channel to the area where you want the content from the first image to appear.
- Green Channel: Assign the green channel to the area where you want the content from the Second image to appear.
- Blue Channel: Assign the blue channel to the area where you want the content from the third image to appear.
Key Steps:
- Create RGB Mask in Photoshop: Create an image of the same Dimensions as your other images. The image will be filled with a red background, which you will then use green and blue brushes to indicate which areas you would like the different aspects of the images to exist.
- Load Source Images: Load all the images you want to be applied into ComfyUI. Three different images can be used with this technique.
- Apply the IPAdapter to specific sections Use settings to make the photos line up as you would like.
This workflow is commonly used for complex image manipulations. A good example of this would be taking one person from one image and two others from a different image and creating one seamless image of the three people in a different location than any of the original photos.
The RGB Mask workflow opens up creative avenues in the AI image creation space. By understanding and utilizing each of the workflows detailed above, your image generation will be sure to improve.
How to Use IPAdapter Masking in ComfyUI
Installing the Necessary Tools
Before diving into IPAdapter masking, ensure you have the following installed within ComfyUI:
- ComfyUI Manager: This is a must-have extension for managing custom nodes and models. Install it through the ComfyUI interface.
- IPAdapter Nodes: Install the IPAdapter custom nodes from the ComfyUI Manager.
- Necessary Models: download any of the models for IPAdapter from websites such as Civitai or Hugging Face. For face manipulation be sure to choose one that is labeled "Face" or similar.
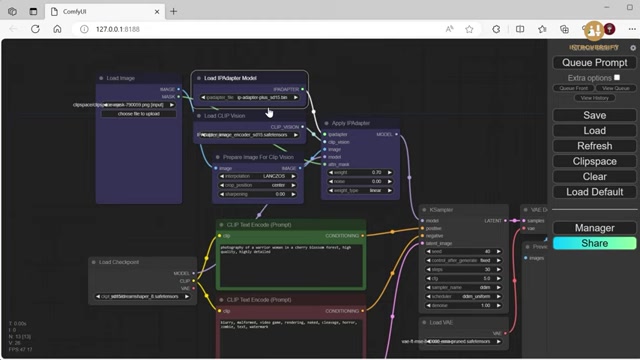
If you have previously purchased the IPAdapter, then your ComfyUI version should automatically come prepared with the correct things installed. If not, then use the ComfyUI manager to locate and download missing components.
Steps for IPAdapter Single Mask Workflow
Here are the general steps to use IPAdapter in ComfyUI:
- Drag and Drop: Drag the 'IPAdapter Single Mask' file into the ComfyUI to get the workflow set up.
- Select Model: Decide which IPAdapter model you are planning to use.
- Select CLIP Vision Model: After you've found the necessary CLIP Vision, choose 'model.safetensors'
- Select Checkpoint: Here you must select your image model.
- Select VAE: Select the VAE model from the dropdown list. Most suggest using the 84000 VAE
- Run: Now, run the ComfyUI. If you are seeing a snowy picture without your original image, then you have not implemented a masking plan.
- Right-Click Image: Locate the first image and right-click, then select 'open in mask editor'
- Create Mask: Create a mask to indicate what portions of the image you want influenced by IPAdapter. Generally, you will black-out the image so only the silhouette is visible.
- Run again: With the proper settings in place, your image should now be generating successfully.
Steps for IPAdapter RGB Mask Workflow
Here are the general steps to use IPAdapter in ComfyUI:
- Drag and Drop: Drag the 'IPAdapter RGB Mask' file into the ComfyUI to get the workflow set up.
- Load IPAdapter Files: Load the three image files you would like to use.
- Run: You can try running the image now, but it will not generate what you want and you will need to perform steps to get the proper image.
- Create RGB Mask in Photoshop: First, set the background of an image to red. Then draw with the color green and blue to indicate what aspects of each photo you want included in the final generated image.
- Select RGB Mask: Now select the photoshop image as the RGB mask. With the image chosen, the rendering should work correctly with all aspects included.
Once you follow the proper steps to set up and create the images needed for these two methods, it will dramatically improve the quality of the images you are generating. This can allow you to make complex edits that you wouldn't be able to previously.








Most people like

































Report
Please select a reason for reporting
- 13 Reasons to Switch from Snapchat to Text Messaging
- 7 Powerful Speech to Text Apps to Boost Productivity
- 10 Best Speech to Text Tools for Effortless Transcription
- 13 Free Tools to Easily Transcribe Audio to Text
- 15 Surprising Ways Google's Speech-to-Text Boosts Productivity
- 7 Best Free Online Audio to Text Transcription Tools
- 9 Tips to Transcribe Speech to Text Faster and Better
- 13 Best Speech to Text Software for Windows 10 in 2023
- 7 Tips for Choosing the Best Transcriber for Audio to Text
- 11 Reasons Why Dragon Speech-to-Text Apps are Game-Changers
- 6 Secrets to Enhance Your Speech to Text Transcription
- 6 Brilliant Ways to Boost Productivity with Talk-to-Text on Your MacBook
- 6 Ways Transcription Software Converts Audio to Text
- 8 Tips to Transcribe Speech to Text Like a Pro
- 6 Reasons IBM Watson Speech to Text is a Game-Changer
- 14 Powerful Ways Talk-to-Text Improves Your Workflow
- 12 Top Windows Speech-to-Text Software for Efficient Transcription
- 12 Game-Changing Benefits of Apple's Speech to Text Technology
- 9 Powerful Use Cases for AWS Speech to Text Technology
- 10 Easy Steps to Transcribe YouTube Videos to Text
- transcription audio en texte
- online audio transcription
- free audio file transcription
- free ai audio transcription
- audio transcription service
- audio transcription online free
- audio transcription free online
- audio to transcription software
- audio and transcript
- ai audio transcription free
- voice recording to text converter
- translate voice recording to text
- record voice to text
- audio recording to text converter
- voice recording and transcription
- chatgpt voice to text
- gmail voice to text
- speech to text reader
- speech to text ai free
- speech to talk
- How SEO and Marketing Dashboards Empower Agencies to Drive Results
- How to Use AI Tools to Find Internal Linking Opportunities Across a Business Website
- Discover Your Perfect Haircut with AI Hairstyle Apps
- Free Reputation Calculator Tools: How They're Adapting to Score AI Visibility, Not Just Rankings
- Design Professional Flyers for Free on Your Phone
- Best Free Flyer Maker Apps for Android: Design Like a Pro
- How to Know If Your Business Is Ready for an AI Customer Service Agent
- Revolutionizing Storytelling: From Novels to Screenplays with AI
- Create Engaging Animated Explainer Videos with a Free AI Tool
- Stop Multi-Subscribing: Benchmark Top AI Visual Models in One Canvas
- ASOMobile Helps Teams Benchmark App Store Screenshots Against Competitors
- How to Match LMS Software With Your Organization's Training Plan
- Revolutionizing Email Marketing Agency with AI
- How to Convert BTC to HNT
- Unleashing the Power of AI: Cognizant's Roadmap for Transformation
- Frame to Video Review: A Practical Look at Turning Two Still Frames Into Motion
- NVIDIA NIM: Revolutionizing Supply Chain Data Analysis with AI
- Top AI Tools That Help Brands Stand Out Offline (Not Just Online)
- Top 5 Cold Email Software: Maximize Your Outreach in 2025
- Magic School AI: Revolutionizing Quiz & Assessment Generation

Copyright ©2026 toolify