































Table of Contents
- Key Points
- Free Comic Creation: A Step-by-Step Guide
- Advanced Techniques for Comic Refinement
- Step-by-Step Guide: From Idea to Comic Page
- Pricing Overview: Keeping Costs at Zero
- Advantages and Disadvantages
- Key Features: Google Whisk and Canva
- Creative Avenues: Potential Use Cases
- FAQ
- Related Questions



Free Comic Creation: A Step-by-Step Guide
Introduction to Free Comic Creation
Creating comics can be an expensive endeavor, with costs piling up for software, art supplies, and potentially, professional assistance. But what if you could sidestep these costs and still produce high-quality comics? Thanks to innovative, free online tools, that dream is now a reality. We'll walk you through a process leveraging Google Whisk and Canva, demonstrating how to create professional-looking comics entirely for free.
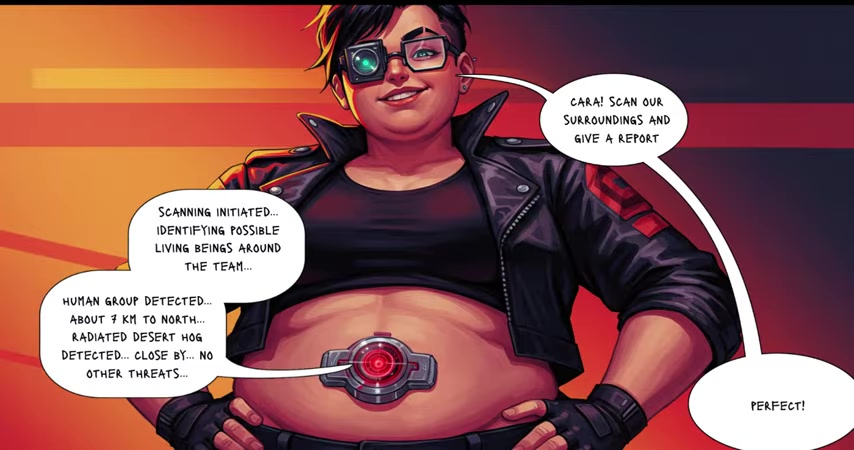
These platforms provide the core functionality you need to realize your comic vision, from generating artwork to laying out your panels and adding dialogue.
With this guide, you will learn valuable techniques for generating consistent characters, crafting compelling scenes, and adding professional touches to your comic pages. Get ready to unlock your creativity and share your stories with the world, all without breaking the bank!
Google Whisk: Your AI Art Generator
Google Whisk is the cornerstone of our free comic creation process. This AI-powered tool allows you to generate custom images in various styles, ensuring character consistency throughout your comic. Here's how to maximize its potential:
-
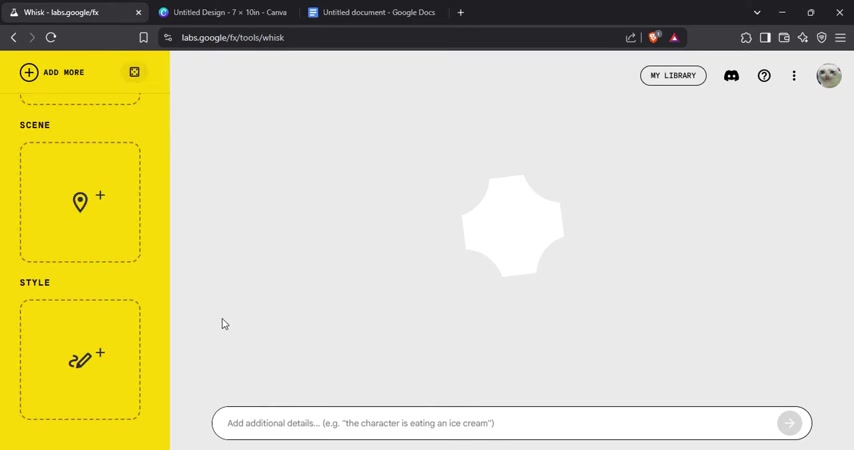
Accessing Google Whisk: Navigate to the Google Whisk website. To unlock the full feature set, scroll to the bottom and click 'Start from Scratch.' This opens a clean interface ready for your creative input.
-
Setting the Style: The first step is defining the visual style of your comic. Upload a reference image that embodies your desired aesthetic. This image will guide Google Whisk in generating artwork that matches your vision.
-
Character Creation: To create consistent characters, begin by outlining their physical traits, clothing, and any defining characteristics in a detailed description. Copy and paste this description into the Prompt box within Google Whisk.
-
Generating Your Character: Google Whisk will then generate images based on your description and the style reference. Iterate on the generated images until you achieve a result that aligns perfectly with your vision. Download the final character image.
-
Building Scenes with Multiple Characters: Upload each character image as a subject reference within Google Whisk. When prompting the scene generation, include detailed descriptions of each character to ensure consistency across panels.
-
Addressing Imperfections: AI-generated art isn't always perfect. Flaws or inconsistencies can be easily fixed by using Adobe Firefly’s Generative Fill or Remove.bg. These tools help edit unwanted parts of the image.
By leveraging Google Whisk's AI capabilities, you can efficiently generate a diverse cast of characters and scenes, all while maintaining a consistent style that defines your comic's visual identity.
Canva: Designing Your Comic Layout
Canva provides the tools necessary to assemble your comic pages with precision and creativity. You can create panels, add dialogues, and create stunning comic layouts. Here’s a detailed breakdown of how to utilize Canva for comic creation:
-
Setting Up Your Canvas: Start by creating a new design in Canva with custom dimensions suitable for a comic page. A standard size is 7 x 10 inches.
-
Arranging Panels and Scenes: Import your generated images into Canva. Arrange the scenes across your canvas in a narrative order. Pay attention to panel size and placement to guide the reader's eye.
-
Adding Comic Strips: Add borders around each scene to create distinct panels. This enhances visual clarity and emphasizes the traditional comic book layout.
-
Creating Speech Bubbles: For dialogues and narration, search for comic bubble graphics in Canva’s element section. Alternatively, you can upload a custom comic bubble pack to use different styles of comic bubbles.
-
Adding Text: Place speech bubbles near the character who is speaking and insert the dialogue within the bubble using Canva's text tools. Select a Font that matches the overall style of your comic.
-
Final Touches: Adjust the page background to a solid color to complete the visual theme of your comic. Black backgrounds can add drama, while lighter colors create a different mood.
Canva streamlines the layout and design process, allowing you to focus on the storytelling aspect of your comic. With its extensive library of graphics and intuitive tools, Canva empowers you to bring a professional aesthetic to your comic pages.




Most people like




























![AIcut: Automate Viral Text Story Videos Creation [2025]](https://i.ytimg.com/vi/AFGu13ApHLw/hq720.jpg?sqp=-oaymwEnCNAFEJQDSFryq4qpAxkIARUAAIhCGAHYAQHiAQoIGBACGAY4AUAB&rs=AOn4CLBW-Ky_AEvG3-v4VH_sxmqLhbESEQ)

Report
Please select a reason for reporting
- 13 Reasons to Switch from Snapchat to Text Messaging
- 7 Powerful Speech to Text Apps to Boost Productivity
- 10 Best Speech to Text Tools for Effortless Transcription
- 13 Free Tools to Easily Transcribe Audio to Text
- 15 Surprising Ways Google's Speech-to-Text Boosts Productivity
- 7 Best Free Online Audio to Text Transcription Tools
- 9 Tips to Transcribe Speech to Text Faster and Better
- 13 Best Speech to Text Software for Windows 10 in 2023
- 7 Tips for Choosing the Best Transcriber for Audio to Text
- 11 Reasons Why Dragon Speech-to-Text Apps are Game-Changers
- 6 Secrets to Enhance Your Speech to Text Transcription
- 6 Brilliant Ways to Boost Productivity with Talk-to-Text on Your MacBook
- 6 Ways Transcription Software Converts Audio to Text
- 8 Tips to Transcribe Speech to Text Like a Pro
- 6 Reasons IBM Watson Speech to Text is a Game-Changer
- 14 Powerful Ways Talk-to-Text Improves Your Workflow
- 12 Top Windows Speech-to-Text Software for Efficient Transcription
- 12 Game-Changing Benefits of Apple's Speech to Text Technology
- 9 Powerful Use Cases for AWS Speech to Text Technology
- 10 Easy Steps to Transcribe YouTube Videos to Text
- transcription audio en texte
- online audio transcription
- free audio file transcription
- free ai audio transcription
- audio transcription service
- audio transcription online free
- audio transcription free online
- audio to transcription software
- audio and transcript
- ai audio transcription free
- voice recording to text converter
- translate voice recording to text
- record voice to text
- audio recording to text converter
- voice recording and transcription
- chatgpt voice to text
- gmail voice to text
- speech to text reader
- speech to text ai free
- speech to talk
- Create Engaging Animated Explainer Videos with a Free AI Tool
- Stop Multi-Subscribing: Benchmark Top AI Visual Models in One Canvas
- Best Seedance 2.5 API Provider: Every Price on the Market, Checked at Source
- AI OnlyFans: How to Generate $30,000/Month (Legally)
- Transform Your Script into an Engaging Video with AI Video Maker!
- AI Marketing Automation: A Comprehensive Guide for Small Businesses
- Midjourney Alternative for Anime Art Creators: Why PixAI May Be Better for Character Workflows
- 10 Things Most People Get Wrong About AI Image Search
- AI Girlfriend Apps: Top Choices Redefining Relationships 2025
- How to Reduce Quoting Errors in Salesforce with AI-Assisted Quote Creation
- AI Resume Builders: EnhanceCV, ResumeNerd AI, & Teal Compared
- ResumeAI: Crafting ATS-Optimized Resumes with AI
- AI in Resume Writing: A New Era for Job Seekers
- AI Resume Tools: Streamline Your Job Search and Land Your Dream Role
- AI Resume Optimization: The Right Way to Land Interviews
- Crafting a Killer Resume with AI: A Step-by-Step Guide
- Crafting a Winning Resume: AI Tools and Expert Tips
- AI Job Search: Level Up Your Career with AI Automation
- Empower Your Career Journey: Dynamic Resumes with AI
- AI Resume Builder: Create Professional Resumes Effortlessly

Copyright ©2026 toolify