































Table of Contents
- Key Points
- Understanding Object Removal Techniques in Photoshop
- Pro Tips for Seamless Object Removal
- Step-by-Step Guide: Removing Objects with Content-Aware Fill
- Content-Aware Fill Pros and Cons
- FAQ
- Related Questions



Step-by-Step Guide: Removing Objects with Content-Aware Fill
Step 1: Duplicate the Background Layer
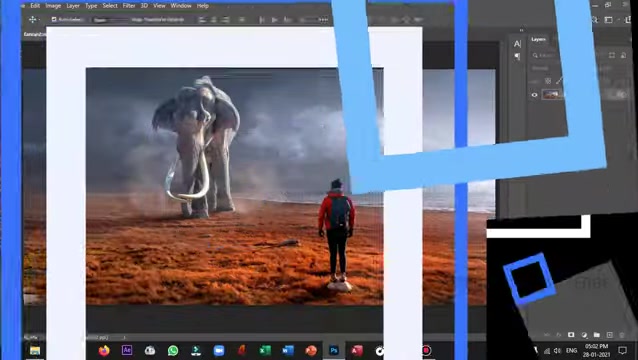
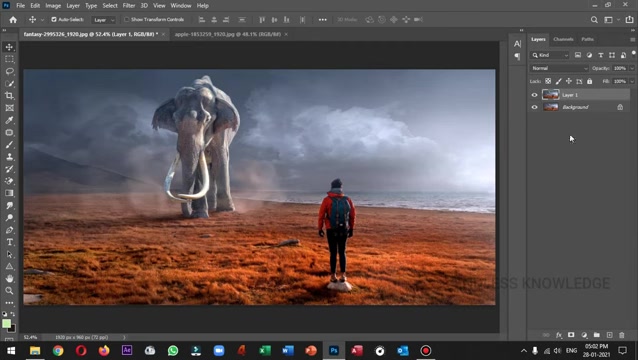
Begin by opening your image in Photoshop. The first step is to duplicate your background layer by pressing Ctrl+J (Windows) or Cmd+J (Mac). This creates a copy of your original image, ensuring that any edits you make are non-destructive and preserve the original file. This practice allows you to experiment with different removal techniques without permanently altering your original image. It allows you to compare your edited image with your original, and to undo any edits that you might dislike. This is an important first step before you begin editing. This is important for photo editors, graphic designers, and everyday users. Always duplicate.
Step 2: Select the Object with the Lasso Tool
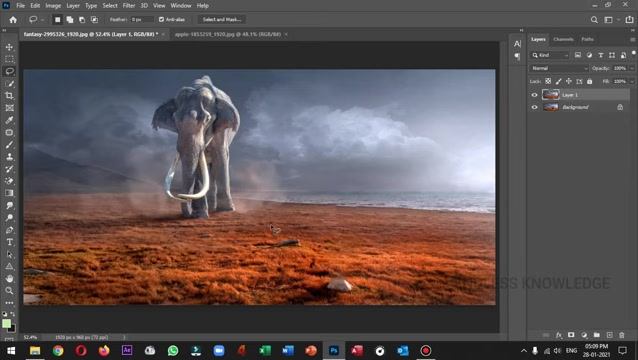
Select the Lasso Tool (L) from the toolbar. The Lasso Tool allows you to make freehand selections around the object you want to remove. Click and drag around the object, creating a selection that loosely encompasses it. It's important to note that the selection doesn't need to be perfectly precise; a general Outline is sufficient. It's important to be free and let your creativity take over. You don't want to add any pressure by being too restrictive. The most important thing is to learn and have fun! The shortcut for selecting the Lasso Tool is to press 'L' on your keyboard. Make sure you know the shortcut for future purposes. This is important for efficiency and saving time.
Step 3: Access Content-Aware Fill
Once you have selected the object, use the shortcut Shift+F5 to bring up the Fill dialog box. Alternatively, you can go to Edit > Fill in the menu bar. In the Fill dialog box, make sure that the Contents option is set to Content-Aware. Check that the color adaptation is enabled as well. Then click “OK” to apply the Content-Aware Fill. Content-Aware Fill will begin to intelligently fill the area of your subject. When you click “OK”, Photoshop analyzes the surrounding pixels. Then it generates new textures and patterns to seamlessly fill the selection, effectively making the object disappear. You also have to make sure to have a good computer because Content-Aware Fill can use up a lot of computing power.
Step 4: Deselect and Refine
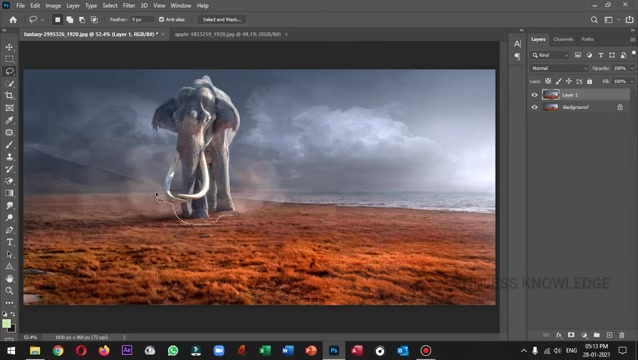
After the Content-Aware Fill has been applied, press Ctrl+D (Windows) or Cmd+D (Mac) to deselect the area. Inspect the result closely. If there are any imperfections or areas that don't Blend seamlessly, you can use other tools like the Clone Stamp Tool or the Healing Brush Tool to refine the image further. Sometimes, Content-Aware Fill may leave some unwanted artifacts or patterns. Clone Stamp Tool allows you to manually copy pixels from one area to another. You can also use the Healing Brush Tool that blends the copied pixels with the surrounding area for a more natural look. These refinement tools can give you more control over small details and ensure a more professional final outcome.





Most people like





































Report
Please select a reason for reporting
- 13 Reasons to Switch from Snapchat to Text Messaging
- 7 Powerful Speech to Text Apps to Boost Productivity
- 10 Best Speech to Text Tools for Effortless Transcription
- 13 Free Tools to Easily Transcribe Audio to Text
- 15 Surprising Ways Google's Speech-to-Text Boosts Productivity
- 7 Best Free Online Audio to Text Transcription Tools
- 9 Tips to Transcribe Speech to Text Faster and Better
- 13 Best Speech to Text Software for Windows 10 in 2023
- 7 Tips for Choosing the Best Transcriber for Audio to Text
- 11 Reasons Why Dragon Speech-to-Text Apps are Game-Changers
- 6 Secrets to Enhance Your Speech to Text Transcription
- 6 Brilliant Ways to Boost Productivity with Talk-to-Text on Your MacBook
- 6 Ways Transcription Software Converts Audio to Text
- 8 Tips to Transcribe Speech to Text Like a Pro
- 6 Reasons IBM Watson Speech to Text is a Game-Changer
- 14 Powerful Ways Talk-to-Text Improves Your Workflow
- 12 Top Windows Speech-to-Text Software for Efficient Transcription
- 12 Game-Changing Benefits of Apple's Speech to Text Technology
- 9 Powerful Use Cases for AWS Speech to Text Technology
- 10 Easy Steps to Transcribe YouTube Videos to Text
- transcription audio en texte
- online audio transcription
- free audio file transcription
- free ai audio transcription
- audio transcription service
- audio transcription online free
- audio transcription free online
- audio to transcription software
- audio and transcript
- ai audio transcription free
- voice recording to text converter
- translate voice recording to text
- record voice to text
- audio recording to text converter
- voice recording and transcription
- chatgpt voice to text
- gmail voice to text
- speech to text reader
- speech to text ai free
- speech to talk
- Meshy AI: How to Create 3D Models from Text and Images
- How SEO and Marketing Dashboards Empower Agencies to Drive Results
- How to Use AI Tools to Find Internal Linking Opportunities Across a Business Website
- Discover Your Perfect Haircut with AI Hairstyle Apps
- Free Reputation Calculator Tools: How They're Adapting to Score AI Visibility, Not Just Rankings
- Design Professional Flyers for Free on Your Phone
- Best Free Flyer Maker Apps for Android: Design Like a Pro
- How to Know If Your Business Is Ready for an AI Customer Service Agent
- Revolutionizing Storytelling: From Novels to Screenplays with AI
- Create Engaging Animated Explainer Videos with a Free AI Tool
- Meshy AI: How to Create 3D Models from Text and Images
- ASOMobile Helps Teams Benchmark App Store Screenshots Against Competitors
- How to Match LMS Software With Your Organization's Training Plan
- Revolutionizing Email Marketing Agency with AI
- How to Convert BTC to HNT
- Unleashing the Power of AI: Cognizant's Roadmap for Transformation
- Frame to Video Review: A Practical Look at Turning Two Still Frames Into Motion
- NVIDIA NIM: Revolutionizing Supply Chain Data Analysis with AI
- Top AI Tools That Help Brands Stand Out Offline (Not Just Online)
- Top 5 Cold Email Software: Maximize Your Outreach in 2025

Copyright ©2026 toolify