































Table of Contents
- Key Points
- Creating 3D Assets with Python AI
- AI and 3D Technology
- How to Install PyTorch for 3D Mesh
- Pricing for AI Image Generators
- Key Features and Technologies for Generating 3D Meshes
- Use Cases for 3D Mesh Generation from Single Images
- FAQ
- Related Questions


Creating 3D Assets with Python AI
Introduction to 3D Mesh Generation from 2D Images
Creating 3D assets from a single image is now within reach, thanks to innovations in deep learning and 3D data processing. Transforming a 2D monocular image into a 3D mesh unlocks possibilities in gaming, virtual reality, and design. By combining Python with deep learning algorithms, it's now possible to construct detailed 3D models using efficient, step-by-step processes. This approach democratizes access to 3D modeling and asset creation.
The ability to generate a 3D mesh from a single image hinges on several technological advances. Deep learning models, particularly those specializing in depth estimation, play a crucial role. These models analyze the 2D image and infer depth information, which is essential for building a 3D structure. 3D data processing techniques then transform this depth information into a point cloud, the foundation of a 3D mesh. Finally, algorithms convert the point cloud into a Cohesive mesh, which can be used in a variety of applications.
Python simplifies this complex process by offering a wide array of libraries tailored for deep learning and 3D data processing. Libraries like PyTorch provide the tools necessary to implement and train deep learning models for depth estimation. Libraries specifically designed for 3D data handling, facilitate the conversion of depth maps into point clouds and meshes. With just a handful of these libraries, developers can implement end-to-end 3D mesh generation pipelines, making the entire process more accessible and streamlined.
Workflow Overview
The typical workflow for generating a 3D mesh from a 2D image involves several key steps:
- Environment Setup: Preparing the development environment with the necessary Python libraries and dependencies.
- Image Acquisition: Obtaining or generating a 2D image using various methods such as smartphone Photography or AI-driven tools.
- Image Preprocessing: Optimizing the image for depth estimation by adjusting parameters such as contrast and resolution.
- Depth Estimation: Using a pre-trained deep learning model to infer a depth map from the preprocessed image.
- Point Cloud Generation: Converting the depth map into a point cloud representation.
- 3D Mesh Generation: Constructing a 3D mesh from the generated point cloud.
The ability to generate 3D meshes from 2D images presents a powerful tool for rapid prototyping and content creation. By integrating AI-driven image creation tools with this workflow, the possibilities become even more extensive, allowing for the generation of unique and detailed 3D assets from virtually any 2D source.
Essential Python Libraries for 3D Mesh Generation
To generate 3D models from single images using Python, having the right libraries is critical. Here are five essential Python libraries that streamline the process:
- PyTorch: This open-source machine learning framework provides the necessary tools for building and training deep learning models, including those used for depth estimation. PyTorch's dynamic computation graph makes it especially suited for research and development.
- Torchvision: As a companion library to PyTorch, torchvision provides datasets, model architectures, and image transformations for computer vision tasks. It includes pre-trained models that can be fine-tuned for depth estimation tasks, reducing the need to train models from scratch.
- NumPy: This is fundamental for numerical computations in Python, especially when dealing with arrays and matrices. NumPy is essential for pre-processing images, handling depth maps, and performing mathematical operations required for 3D data processing.
- SciPy: Building on NumPy, SciPy provides advanced scientific computing tools, including modules for optimization, integration, interpolation, and signal processing. These tools are useful for refining point clouds and meshes.
- Open3D: An open-source library dedicated to 3D data processing, Open3D offers algorithms for point cloud processing, mesh reconstruction, and visualization. It allows you to transform depth maps into point clouds, generate meshes, and Visualize the results, making it invaluable for 3D mesh generation.
These libraries work together to provide an end-to-end solution for generating 3D meshes from single images. By leveraging the power of deep learning with the precision of 3D data processing, developers can create detailed and accurate 3D models with minimal code.
Six Main Steps to Generate a 3D Mesh

Generating a 3D mesh from a 2D monocular image involves a streamlined process with six main steps. This structured approach ensures efficiency and precision, allowing you to transform single images into detailed 3D models. These steps provide a comprehensive overview of the process, highlighting the critical stages involved in 3D mesh generation.
- Prepare the Environment: Setting up your development environment is the first step. This includes installing Python, Anaconda, and the necessary libraries like PyTorch, NumPy, SciPy, and Open3D. Ensuring these are correctly installed sets the foundation for subsequent steps.
- Take/Generate an Image: The next step involves acquiring a 2D image. You can capture an image using your smartphone or generate one using AI models like Stable Diffusion. The source of the image significantly influences the final outcome, so choose wisely.
- Image Pre-Processing: Pre-processing enhances image quality for depth estimation. Adjusting parameters like contrast, brightness, and resolution optimizes the image, improving the accuracy of depth estimation.
- Depth Estimation: Employing a pre-trained deep learning model to estimate depth from the 2D image. This model analyzes the image to create a depth map, representing the distance of each point from the camera.
- Point Cloud Generation: Converting the depth map into a point cloud. Each point in the cloud represents a 3D coordinate derived from the depth map, forming the basis for the mesh.
- 3D Mesh Generation: Constructing the final 3D mesh from the point cloud. Algorithms connect the points in the cloud to form faces and surfaces, resulting in a complete 3D model.
This workflow provides a clear pathway to transform 2D images into 3D meshes. By following these six steps, you can harness the power of Python and deep learning to create detailed 3D models from single images.
Workflow Explained: Prepare the Environment
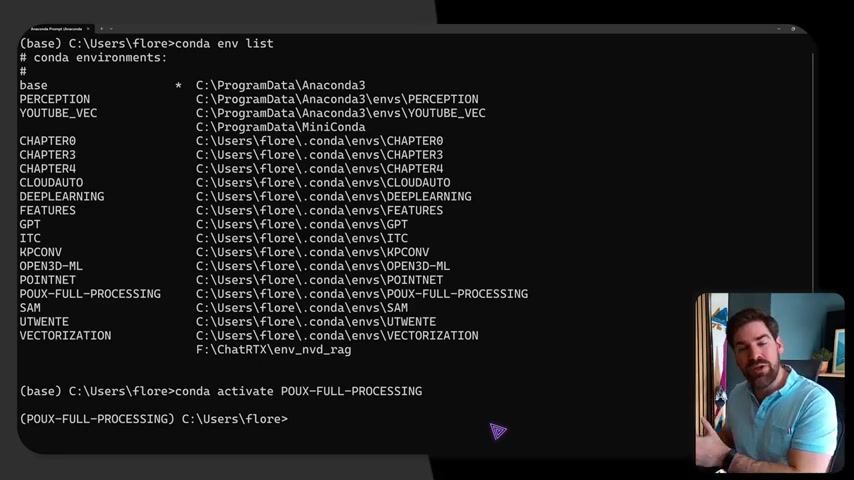
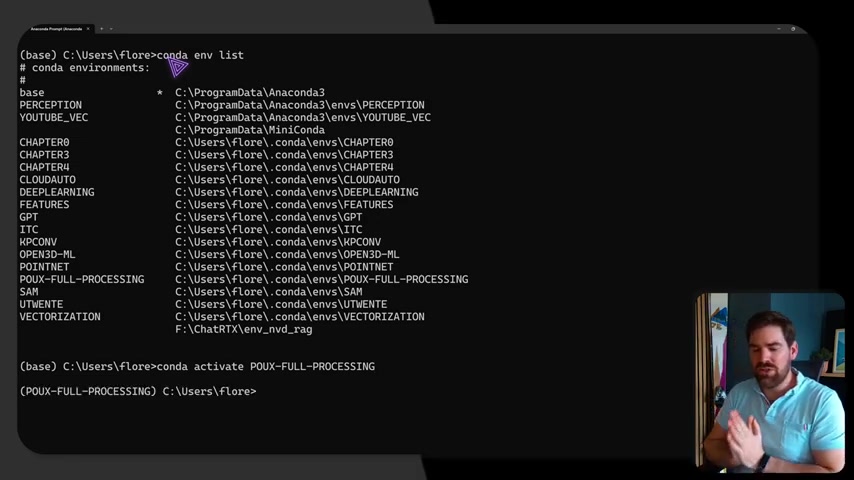
Preparing the environment is crucial for successful 3D mesh generation. This step involves setting up the software and libraries required for the subsequent processes. Ensure Python, Anaconda, and all necessary packages are installed correctly. This setup forms the foundation for your development workflow.
-
Install Python: Python is the programming language at the heart of this process. Download and install the latest version of Python from the official website, ensuring it's compatible with the required libraries.
-
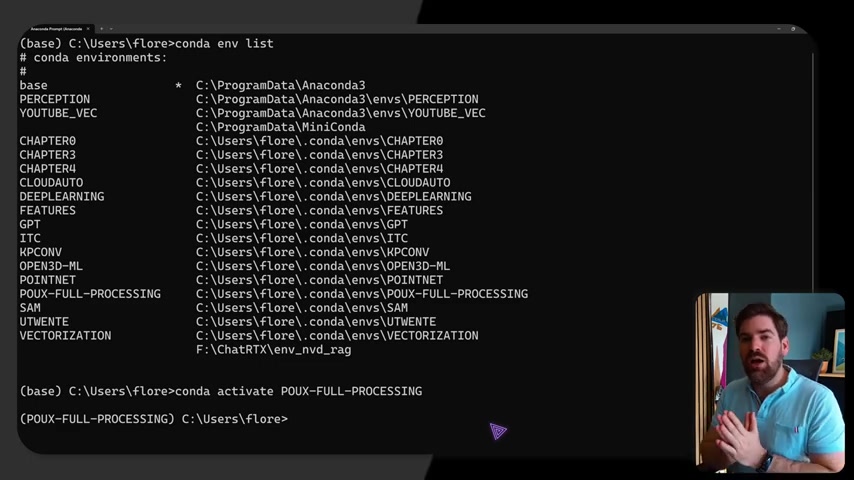
Set Up Anaconda: Anaconda simplifies Package management and environment isolation. It allows you to create virtual environments, preventing conflicts between different projects. Download and install Anaconda, then create a new environment specifically for your 3D mesh generation project.
-
Install Essential Libraries: The next step involves installing the Python libraries necessary for deep learning and 3D data processing. Use Anaconda’s package manager (conda) or pip to install libraries like PyTorch, Torchvision, NumPy, SciPy, and Open3D. Ensure each library is compatible with your Python version.
conda create -n 3dmesh python=3.9 conda activate 3dmesh pip install torch torchvision torchaudio numpy scipy open3d -
Verify Installations: After installation, verify that each library is correctly installed by importing it in a Python script. This confirms that the environment is properly configured and ready for development.
import torch import torchvision import numpy as np import scipy import open3d as o3d print("PyTorch version:", torch.__version__) print("Open3D version:", o3d.__version__) -
Configure IDE: Choose an Integrated Development Environment (IDE) to write and manage your code. Popular options include Visual Studio Code, PyCharm, and Jupyter Notebook. Configure your IDE to use the Anaconda environment created earlier.
-
Test Environment: Run a simple script to test the environment and confirm that all libraries are functioning correctly. This step helps identify and resolve any configuration issues before proceeding with the 3D mesh generation process.
Take/Generate Image with Stable Diffusion
Acquiring the right image is vital for creating a 3D mesh. There are two primary methods for obtaining images: taking a picture using a smartphone or generating one using an AI model such as Stable Diffusion
. Each method offers unique advantages, allowing you to choose the best approach based on your specific needs.
Using a Smartphone to Capture Images
Capturing an image with a smartphone is a straightforward method that provides real-world data. This approach is ideal for modeling existing objects or scenes. Ensure the lighting is adequate and the object is in clear focus for the best results. This method can be highly effective for reproducing physical items in a digital 3D format.
Generating Images with Stable Diffusion
Stable Diffusion and other AI models provide an alternative approach, enabling the creation of images from textual descriptions. This method is ideal for modeling objects that do not exist or exploring Creative Concepts. Generating images using AI models offers extensive control over the final output, allowing you to specify parameters like style, lighting, and composition.
To generate an image using Stable Diffusion, follow these steps:
- Install Stable Diffusion: Download and install Stable Diffusion on your local machine or use an online platform such as Google Colab. Ensure you have the necessary dependencies and configurations set up correctly.
- Choose a User Interface: Select a user interface to interact with Stable Diffusion. Popular options include AUTOMATIC1111’s web UI, InvokeAI, and Dreambooth. These interfaces provide a convenient way to input prompts and generate images.
- Write a Prompt: Craft a detailed prompt that describes the image you want to generate. The more specific the Prompt, the better the results. Include details about the object, style, lighting, and composition.
- Generate the Image: Input the prompt into Stable Diffusion and generate the image. Experiment with different prompts and parameters to refine the output. It can take several iterations to achieve the desired result.
- Save the Image: Once you’re satisfied with the generated image, save it in a suitable format such as PNG or JPG. This image will serve as the input for the 3D mesh generation process.
By combining the flexibility of AI-generated images with the precision of 3D mesh generation techniques, you can create highly detailed and unique 3D models from any 2D source. This integration opens up new possibilities for content creation, allowing you to explore and visualize concepts in ways never before possible.
Image Pre-Processing Techniques
Image pre-processing is an essential step in generating a 3D mesh from a 2D image. Proper pre-processing ensures that the image is optimized for depth estimation, improving the accuracy and quality of the final 3D model. Pre-processing prepares the image for depth estimation, enhancing the overall quality of the 3D mesh generation process.
- Resizing the Image: Resizing the image to a standard resolution ensures consistency in the input data. This step helps the depth estimation model perform more effectively. Resize the image to Dimensions appropriate for your model, typically around 256x256 or 512x512 pixels.
- Normalizing Pixel Values: Normalizing pixel values scales the intensity range of the image to a standard range, such as 0 to 1. This reduces the impact of varying lighting conditions and improves the model's performance.
- Adjusting Contrast and Brightness: Adjusting contrast and brightness enhances the details in the image, making it easier for the depth estimation model to identify features. Experiment with different settings to find the optimal balance.
- Noise Reduction: Reducing noise in the image removes unwanted artifacts that can interfere with depth estimation. Apply noise reduction techniques such as Gaussian blur or median filtering to smooth out the image.
- Edge Enhancement: Enhancing edges sharpens the boundaries of objects, making them more distinct. This can help the depth estimation model better Delineate the structures in the image.
These techniques prepare the image for accurate depth estimation, significantly improving the overall quality of the 3D mesh generation process. By optimizing the input data, you ensure that the depth estimation model performs at its best, resulting in a more detailed and accurate 3D model.
Depth Estimation: Unleashing Deep Learning for 3D Mesh
Depth estimation is a crucial process in transforming a 2D image into a 3D mesh. By employing deep learning models, it infers the depth of each pixel in the image, creating a depth map that serves as the foundation for the 3D model
. The effectiveness of depth estimation directly impacts the quality and accuracy of the final 3D mesh.
Depth Estimation with Deep Learning
Deep learning models are trained to analyze 2D images and predict the depth information, thereby estimating the distance of each point from the camera. These models learn complex Patterns and relationships between image features and depth, enabling them to generate highly accurate depth maps.
- Pre-trained Models: Many pre-trained depth estimation models are readily available, reducing the need for extensive training from scratch. These models have been trained on large datasets and can be fine-tuned for specific applications.
- Model Architectures: Popular model architectures include Convolutional Neural Networks (CNNs), Recurrent Neural Networks (RNNs), and Transformers. Each architecture has its strengths and weaknesses, depending on the task.
Choosing the Right Model
Selecting the appropriate depth estimation model depends on various factors, such as the complexity of the image and the desired accuracy. Consider the following factors:
- Accuracy: Evaluate the model’s accuracy on Relevant datasets to ensure it meets the requirements.
- Computational Cost: Balance accuracy with computational cost to ensure the model is efficient.
- Compatibility: Ensure the model is compatible with your chosen deep learning framework.
Performing Depth Estimation
- Load the Pre-trained Model: Begin by loading the pre-trained depth estimation model into your deep learning framework. Ensure you have the model weights and configuration files available.
- Pre-process the Image: Pre-process the image to ensure it is compatible with the model. This may involve resizing, normalizing, and adjusting the color space.
- Run Inference: Run inference on the pre-processed image to generate the depth map. The model will analyze the image and estimate the depth for each pixel.
- Visualize the Depth Map: Visualize the depth map to verify the results. Use color gradients or other techniques to represent depth information.
By employing deep learning for depth estimation, you can accurately infer the depth information from 2D images, forming the basis for detailed and realistic 3D models. This process bridges the gap between 2D and 3D, enabling the creation of immersive and interactive experiences.
Point Cloud Generation Explained
Point cloud generation is the transformative step where depth data becomes a Spatial map. This process converts depth maps into a set of 3D points, each representing a location in space. The resulting point cloud forms the foundation for constructing a 3D mesh. The method you employ to create this point cloud will determine the quality and usefulness of the final product.
Converting Depth Maps to Point Clouds
Depth maps provide a 2D array of depth values, where each value corresponds to the distance of a pixel from the camera. To generate a point cloud, these depth values must be converted into 3D coordinates.
- Camera Parameters: To convert depth values into 3D coordinates, camera parameters like focal length and principal point are necessary. These parameters define the camera's intrinsic properties and its position in space.
- Coordinate Transformation: Using camera parameters, you can transform each pixel's depth value into a 3D point in the camera's coordinate system. This transformation involves mathematical operations to map the 2D pixel coordinates to 3D space.
Techniques for Point Cloud Generation
There are several techniques for generating point clouds from depth maps. Some common methods include:
- Direct Conversion: This involves directly converting depth values into 3D coordinates using the camera parameters. Each pixel in the depth map becomes a point in the cloud, forming the basis for the mesh.
- Filtering and Smoothing: Filters out noise and smooth out the point cloud. Techniques such as outlier removal and smoothing can enhance data quality and precision.
- Registration and Alignment: Register the point cloud with other data sources or Align it with existing models. Registration ensures that the point cloud is correctly positioned and oriented in space.
Enhancing Point Cloud Quality
- Filtering Outliers: Remove points that are far from the rest of the data to reduce noise and improve the accuracy of the cloud.
- Smoothing the Point Cloud: Applies smoothing techniques to fill gaps and smooth surfaces to achieve a more accurate representation.
- Resampling the Point Cloud: Samples the point cloud to balance density and maintain accuracy and achieve a more uniform distribution.
By employing these techniques, you can create a high-quality point cloud that forms the foundation for generating detailed and accurate 3D meshes. High-quality point clouds result in more refined and reliable 3D models.
3D Mesh Generation: The Final Step
Transforming a point cloud into a 3D mesh is the culminating step in creating a 3D model from a 2D image
. This process connects the points in the cloud to form surfaces and faces, resulting in a complete 3D structure. The quality and accuracy of the mesh depend on the techniques used. 3D meshes result in detailed and realistic 3D models.
Understanding Mesh Construction
Mesh construction involves connecting the points in the cloud to create faces, edges, and vertices. These elements form the basic building blocks of the mesh, defining its Shape and structure. The key is to choose appropriate algorithms and techniques.
Techniques for 3D Mesh Generation
Various techniques exist for creating 3D meshes from point clouds. Some of the most common include:
- Triangulation: Divide the point cloud into triangles, connecting each point to its neighbors. This creates a surface composed of triangular faces, forming the basis of the mesh.
- Surface Reconstruction: Reconstruct the surface from the point cloud, generating a smooth and continuous mesh. Techniques such as Poisson reconstruction or ball pivoting can be used for this purpose.
- Mesh Simplification: Reduce the complexity of the mesh by decreasing the number of faces and vertices. This technique helps optimize the mesh for real-time rendering and simulation.
Fine-Tuning the Mesh
- Smoothing the Mesh: Smooth the mesh to enhance its visual appearance and remove sharp edges. Techniques such as Laplacian smoothing or Gaussian smoothing can be used.
- Adding Details: Incorporate details into the mesh by adding fine-grained features and textures. This enhances the realism and richness of the model.
- Optimizing the Mesh: Optimize the mesh for real-time rendering and simulation. Reduce the number of faces and vertices, and streamline the structure. The goal is to improve performance while maintaining quality.
By employing these techniques, you can generate detailed and accurate 3D meshes from point clouds, creating high-quality 3D models for various applications. The careful connection of points to form surfaces results in complete 3D structures.
AI and 3D Technology
Deep Learning: The Core Technology
Deep learning serves as the core technology in 3D mesh generation from 2D images. By training neural networks, these systems learn to understand and recreate depth from the image . They use models like CNNs and RNNs, which learn patterns and relationships from the input image.
Deep Learning Models
Models such as Convolutional Neural Networks (CNNs) analyze the image and learn spatial hierarchies, enabling them to estimate the depth of various elements within the image. Recurrent Neural Networks (RNNs) process sequences of data, making them suitable for tasks such as video analysis and time-series forecasting. These models use layers of interconnected nodes to process the image data, extracting features, and estimating depth.
- Depth Estimation Networks: Networks that are trained to directly estimate the depth of each pixel in the image. These networks learn to map image features to depth values. These networks are the workhorse for creating depth maps.
- Segmentation Networks: Networks that segment the image into different regions, each representing an object or surface. These networks are useful for segmenting objects and features in the image. This segmentation aids the generation process.
Training Deep Learning Models
To train deep learning models for 3D mesh generation, you need a large dataset of 2D images and corresponding depth maps. Training involves feeding the model the images, comparing its predictions with the ground truth depth maps, and adjusting its parameters to minimize the error. Training deep learning models involves several key steps:
- Data Preprocessing: Prepare the dataset by resizing, normalizing, and augmenting the images. Data preprocessing ensures the model receives clean, consistent input.
- Model Configuration: Configure the model architecture by specifying the number of layers, the type of activation functions, and the learning rate. Good configurations balance efficiency and accuracy.
- Optimization: Select an optimization algorithm to minimize the error between the model's predictions and the ground truth. Optimizers include Adam, SGD, and RMSprop.
Inference and Prediction
Once the deep learning model is trained, it can be used for inference to generate depth maps from new 2D images. Inference involves feeding the model the image and obtaining its depth estimation. The process provides the depth map needed for point cloud generation.
Integration with AI-Generated Images
Combining the method of creating 3D meshes from 2D images with AI-generated content introduces new dimensions for artistic and practical projects

. Models like Stable Diffusion produce customized images based on textual prompts, offering vast opportunities for unique 3D asset designs.
Using AI to Create Images
AI models such as Stable Diffusion, DALL-E, and Midjourney are used to generate images from textual prompts. These models use deep learning techniques to synthesize images that match the descriptions provided. These tools allow for the creation of non-existent objects.
- Text-to-Image Models: Input a textual description and the model generates an image that matches the description. Stable Diffusion, DALL-E, and Midjourney belong to this category. These are the core engines for generating art.
- Image-to-Image Models: Input an initial image and the model generates a new image that is similar but modified based on the input. These tools provide another method for creativity.
Integration with 3D Mesh Generation
The combination of AI-generated images with 3D mesh generation opens up new possibilities for content creation. One approach is to generate an image of a desired object using Stable Diffusion and then create a 3D mesh from the generated image. By generating images and models, one can create anything.
- Image Generation: Create the image using a text prompt or an initial image.
- Pre-processing: The image undergoes pre-processing to remove noise and enhance features.
- Mesh Generation: Mesh-generation uses algorithms to create surfaces and faces. The quality can vary greatly.
Practical Applications
AI-generated images combined with 3D mesh generation have practical applications in various industries. These applications include:
- Game Development: Create custom 3D models for Game environments based on text-generated ideas.
- Design: Generate Novel product concepts and create 3D models for prototyping.
- Virtual Reality: Develop virtual reality environments with unique, AI-generated assets.
By integrating AI-generated images with 3D mesh generation, the design process becomes more streamlined and creative, allowing for the creation of highly detailed and original 3D models for diverse applications.






Most people like



































Report
Please select a reason for reporting
- 13 Reasons to Switch from Snapchat to Text Messaging
- 7 Powerful Speech to Text Apps to Boost Productivity
- 10 Best Speech to Text Tools for Effortless Transcription
- 13 Free Tools to Easily Transcribe Audio to Text
- 15 Surprising Ways Google's Speech-to-Text Boosts Productivity
- 7 Best Free Online Audio to Text Transcription Tools
- 9 Tips to Transcribe Speech to Text Faster and Better
- 13 Best Speech to Text Software for Windows 10 in 2023
- 7 Tips for Choosing the Best Transcriber for Audio to Text
- 11 Reasons Why Dragon Speech-to-Text Apps are Game-Changers
- 6 Secrets to Enhance Your Speech to Text Transcription
- 6 Brilliant Ways to Boost Productivity with Talk-to-Text on Your MacBook
- 6 Ways Transcription Software Converts Audio to Text
- 8 Tips to Transcribe Speech to Text Like a Pro
- 6 Reasons IBM Watson Speech to Text is a Game-Changer
- 14 Powerful Ways Talk-to-Text Improves Your Workflow
- 12 Top Windows Speech-to-Text Software for Efficient Transcription
- 12 Game-Changing Benefits of Apple's Speech to Text Technology
- 9 Powerful Use Cases for AWS Speech to Text Technology
- 10 Easy Steps to Transcribe YouTube Videos to Text
- transcription audio en texte
- online audio transcription
- free audio file transcription
- free ai audio transcription
- audio transcription service
- audio transcription online free
- audio transcription free online
- audio to transcription software
- audio and transcript
- ai audio transcription free
- voice recording to text converter
- translate voice recording to text
- record voice to text
- audio recording to text converter
- voice recording and transcription
- chatgpt voice to text
- gmail voice to text
- speech to text reader
- speech to text ai free
- speech to talk
- How SEO and Marketing Dashboards Empower Agencies to Drive Results
- How to Use AI Tools to Find Internal Linking Opportunities Across a Business Website
- Discover Your Perfect Haircut with AI Hairstyle Apps
- Free Reputation Calculator Tools: How They're Adapting to Score AI Visibility, Not Just Rankings
- Design Professional Flyers for Free on Your Phone
- Best Free Flyer Maker Apps for Android: Design Like a Pro
- How to Know If Your Business Is Ready for an AI Customer Service Agent
- Revolutionizing Storytelling: From Novels to Screenplays with AI
- Create Engaging Animated Explainer Videos with a Free AI Tool
- Stop Multi-Subscribing: Benchmark Top AI Visual Models in One Canvas
- Top Virtual Assistant Companies in 2026: Reviews, Pricing, and Plans Compared
- AI Photo Generator Remove BG Review: My Experience Testing an AI Background Editing Tool
- Beyond Robotic Narration: My Honest Experience with VideoAI and Its Insane Character Voice Library
- Testing Super-Resolution: An In-Depth Look at Modern Image Upscaling
- AI CRM vs. Traditional CRM: Which Strategy Wins?
- Ultimate Guide: What To Do After Buying A Domain Name
- Non-Human Identities Became the Access-Management Problem Nobody Budgeted For
- Create Your Own Book Store Website for Free with Wordpress
- Why do so many AI tools underdeliver for online stores?
- Vintage Travel Poster Ideas With an AI Image Generator

Copyright ©2026 toolify