























Illustrator Coloring Tutorial: Master Easy Colorization Techniques

Updated on May 30,2025








Table of Contents
- Key Points
- Setting Up Your Illustrator Workspace for Easy Coloring
- The Coloring Method: A Step-by-Step Guide
- Quick Tips for Better Coloring Workflow in Illustrator
- Advantages and Disadvantages of This Coloring Method
- Frequently Asked Questions about Coloring in Adobe Illustrator
- Related Questions


Setting Up Your Illustrator Workspace for Easy Coloring
Preparing Your Line Work
Before diving into coloring, it’s crucial to properly prepare your line work. This means ensuring all your lines connect to form closed shapes. Why is this important? This method
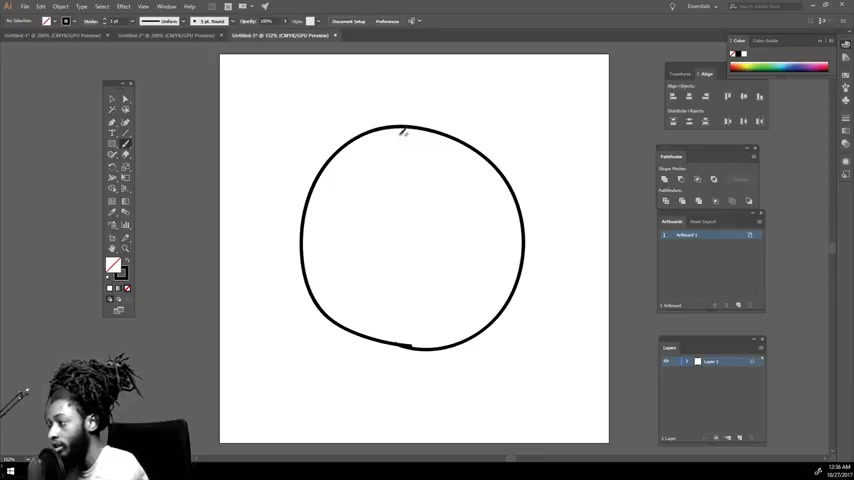
leverages Illustrator’s ability to fill defined areas with color efficiently. If your lines aren't closed, the 'paint bucket' effect (which we'll essentially be creating) won’t work correctly, and you'll end up with color spilling everywhere.
Use the pen tool or brush tool to create your initial line art. When using the brush tool, focus on clean, continuous strokes. Always double-check that the start and end points of your lines meet seamlessly.
If you find gaps, use the direct selection tool (the white arrow) to adjust individual anchor points and ensure they connect. Zooming in can help you identify and correct small imperfections.
Alternatively, you can use the 'Join' command (Object > Path > Join) to automatically connect two selected endpoints. This is a quick fix for minor gaps, but it’s best to manually adjust more significant discrepancies for optimal results.
Key Steps for Line Work Preparation:
- Close All Paths: Ensure each Shape is fully enclosed. No gaps allowed!
- Clean Up Overlaps: Where lines intersect, trim or merge them for cleaner fills.
- Simplify Paths (Optional): Reduce the number of anchor points to improve performance, especially in complex designs. (Object > Path > Simplify)
Properly preparing your line work dramatically streamlines the coloring process, saving you time and frustration later on. Think of it as laying a solid foundation for a vibrant and successful illustration.
The key to ensuring efficient color application lies in the integrity of your initial design. Making sure all paths are meticulously closed off transforms the coloring task into a seamless and rewarding experience.
Merging Paths with the Pathfinder Tool
The Pathfinder tool in Adobe Illustrator is a powerhouse for manipulating shapes. For coloring, we'll use it to merge your lines into a single, unified path
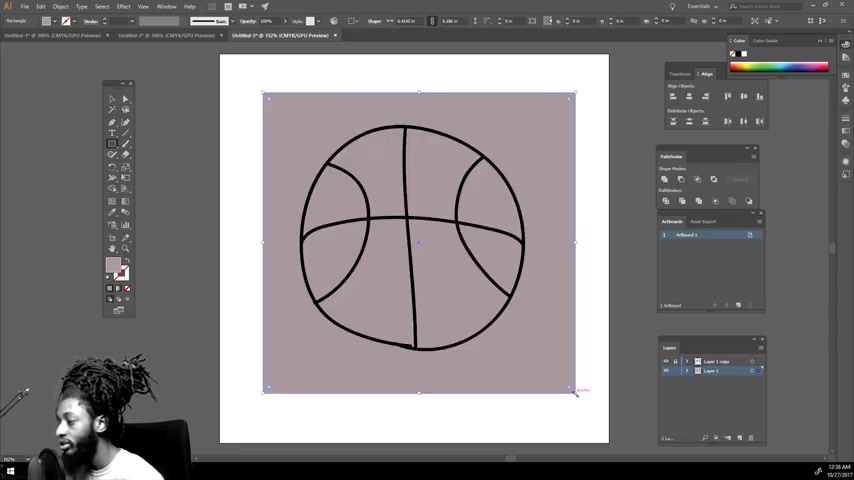
. This is essential for the coloring method we’re about to explore.
How to Merge Paths:
- Select All Line Work: Use the selection tool (the black arrow) to highlight all the lines you want to merge. Make sure you truly select everything; stray lines can cause problems later.
- Open the Pathfinder Panel: Go to Window > Pathfinder. If it’s already open, you’ll see the Pathfinder panel appear on your screen.
- Click the 'Merge' Button: In the Pathfinder panel, look for the 'Pathfinders' section (usually the bottom half). The 'Merge' option is typically the Second icon from the left. Click it. It looks like two overlapping squares becoming one.
What Does 'Merge' Do?
The 'Merge' function in Pathfinder acts like a intelligent union. It combines all selected paths into a single shape, while also removing any overlapping segments. This creates a clean Outline that's perfect for filling with color. This is a critical step in enhancing your Illustrator coloring skills.
Without merging, Illustrator treats each line as an individual object. This makes coloring cumbersome, as you’d have to manually fill each segment. Merging streamlines the process, allowing you to apply color to entire sections with a single click.
After merging, your lines might appear slightly different. This is normal. Pathfinder is optimizing the paths for a cleaner fill. If you Notice any unexpected changes, undo the merge and carefully re-examine your line work for overlaps or open paths before trying again.
Benefits of Using Pathfinder Merge:
- Simplified Coloring: Fill entire areas with one click.
- Clean Outlines: Eliminates overlapping segments for crisper results.
- Improved Performance: Reduces the number of objects in your file, leading to smoother performance, especially with complex designs.
Mastering the Pathfinder tool, especially the 'Merge' function, opens up a world of possibilities for efficient and visually appealing coloring in Adobe Illustrator. It's a foundational skill for any digital artist looking to refine their workflow.
Layer Management: Organizing Your Colors and Line Work
Organizing your artwork into layers is paramount for a smooth coloring workflow. Layers allow you to isolate different aspects of your design, making it easier to select, edit, and color individual elements
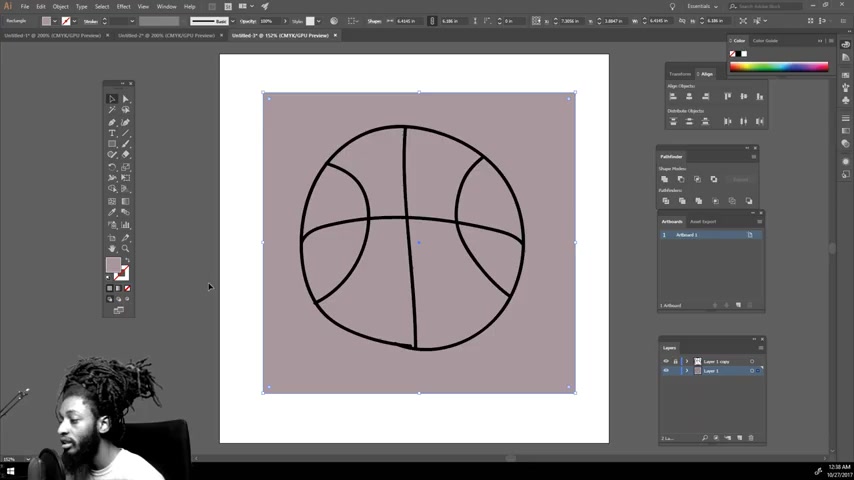
.
Think of layers as transparent sheets stacked on top of each other. You can draw on each sheet independently, without affecting the others. This is incredibly useful for separating line work from colors, allowing you to edit one without accidentally modifying the other.
Setting Up Your Layers:
- Create a New Layer: Open the Layers panel (Window > Layers). At the bottom of the panel, click the 'Create New Layer' button (it looks like a plus sign in a square).
- Rename Your Layers: Double-click on the default layer name (e.g., 'Layer 1') to rename it. Good names might be 'Line Work,' 'Base Colors,' 'Shading,' etc.
- Arrange Your Layers: Drag layers up or down in the panel to change their stacking order. Elements on top layers will appear in front of elements on bottom layers.
Recommended Layer Structure:
- Top Layer: Line Work (Locked) This layer contains your merged lines. Lock it to prevent accidental modifications. We are going to create our fill color in a layer under the line art layer to allow for even easier editing later.
- Middle Layer: Base Colors This layer holds your initial color fills. Keeping it separate from the line work ensures you can adjust colors without affecting the outlines.
- Bottom Layer: Shading (Optional) Use this layer to add shadows and highlights for depth and dimension.
Locking Layers:
To prevent accidental edits, lock layers you’re not actively working on. In the Layers panel, click the empty square next to the eye icon for a layer. A lock icon will appear, indicating the layer is locked.
Why Use Layers?
- Selective Editing: Easily modify individual elements without affecting others.
- Organization: Keep your file tidy and manageable, especially in complex illustrations.
- Flexibility: Experiment with different color schemes and effects without permanently altering your original line work.
By mastering layer management, you’ll unlock a new level of control and efficiency in your Adobe Illustrator coloring workflow. It’s an essential skill for producing polished and professional digital artwork.








Most people like
































Report
Please select a reason for reporting
- 13 Reasons to Switch from Snapchat to Text Messaging
- 7 Powerful Speech to Text Apps to Boost Productivity
- 10 Best Speech to Text Tools for Effortless Transcription
- 13 Free Tools to Easily Transcribe Audio to Text
- 15 Surprising Ways Google's Speech-to-Text Boosts Productivity
- 7 Best Free Online Audio to Text Transcription Tools
- 9 Tips to Transcribe Speech to Text Faster and Better
- 13 Best Speech to Text Software for Windows 10 in 2023
- 7 Tips for Choosing the Best Transcriber for Audio to Text
- 11 Reasons Why Dragon Speech-to-Text Apps are Game-Changers
- 6 Secrets to Enhance Your Speech to Text Transcription
- 6 Brilliant Ways to Boost Productivity with Talk-to-Text on Your MacBook
- 6 Ways Transcription Software Converts Audio to Text
- 8 Tips to Transcribe Speech to Text Like a Pro
- 6 Reasons IBM Watson Speech to Text is a Game-Changer
- 14 Powerful Ways Talk-to-Text Improves Your Workflow
- 12 Top Windows Speech-to-Text Software for Efficient Transcription
- 12 Game-Changing Benefits of Apple's Speech to Text Technology
- 9 Powerful Use Cases for AWS Speech to Text Technology
- 10 Easy Steps to Transcribe YouTube Videos to Text
- transcription audio en texte
- online audio transcription
- free audio file transcription
- free ai audio transcription
- audio transcription service
- audio transcription online free
- audio transcription free online
- audio to transcription software
- audio and transcript
- ai audio transcription free
- voice recording to text converter
- translate voice recording to text
- record voice to text
- audio recording to text converter
- voice recording and transcription
- chatgpt voice to text
- gmail voice to text
- speech to text reader
- speech to text ai free
- speech to talk
- Design Professional Flyers for Free on Your Phone
- Best Free Flyer Maker Apps for Android: Design Like a Pro
- How to Know If Your Business Is Ready for an AI Customer Service Agent
- Revolutionizing Storytelling: From Novels to Screenplays with AI
- Create Engaging Animated Explainer Videos with a Free AI Tool
- Stop Multi-Subscribing: Benchmark Top AI Visual Models in One Canvas
- Best Seedance 2.5 API Provider: Every Price on the Market, Checked at Source
- AI OnlyFans: How to Generate $30,000/Month (Legally)
- Transform Your Script into an Engaging Video with AI Video Maker!
- AI Marketing Automation: A Comprehensive Guide for Small Businesses
- Design Professional Flyers for Free on Your Phone
- Best Free Flyer Maker Apps for Android: Design Like a Pro
- Unleash Creativity: AI Coloring Pages with ColoringBook.ai
- Generate Stunning AI Photos with Google Gemini: A Guide
- Boost Your Etsy Sales with Stunning Digital Invitations!
- Revolutionize Your Etsy Listing with AI Text Generator
- Create Coloring Pages with AI: A Bing AI Tutorial
- Photo Lab App: Transform Your Photos with Stunning AI Effects
- Effortless Design: Rewriting Text with Microsoft Designer's AI
- Create & Sell Kids' Coloring Books with AI - KDP Guide

Copyright ©2026 toolify