































Table of Contents
- Key Points
- Understanding MediaPipe Image Segmentation
- Optimizing Performance and User Experience
- Getting Started with MediaPipe Image Segmentation for Web
- Advantages and Disadvantages of MediaPipe Image Segmentation
- Key Capabilities of MediaPipe Image Segmentation
- Frequently Asked Questions
- Related Questions


Understanding MediaPipe Image Segmentation
What is Image Segmentation?
Image segmentation is a computer vision technique that involves partitioning a digital image into multiple segments (sets of pixels). The goal is to simplify and/or change the representation of an image into something that is more meaningful and easier to analyze. More precisely, Image Segmentation is the process of assigning a label to every pixel in an image such that pixels with the same label share certain visual characteristics.
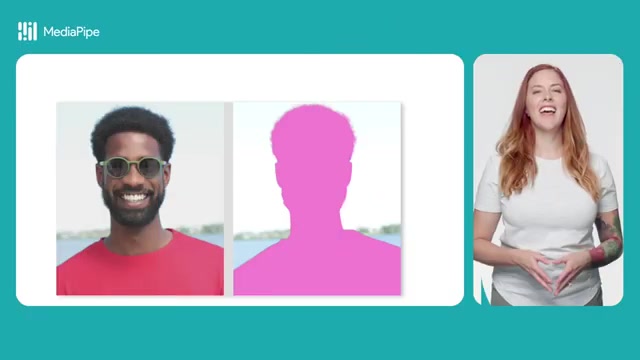
Think of it as outlining different objects in an image or video. For example, you might want to identify the person, the background, or even specific features like hair or clothing. This opens doors for a variety of applications, from visual effects to advanced image analysis.
MediaPipe’s implementation simplifies this process, giving developers a ready-to-use solution for their projects. By categorizing pixels, you can then apply specific effects or analyses to these defined regions.
MediaPipe Image Segmenter Task
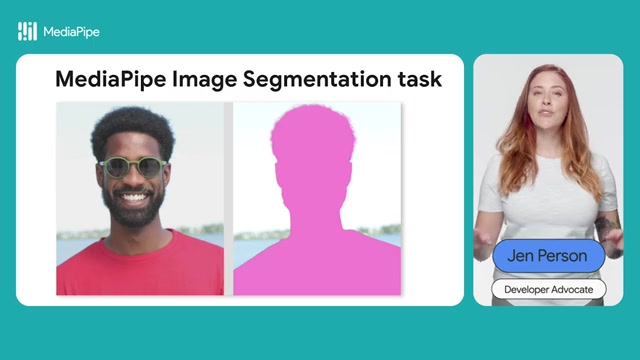
The MediaPipe Image Segmenter task is designed to make implementing image segmentation straightforward. It allows you to divide images into distinct regions based on predefined categories. This means the model is trained to recognize specific types of objects or textures, like people, backgrounds, or even elements like hair and skin.
With this functionality, you can identify these predefined segments in an image or video frame and then apply visual effects or perform analyses on just those segments. A classic example is background blurring, where the segment representing the background is blurred, while the foreground remains sharp. This is just one of the many creative possibilities.
Optimizing Performance and User Experience
Storing ML Assets
For the best user experience, avoid bundling your model or WASM binary directly into your website's code. Instead, store these assets server-side and provide links to them when initializing the image segmenter. This approach significantly reduces the initial download size of your website, leading to faster loading times and a better user experience.
Leveraging MediaPipe Studio
MediaPipe Studio is a great way to find the appropriate Model that works for your purposes before writing code. MediaPipe Studio also allows trying out different configuration options so you can see everything that the task can do.
Getting Started with MediaPipe Image Segmentation for Web
Choosing a Segmentation Model
Before diving into code, take a look at the available segmentation models to determine which one best suits your needs. Consider the types of objects or features you want to segment and choose the model trained for those categories. MediaPipe Studio allows you to try out these models in a no-code environment.
Installing the Tasks Vision Package
To use the image segmentation task in your web project, you'll need to install the MediaPipe Tasks Vision package. You can achieve this using npm (Node Package Manager):
npm install @mediapipe/tasks-visionAlternatively, you can include the package directly in your HTML using a CDN (Content Delivery Network):
<!-- You can replace JSDelivr with another CDN if you prefer to -->
<script src="https://cdn.jsdelivr.net/npm/@mediapipe/tasks-vision/vision_bundle.js" crossorigin="anonymous"></script>
Note: When integrating ML assets, you don't want to bundle your model or WASM binary into your website. Instead, you can store them server-side and provide links when initializing your image segmenter.
Initializing the Image Segmenter
Here’s example code to initialize the image segmenter:
async function createImageSegmenter() {
  const vision = await FilesetResolver.forVisionTasks(
      "https://cdn.jsdelivr.net/npm/@mediapipe/tasks-vision/wasm");

  imageSegmenter = await ImageSegmenter.createFromOptions(vision, {
    baseOptions: {
      modelAssetPath: "https://storage.googleapis.com/mediapipe-models/image_segmenter/selfie_segmenter/float16/latest/selfie_segmenter.tflite",
      delegate: "GPU"
    },
    outputCategoryMask: true
  });
}- FilesetResolver: This configures the WASM binary loading.
- ImageSegmenter.createFromOptions: This creates the image segmenter, taking the WASM configuration and a set of options.
- modelAssetPath: Specifies the URL of the segmentation model.
- delegate: Defines whether to use the GPU for processing (if available).
- outputCategoryMask: When set to
true, this setting provides an image mask. Each pixel is colored according to its matching category, offering visual segmentation.
Running Segmentation
To perform segmentation on an image, use the segment method:
const result = imageSegmenter.segment(image);The segment method is synchronous, meaning it will block the main thread while processing. Consider this when designing your UI to avoid potential performance issues.
The segment source can be an HTMLCanvasElement, HTMLVideoElement, HTMLImageElement, ImageData, or ImageBitmap.
There's also a version of the segment method that uses a callback. The callback-based method is more efficient and memory will be freed automatically for you, but the segment result resources will only exist when the callback is running:
const result = imageSegmenter.segment(image, callback);

function callback(result: ImageSegmenterResult) {
  // handle the results
}
Accessing Segmentation Results
You can access the segmentation results through the categoryMask or confidenceMasks properties of the result object:
const mask = result.categoryMask.getAsFloat32Array();The content of the output depends on the output type set during task configuration.
Segmenting Video Frames
To segment video frames, use the segmentForVideo method:
const startTimeMs = performance.now();
const result = imageSegmenter.segmentForVideo(video, startTimeMs);- performance.now(): Gets the current timestamp for accurate video processing.
- segmentForVideo(): Segments a specific frame of the video.
Remember to clean up resources by calling the close method on the imageSegmenterResult when you are done.
Key Capabilities of MediaPipe Image Segmentation
Available Segmentation Models
MediaPipe offers several models specifically trained for segmenting people and their features:
-
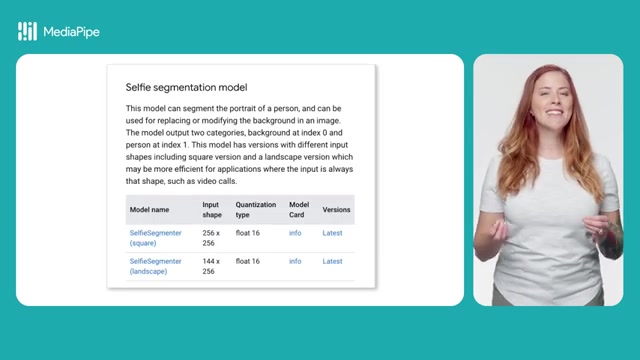
Selfie Segmentation Model: This model excels at segmenting a person from their background, enabling effects like background replacement or modification. It differentiates between 'background' (index 0) and 'person' (index 1). The selfie segmentation model exists in a square variant, with input shape 256x256, and a landscape variant, with input shape 144x256.
-
Hair Segmentation Model: This specialized model isolates a person’s hair, allowing for effects like recoloring or other hair-specific modifications. It outputs segmentation categories for background and hair. The hair segmentation model has an input shape of 512x512.
-
Multi-class Selfie Segmentation Model: Going beyond basic person/background separation, this model identifies areas like hair, skin (both body and face), clothing, and accessories. This provides finer-grained control for effects and analysis. The mutli-class selfie segmentation model has an input shape of 256x256.
-
DeepLab-v3 Model: This general-purpose model identifies a number of categories, including background, person, cat, dog, and potted plant. This model offers broader segmentation capabilities for diverse scenes. The DeepLab-V3 Model has an input shape of 257x257.
Cross-Platform API Availability
MediaPipe provides APIs for a variety of platforms:
- Android: Integrate image segmentation directly into your Android apps for on-device processing.
- Python: Utilize Python for prototyping, research, or backend processing with MediaPipe's segmentation capabilities.
- Web: Bring real-time image segmentation to your web applications, enabling interactive experiences.
More platforms are anticipated in the future, making MediaPipe a versatile choice for any development environment.
WebAssembly (WASM) Support
MediaPipe for web utilizes WebAssembly (WASM), a binary instruction format that allows non-web-based code to run efficiently within the browser. You don't need to fully understand WASM to use MediaPipe, but it's the underlying technology that enables high-performance machine learning tasks directly in the browser.


Most people like
































Report
Please select a reason for reporting
- 13 Reasons to Switch from Snapchat to Text Messaging
- 7 Powerful Speech to Text Apps to Boost Productivity
- 10 Best Speech to Text Tools for Effortless Transcription
- 13 Free Tools to Easily Transcribe Audio to Text
- 15 Surprising Ways Google's Speech-to-Text Boosts Productivity
- 7 Best Free Online Audio to Text Transcription Tools
- 9 Tips to Transcribe Speech to Text Faster and Better
- 13 Best Speech to Text Software for Windows 10 in 2023
- 7 Tips for Choosing the Best Transcriber for Audio to Text
- 11 Reasons Why Dragon Speech-to-Text Apps are Game-Changers
- 6 Secrets to Enhance Your Speech to Text Transcription
- 6 Brilliant Ways to Boost Productivity with Talk-to-Text on Your MacBook
- 6 Ways Transcription Software Converts Audio to Text
- 8 Tips to Transcribe Speech to Text Like a Pro
- 6 Reasons IBM Watson Speech to Text is a Game-Changer
- 14 Powerful Ways Talk-to-Text Improves Your Workflow
- 12 Top Windows Speech-to-Text Software for Efficient Transcription
- 12 Game-Changing Benefits of Apple's Speech to Text Technology
- 9 Powerful Use Cases for AWS Speech to Text Technology
- 10 Easy Steps to Transcribe YouTube Videos to Text
- transcription audio en texte
- online audio transcription
- free audio file transcription
- free ai audio transcription
- audio transcription service
- audio transcription online free
- audio transcription free online
- audio to transcription software
- audio and transcript
- ai audio transcription free
- voice recording to text converter
- translate voice recording to text
- record voice to text
- audio recording to text converter
- voice recording and transcription
- chatgpt voice to text
- gmail voice to text
- speech to text reader
- speech to text ai free
- speech to talk
- Create Engaging Animated Explainer Videos with a Free AI Tool
- Stop Multi-Subscribing: Benchmark Top AI Visual Models in One Canvas
- Best Seedance 2.5 API Provider: Every Price on the Market, Checked at Source
- AI OnlyFans: How to Generate $30,000/Month (Legally)
- Transform Your Script into an Engaging Video with AI Video Maker!
- AI Marketing Automation: A Comprehensive Guide for Small Businesses
- Midjourney Alternative for Anime Art Creators: Why PixAI May Be Better for Character Workflows
- 10 Things Most People Get Wrong About AI Image Search
- AI Girlfriend Apps: Top Choices Redefining Relationships 2025
- How to Reduce Quoting Errors in Salesforce with AI-Assisted Quote Creation
- AI Resume Builders: EnhanceCV, ResumeNerd AI, & Teal Compared
- ResumeAI: Crafting ATS-Optimized Resumes with AI
- AI in Resume Writing: A New Era for Job Seekers
- AI Resume Tools: Streamline Your Job Search and Land Your Dream Role
- AI Resume Optimization: The Right Way to Land Interviews
- Crafting a Killer Resume with AI: A Step-by-Step Guide
- Crafting a Winning Resume: AI Tools and Expert Tips
- AI Job Search: Level Up Your Career with AI Automation
- Empower Your Career Journey: Dynamic Resumes with AI
- AI Resume Builder: Create Professional Resumes Effortlessly

Copyright ©2026 toolify