






















Local AI Image Recognition with OpenCV: A Python Tutorial

Updated on Aug 10,2025

Table of Contents

Artificial Intelligence has revolutionized countless fields, and image recognition is one of its most captivating applications. Imagine being able to identify objects, faces, or even emotions within images, all without relying on external servers or cloud services. This is the power of local AI image recognition, and it's more accessible than you might think. Using Python and the robust OpenCV library, you can build your own AI-powered image analysis tools directly on your computer. This comprehensive guide will walk you through the process step by step, empowering you to harness the potential of local AI image recognition for various exciting projects.

Key Points

Learn how to set up OpenCV, a powerful library for computer vision tasks.

Understand the process of importing images and preparing them for analysis.

Discover how to load pre-trained AI models for image recognition.

Explore the Haar Cascade classifier for face detection.

Implement code to detect faces in images using Python and OpenCV.

Learn to draw rectangles around detected faces to visually highlight results.

Understand the process of converting an image to grayscale for optimal recognition.

Introduction to Local AI Image Recognition

What is Local AI Image Recognition?

Local ai Image Recognition refers to performing image analysis tasks directly on your device (computer, laptop, or even a Raspberry Pi) without sending data to external servers. This approach offers significant advantages, including enhanced privacy, faster processing speeds (especially when dealing with large images or limited internet connectivity), and the ability to operate offline. The core concept involves leveraging pre-trained AI models and computer vision libraries like OpenCV to analyze images and extract meaningful information locally.

This means your image data never leaves your machine, providing a higher level of confidentiality. Further, it eliminates dependency on internet connectivity. This is crucial in situations where network access is unreliable or unavailable. Performing calculations locally reduces latency. This results in faster response times, which are critical for real-time applications such as surveillance systems, robotics, and interactive art installations.

Local AI Image Recognition is suitable for tasks like:

  • Face detection: Identifying faces in photos and videos.
  • Object detection: Recognizing specific objects within an image (e.g., cars, trees, animals).
  • Image classification: Categorizing images based on their content (e.g., landscapes, portraits, food photos).
  • Facial Expression Recognition: Identifying emotions within an image.

Why Use Python and OpenCV for Image Recognition?

Python has become the go-to language for data science and AI due to its simplicity, extensive libraries, and vast community support. OpenCV (Open Source Computer Vision Library) is a powerful and versatile open-source library specifically designed for computer vision tasks. Here's why Python and OpenCV are an ideal combination:

  • Python's Simplicity: Python's easy-to-learn syntax makes it accessible to both beginners and experienced programmers. Its readability simplifies the development and debugging process, thus reducing the time spent in development and deployment.
  • Rich Ecosystem: Python's vast ecosystem of libraries like NumPy, SciPy, and scikit-learn provides the tools for advanced numerical computations and machine learning. Such a rich collection of supporting tools boosts the efficiency and effectiveness of the development process.
  • OpenCV's Functionality: OpenCV offers a comprehensive suite of functions for image processing, feature detection, object tracking, and more. It is optimized for performance, enabling efficient execution of complex algorithms. OpenCV simplifies tasks such as filtering, edge detection, and color manipulation, which are essential for image recognition.
  • Community Support: The active OpenCV community provides extensive documentation, tutorials, and support forums, making it easy to find solutions to common problems. The vibrant community around both Python and OpenCV assures readily available support and resources.
  • Cross-Platform Compatibility: Python and OpenCV are cross-platform, enabling you to develop and deploy your image recognition applications on various operating systems (Windows, macOS, Linux). The capacity to write once and run anywhere lowers development costs and increases flexibility.

Together, Python and OpenCV provide a powerful and efficient platform for building local AI image recognition systems. OpenCV handles the image processing and computer vision aspects, while Python provides the programming structure and integration capabilities.

Advanced Tips for Optimizing Performance

Enhancing Speed and Efficiency

To further optimize the performance of local AI image recognition with OpenCV, consider the following tips:

  1. Reduce Image Size: Processing smaller images significantly reduces computation time. Resize images to the smallest acceptable size while preserving essential details. The optimal resolution varies depending on the complexity of the scene and the size of the objects you are trying to detect. Decreasing the size of the image directly corresponds to a reduction in the number of computations required, speeding up the analysis.

  2. Use Grayscale Images: Convert color images to grayscale, as Haar Cascade classifiers and other feature-based algorithms primarily work with grayscale images. Color information is often unnecessary and increases processing overhead.

  3. Adjust Parameters: Fine-tune parameters in the detectMultiScale function, such as scaleFactor, minNeighbors, and minSize, to optimize the detection process for your specific images.

  4. Hardware Acceleration: Utilize hardware acceleration libraries like CUDA (for NVIDIA GPUs) to offload computations from the CPU to the GPU. The use of GPU enables faster execution of complex algorithms, especially beneficial in real-time applications that require high processing speed.

  5. Multithreading: Implement multithreading to process multiple images concurrently. This is especially effective when dealing with a large dataset or a video stream.

  6. Caching: Cache pre-computed results and frequently used data to avoid redundant computations. The use of memory optimization reduces the number of computations required in each iteration.

Step-by-Step Guide: Implementing Local AI Image Recognition with OpenCV

Step 1: Install OpenCV

Before diving into the code, you need to install the OpenCV library.

This can be easily done using pip, the Python package installer.

  1. Open your terminal or command Prompt.
  2. Type the following command and press Enter:

    pip install opencv-python

    This command downloads and installs the latest version of OpenCV. Once the installation is complete, you are ready to import OpenCV into your Python scripts.

It’s crucial to ensure OpenCV is correctly installed to avoid import errors later in the development process. Always verify the version by importing OpenCV and printing its version number, which can help resolve compatibility issues and utilize the library more efficiently.

Step 2: Import OpenCV and Load the Image

Now that OpenCV is installed, let's import it into your Python script and load an image for analysis.

The following code snippet demonstrates this:

```python
import cv2

# Load the image
image = cv2.imread('path/to/your/image.jpg')

if image is None:
    print("Error: Could not read image")
    exit()
```

*   Replace `'path/to/your/image.jpg'` with the actual path to your image file.
*   The `cv2.imread()` function reads the image and returns a NumPy array representing the image data.
*   It's important to verify that the image is loaded correctly to avoid downstream errors. The `if` statement handles cases where the image cannot be read.

Loading the image correctly is paramount, ensuring that the subsequent image processing steps can proceed without issues. Always double-check the image path and confirm the file exists to streamline the image recognition process.

Step 3: Load the Pre-trained AI Model (Haar Cascade Classifier)

To perform image recognition, you need a pre-trained AI model. One popular model for face detection is the Haar Cascade classifier.
This model is trained to identify faces based on specific features.

```python
# Load the Haar Cascade classifier for face detection
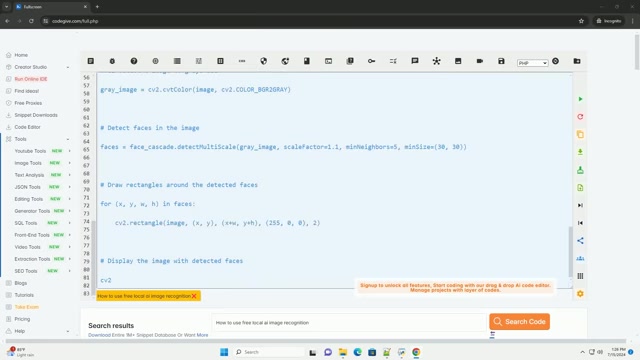
face_cascade = cv2.CascadeClassifier(cv2.data.haarcascades + 'haarcascade_frontalface_default.xml')

if face_cascade.empty():
    raise IOError('Unable to load the face cascade classifier xml file')
```

*   This code loads the Haar Cascade classifier from OpenCV's data directory.
*   The `'haarcascade_frontalface_default.xml'` file contains the pre-trained model for frontal face detection. Make sure to specify the correct file path and confirm that the XML file is available to avoid loading errors. An `IOError` is raised if the file cannot be loaded.

Loading the pre-trained model correctly is vital as it forms the backbone of the face detection process. Ensuring the file path is accurate and accessible is crucial for seamless functionality, and immediate error handling ensures the application remains robust.

Step 4: Perform Image Recognition (Face Detection)

Now, let's use the loaded Haar Cascade classifier to detect faces in the image.
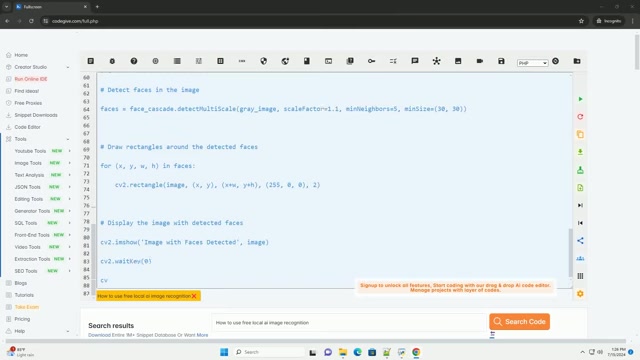
This involves converting the image to grayscale and applying the detectMultiScale function.

```python
# Convert the image to grayscale
gray_image = cv2.cvtColor(image, cv2.COLOR_BGR2GRAY)

# Detect faces in the image
faces = face_cascade.detectMultiScale(gray_image, scaleFactor=1.1, minNeighbors=5, minSize=(30, 30))
```

*   `cv2.cvtColor()` converts the image to grayscale, as Haar Cascade classifiers work best with grayscale images.
*   `detectMultiScale()` detects faces in the grayscale image. Parameters like `scaleFactor`, `minNeighbors`, and `minSize` can be adjusted to fine-tune the detection process.

Parameter Explanation:

  • scaleFactor: Parameter specifying how much the image size is reduced at each image scale.
  • minNeighbors: Parameter specifying how many neighbors each candidate rectangle should have to retain it.
  • minSize: Minimum possible object size. Objects smaller than that are ignored.

Proper grayscale conversion and the adjustment of detection parameters significantly influence the accuracy of face detection, optimizing the algorithm for specific scenarios. Such fine-tuning is crucial for real-world applications to ensure robust performance.

Step 5: Draw Rectangles Around the Detected Faces

To visually highlight the detected faces, draw rectangles around them using the cv2.rectangle() function.

This provides a clear indication of where the faces are located in the image.

```python
# Draw rectangles around the detected faces
for (x, y, w, h) in faces:
    cv2.rectangle(image, (x, y), (x+w, y+h), (0, 255, 0), 2)
```

*   This loop iterates over the detected faces and draws a green rectangle around each one.
*   The `cv2.rectangle()` function takes the image, the top-left corner coordinates `(x, y)`, the bottom-right corner coordinates `(x+w, y+h)`, the color `(0, 255, 0)` (green in BGR format), and the rectangle thickness `2` as parameters.

Drawing rectangles is an essential step for visualizing the results of face detection. This visual confirmation ensures that the algorithm is functioning correctly and identifies potential areas for improvement. Furthermore, it creates a more user-friendly output, making the system accessible to a broader audience.

Step 6: Display the Image with Detected Faces

Finally, display the image with the detected faces using the cv2.imshow() function.

This allows you to see the results of the image recognition process.

```python
# Display the image with detected faces
cv2.imshow('Image with Faces Detected', image)
cv2.waitKey(0)
cv2.destroyAllWindows()
```

*   `cv2.imshow()` displays the image in a window titled `'Image with Faces Detected'`.
*   `cv2.waitKey(0)` waits indefinitely for a key press. It pauses the execution of the script, thus preventing the window from closing immediately.
*   `cv2.destroyAllWindows()` closes all OpenCV windows when a key is pressed.

Displaying the final image is crucial for verifying that the face detection process works as expected. This step completes the cycle from image loading to visual output, offering a straightforward way to validate the AI model's performance and make necessary adjustments.

Pricing

OpenCV and the Haar Cascade Classifier: Free and Open Source

One of the biggest advantages of using OpenCV and the Haar Cascade classifier is that they are both completely free and open source. This means you can use them for personal and commercial projects without incurring any licensing fees.

This accessibility makes it an excellent choice for students, hobbyists, and businesses looking to implement AI image recognition without breaking the bank. The open-source nature also allows you to modify and customize the libraries to suit your specific needs.

Advantages and Disadvantages of OpenCV Local AI

👍 Pros

Enhanced Privacy

Faster Processing

Offline Functionality

Cost-Effective

Customizable

👎 Cons

Limited Computational Resources

Complexity

Model Training Overhead

Maintenance

Scalability limitations

Core Features of OpenCV for Image Recognition

Key functionalities

OpenCV provides a rich set of features that make it an ideal choice for AI image recognition:

  • Image Processing: OpenCV offers a wide range of image processing functions, including filtering, edge detection, color space conversion, and morphological operations.
  • Feature Detection: It includes algorithms for detecting various features in images, such as edges, corners, and keypoints.
  • Object Detection: OpenCV provides pre-trained models and algorithms for detecting objects in images, including face detection, pedestrian detection, and vehicle detection.
  • Video Analysis: It supports video analysis tasks such as object tracking, motion estimation, and video stabilization.
  • Machine Learning: OpenCV integrates with popular machine learning libraries and provides tools for training and deploying custom models.
  • Cross-Platform Support: OpenCV is available on multiple platforms, including Windows, macOS, Linux, Android, and iOS.

Practical Use Cases for Local AI Image Recognition

Real-world applications

Local AI image recognition has a wide array of applications across various industries:

  • Security Systems: Implementing face detection in security cameras for identifying unauthorized personnel.
  • Robotics: Enabling robots to recognize objects and navigate their environment.
  • Automotive Industry: Using object detection for advanced driver-assistance systems (ADAS) to identify traffic signs, pedestrians, and other vehicles.
  • Healthcare: Analyzing medical images for detecting diseases and abnormalities.
  • Retail: Implementing face recognition in stores for customer analytics and personalized shopping experiences.
  • Interactive Art Installations: Creating interactive art installations that respond to facial expressions and gestures.
  • Offline Applications: Developing applications that can perform image recognition tasks without an internet connection.

Frequently Asked Questions (FAQ)

What is OpenCV?
OpenCV (Open Source Computer Vision Library) is a programming library primarily aimed at real-time computer vision. Originally developed by Intel, it is now supported by Willow Garage and Itseez. It is free for both academic and commercial use and has C++, Python, Java, and MATLAB interfaces and supports Windows, Linux, Android and Mac OS.
What is the Haar Cascade classifier?
The Haar Cascade classifier is a machine learning object detection approach where a cascade function is trained from a lot of positive and negative images. It is then used to detect objects in other images. This method was proposed by Paul Viola and Michael Jones in their paper, 'Rapid Object Detection using a Boosted Cascade of Simple Features'.
Can I use OpenCV for commercial purposes?
Yes, OpenCV is licensed under a BSD license, which allows it to be used for commercial purposes without any licensing fees.
What are the system requirements for running OpenCV?
The system requirements for running OpenCV depend on the complexity of the image recognition tasks. However, in general, you need a computer with a reasonable amount of RAM (at least 4GB) and a decent processor. OpenCV can run on Windows, macOS, and Linux.
How accurate is face detection with the Haar Cascade classifier?
The accuracy of face detection with the Haar Cascade classifier depends on various factors such as image quality, lighting conditions, and face orientation. While it can be quite accurate in controlled environments, it may struggle with challenging images.

Related Questions

How can I improve the accuracy of face detection in OpenCV?
Improving the accuracy of face detection in OpenCV involves several strategies that optimize the process, focusing on environmental factors, model fine-tuning, and sophisticated preprocessing techniques. Properly calibrating these elements can significantly enhance the reliability of face detection systems, ensuring robust performance across varying conditions. Here are detailed methods to boost accuracy: Lighting Conditions: Ensure images have uniform and adequate lighting. Poor lighting leads to shadows and reduced contrast, making it difficult for the classifier to identify facial features accurately. Solution: Use diffused lighting or adjust image settings such as brightness and contrast using OpenCV functions to improve feature visibility. Image Resolution and Scale: Use images with sufficient resolution for feature detection. Scaling images down too much can lose critical details. Properly sizing the images can optimize detection. Solution: Experiment with different image sizes to find an optimal balance. Use the cv2.resize() function to adjust image dimensions while preserving aspect ratio. Also, adjust the minSize parameter in the detectMultiScale function to ensure that the algorithm looks for faces within an appropriate size range. Face Orientation: The Haar Cascade classifier is trained primarily on frontal faces. Detection accuracy drops significantly with tilted or profile faces. Solution: Train the classifier on a more diverse set of face orientations or use more advanced algorithms capable of handling various poses. Consider using alternative classifiers or deep learning models trained to recognize different face angles. The integration of a 3D model can help adjust face orientation to help the original classifier detect faces more easily. Background Clutter: Complex backgrounds can confuse the classifier, leading to false positives. Reducing background noise helps focus the detection process on potential faces. Solution: Use background subtraction techniques to isolate potential faces. Apply Gaussian blur to reduce high-frequency noise that may mimic facial features. Carefully calibrating parameters of background noise filtering will help increase accuracy. Classifier Selection and Training: Use appropriate classifiers for specific tasks. The default Haar Cascade is suitable for most frontal face detections, but other cascades or custom-trained models may perform better in specific scenarios. Solution: Explore different pre-trained cascades or train your own classifier using a custom dataset to better suit your application. Techniques such as transfer learning can help fine tune the classifiers. Also, carefully select training data, making sure it represents the range of images where you plan to use face detection. Parameter Optimization: Fine-tune the scaleFactor, minNeighbors, and minSize parameters in the detectMultiScale function to optimize detection for your specific images. Solution: Use a grid search or Bayesian optimization to find the best parameter settings. Adjust scaleFactor to control the scale reduction at each image pyramid level. Adjust minNeighbors to control the minimum number of neighboring rectangles that must be retained.
What are some alternatives to the Haar Cascade classifier?
While the Haar Cascade classifier is a popular choice for face detection due to its speed and simplicity, several other algorithms offer improved accuracy and robustness. Here are some notable alternatives: Local Binary Patterns (LBP): LBP is another feature-based approach but is generally faster than Haar Cascades. Like Haar Cascades, LBP classifiers are also implemented as cascade classifiers and can be trained for various object detection tasks. Pros: Faster computation, relatively simple to implement. Cons: Less robust than Haar Cascades under varying lighting conditions, lower accuracy for complex scenarios. Histogram of Oriented Gradients (HOG): HOG is a feature descriptor used in computer vision and image processing for object detection. It counts occurrences of gradient orientation in localized portions of an image. Pros: More robust to lighting and pose variations compared to Haar Cascades. Cons: Slower than Haar Cascades and LBP, more computationally intensive. Single Shot Detector (SSD): SSD is a popular object detection algorithm that directly predicts object categories and bounding box locations in a single pass, making it faster than region-based methods. Pros: High speed, relatively accurate compared to other single-stage detectors. Cons: May struggle with small objects, requires significant computational resources. You Only Look Once (YOLO): YOLO is another real-time object detection system known for its speed and efficiency. It divides an image into a grid and predicts bounding boxes and class probabilities for each grid cell. Pros: Extremely fast, good for real-time applications. Cons: Less accurate than two-stage detectors, may struggle with overlapping objects. Faster R-CNN: Faster R-CNN is a two-stage object detection algorithm. It first proposes regions of interest and then classifies these regions. Pros: High accuracy, robust to various conditions. Cons: Slower than SSD and YOLO, computationally intensive.

Most people like















