































Table of Contents
- Key Points
- Unlocking the Potential of Microsoft Stream for Video Management
- Optimizing Your Video Content with Microsoft Stream's Advanced Features
- Step-by-Step Guide: Optimizing Your Videos in Microsoft Stream
- Microsoft Stream: Weighing the Benefits and Drawbacks
- Frequently Asked Questions About Microsoft Stream
- Related Questions on Video Management Strategies



Unlocking the Potential of Microsoft Stream for Video Management
What is Microsoft Stream and Why Use It?
Microsoft Stream is a video service within the Microsoft 365 suite designed for businesses and educational institutions. It offers a secure and centralized platform to upload, store, organize, and share video content

. Unlike general video-sharing platforms, Microsoft Stream provides enterprise-grade security, compliance, and integration with other Microsoft tools. By leveraging Microsoft Stream, organizations can ensure their video assets are managed effectively, enhancing internal communications, training programs, and knowledge sharing. Key benefits include:
- Centralized Video Storage: Consolidate video content in one secure location, accessible across the organization.
- Seamless Integration: Works flawlessly with Microsoft Teams, OneDrive, and SharePoint for a unified user experience.
- Enhanced Security: Protect sensitive video content with robust access controls and compliance features.
- AI-Powered Features: Leverage automated transcription, chapter creation, and Copilot integration to optimize video engagement.
- Improved Accessibility: Make video content more accessible to all employees with accurate transcripts and closed captions.
- Better Communication: Enhance internal communications by sharing organizational policies through videos.
Microsoft Stream is more than just a place to store videos; it's a powerful tool for transforming how organizations communicate and collaborate.
Understanding the Integration with Microsoft Teams, OneDrive, and SharePoint
One of Microsoft Stream's greatest strengths is its deep integration with other Microsoft 365 applications. This integration streamlines workflows and enhances user accessibility. Here’s a closer look at how it works:
- Microsoft Teams: Teams meetings can be automatically recorded and stored in Stream
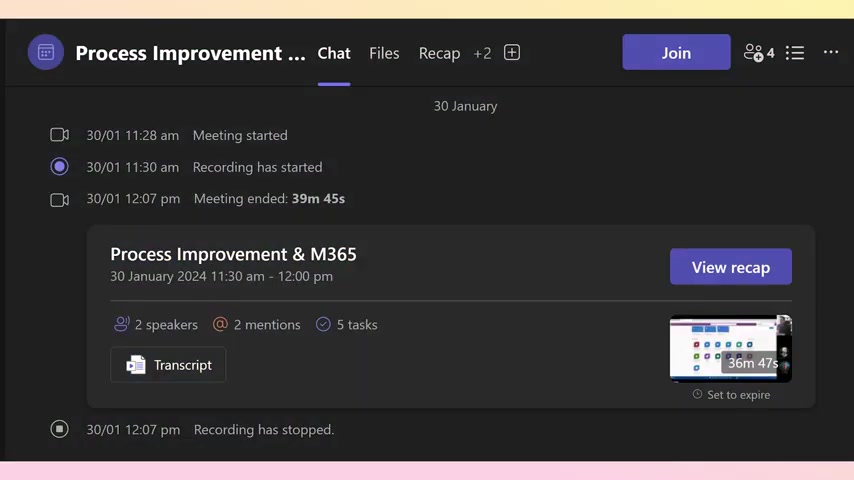
. This makes it easy to revisit discussions, share meeting highlights, and ensure that everyone stays informed, even if they couldn’t attend live.
- OneDrive: Store videos within OneDrive, and they're automatically managed by Stream in the background . This integration provides a convenient way to manage and share video content alongside other files.
- SharePoint: Embed Stream videos directly into SharePoint sites . This allows you to create engaging learning portals, share company announcements, and enhance internal communications.
This interconnected ecosystem ensures that your video content is readily available wherever your teams are working, fostering seamless collaboration and knowledge sharing.
Think of it as a unified video management experience within your existing Microsoft 365 environment, making it incredibly convenient and efficient to use.
Optimizing Your Video Content with Microsoft Stream's Advanced Features
The Power of Trimming: Removing Unwanted Content
Video recordings often contain extraneous material at the beginning or end, such as setup time or post-meeting chatter. Video Trimmer offers a simple way to cut those sections from a clip. Microsoft Stream’s trimming feature allows you to easily remove these unwanted sections, creating a polished and professional viewing experience
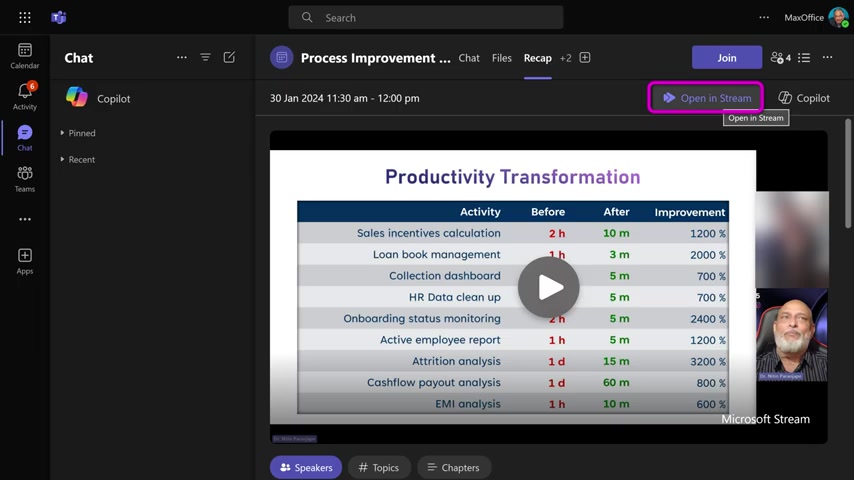
. The ability to trim video is extremely important for all types of videos but specifically when it comes to Training Videos, App Usage Videos, Policy Explanations, Reference Videos, Technical Videos or Safety Videos.
To trim a video in Microsoft Stream:
- Navigate to the video within Microsoft Stream.
- Click the 'Update video details' icon.
- Select the 'Trim video' tab.
- Use the trimming handles to adjust the start and end points of the video.
- Click 'Apply' to save the changes.
This simple yet powerful feature ensures that viewers focus on the most relevant content, saving time and improving engagement. It also helps protect sensitive information that may have been shared before or after the meeting's official start.
Generating and Utilizing Transcripts for Enhanced Accessibility and Searchability
Accessibility is a critical aspect of effective video management. Microsoft Stream automatically generates transcripts for your videos, making them accessible to a wider audience, including those with hearing impairments. The transcript can also be downloaded and can be reused with other applications such as YouTube. More importantly Stream automatically generates a transcript

. Accurate transcripts significantly improve the searchability of your video content. Users can quickly find specific information within a video by searching the transcript, saving time and enhancing the overall viewing experience.
To generate a transcript in Microsoft Stream:
- Navigate to the video within Microsoft Stream.
- Select 'Video settings' .
- Enable the 'Transcript and captions' option.
- Microsoft Stream will automatically generate a transcript.
- Choose the correct 'Spoken language' . For example, 'English (India)' .
It’s important to choose the correct spoken language to ensure the transcript is highly accurate. Once the transcript is generated, you can easily navigate through the video by clicking on specific sections within the transcript. In addition, Stream gives you the ability to search for specific keywords inside the transcript . Also you can easily download the transcript to repurpose.
Creating Chapters for Easy Navigation
For longer videos, creating chapters can significantly improve the viewing experience. Chapters allow viewers to quickly jump to specific sections of interest, making it easier to navigate through the content and find the information they need. Microsoft Stream allows you to manually create chapters within your videos, providing a structured and user-friendly viewing experience

.
To create chapters in Microsoft Stream:
- Navigate to the video within Microsoft Stream.
- Select 'Video settings'.
- Enable the 'Chapters' option.
- Click on 'Generate'.
You can also click 'Go to chapters' to edit any existing chapters

. Chapter creation is an invaluable tool for improving the usability of your video content.
Harnessing the Power of Copilot in Stream
For Microsoft 365 users with Copilot, Stream’s capabilities get supercharged, because Copilot gives you better search results . Copilot is an AI-powered productivity tool designed to enhance your workflow. Within Microsoft Stream, Copilot helps you summarize video content, identify key topics, list action items, and answer questions related to the video .
To use Copilot in Microsoft Stream:
- Navigate to the video within Microsoft Stream.
- Click the 'Copilot' button on the right-hand side of the screen .
Copilot then provides you with a summary of the key topics, action items and more information on the video. It also offers the opportunity to ask questions to the Copilot chatbot .
Step-by-Step Guide: Optimizing Your Videos in Microsoft Stream
Step 1: Uploading Your Video to Microsoft Stream
The first step is to upload your video to Microsoft Stream. You can do this directly from the Stream platform or through integrated applications like Microsoft Teams, OneDrive, or SharePoint.
-
From Microsoft Stream:
- Log in to Microsoft Stream with your Microsoft 365 account.
- Click the 'Create' button and select 'Upload video'.
- Choose the video file from your computer and upload it to Microsoft Stream.
-
From Microsoft Teams:
- Record a meeting in Microsoft Teams.
- The recording will automatically be saved to Microsoft Stream.
-
From OneDrive or SharePoint:
- Upload the video file to OneDrive or SharePoint.
- Microsoft Stream will automatically detect and manage the video in the background.
After uploading, remember to rename your video appropriately

for easier identification.
Step 2: Trimming Unwanted Sections
Once your video is uploaded, trim any unwanted sections to create a polished viewing experience. This is especially useful for recorded meetings or training videos.
- Navigate to the video within Microsoft Stream.
- Click the 'Update video details' icon.
- Select the 'Trim video' tab.
- Use the trimming handles to adjust the start and end points of the video.
- Click 'Apply' to save the changes.
Step 3: Generating a Transcript and Captions
Generate a transcript and captions for your video to improve accessibility and searchability.
- Navigate to the video within Microsoft Stream.
- Select 'Video settings'.
- Enable the 'Transcript and captions' option.
- Verify the spoken language and click 'Generate'.
- Review the generated transcript for accuracy and make any necessary corrections.
Step 4: Creating Chapters for Easy Navigation
Create chapters within your video to provide a structured and user-friendly viewing experience.
- Navigate to the video within Microsoft Stream.
- Select 'Video settings'.
- Enable the 'Chapters' option.
- Microsoft Stream will automatically generate Chapters or click on 'Go to Chapters' to manually add additional Chapters .








Most people like


































Report
Please select a reason for reporting
- 13 Reasons to Switch from Snapchat to Text Messaging
- 7 Powerful Speech to Text Apps to Boost Productivity
- 10 Best Speech to Text Tools for Effortless Transcription
- 13 Free Tools to Easily Transcribe Audio to Text
- 15 Surprising Ways Google's Speech-to-Text Boosts Productivity
- 7 Best Free Online Audio to Text Transcription Tools
- 9 Tips to Transcribe Speech to Text Faster and Better
- 13 Best Speech to Text Software for Windows 10 in 2023
- 7 Tips for Choosing the Best Transcriber for Audio to Text
- 11 Reasons Why Dragon Speech-to-Text Apps are Game-Changers
- 6 Secrets to Enhance Your Speech to Text Transcription
- 6 Brilliant Ways to Boost Productivity with Talk-to-Text on Your MacBook
- 6 Ways Transcription Software Converts Audio to Text
- 8 Tips to Transcribe Speech to Text Like a Pro
- 6 Reasons IBM Watson Speech to Text is a Game-Changer
- 14 Powerful Ways Talk-to-Text Improves Your Workflow
- 12 Top Windows Speech-to-Text Software for Efficient Transcription
- 12 Game-Changing Benefits of Apple's Speech to Text Technology
- 9 Powerful Use Cases for AWS Speech to Text Technology
- 10 Easy Steps to Transcribe YouTube Videos to Text
- transcription audio en texte
- online audio transcription
- free audio file transcription
- free ai audio transcription
- audio transcription service
- audio transcription online free
- audio transcription free online
- audio to transcription software
- audio and transcript
- ai audio transcription free
- voice recording to text converter
- translate voice recording to text
- record voice to text
- audio recording to text converter
- voice recording and transcription
- chatgpt voice to text
- gmail voice to text
- speech to text reader
- speech to text ai free
- speech to talk
- How SEO and Marketing Dashboards Empower Agencies to Drive Results
- How to Use AI Tools to Find Internal Linking Opportunities Across a Business Website
- Discover Your Perfect Haircut with AI Hairstyle Apps
- Free Reputation Calculator Tools: How They're Adapting to Score AI Visibility, Not Just Rankings
- Design Professional Flyers for Free on Your Phone
- Best Free Flyer Maker Apps for Android: Design Like a Pro
- How to Know If Your Business Is Ready for an AI Customer Service Agent
- Revolutionizing Storytelling: From Novels to Screenplays with AI
- Create Engaging Animated Explainer Videos with a Free AI Tool
- Stop Multi-Subscribing: Benchmark Top AI Visual Models in One Canvas
- ASOMobile Helps Teams Benchmark App Store Screenshots Against Competitors
- How to Match LMS Software With Your Organization's Training Plan
- Revolutionizing Email Marketing Agency with AI
- How to Convert BTC to HNT
- Unleashing the Power of AI: Cognizant's Roadmap for Transformation
- Frame to Video Review: A Practical Look at Turning Two Still Frames Into Motion
- NVIDIA NIM: Revolutionizing Supply Chain Data Analysis with AI
- Top AI Tools That Help Brands Stand Out Offline (Not Just Online)
- Top 5 Cold Email Software: Maximize Your Outreach in 2025
- Magic School AI: Revolutionizing Quiz & Assessment Generation

Copyright ©2026 toolify