































Table of Contents
- Key Points for OpenAI API Mastery
- Unlocking the Power of OpenAI with Python
- Enhancing Functionality with Image Inputs
- Crafting a Seamless User Experience
- OpenAI API Python project: Advantages and Disadvantages
- Frequently Asked Questions
- Related Questions


Unlocking the Power of OpenAI with Python
Getting Started with the OpenAI API
Embarking on an AI-driven project with the OpenAI API requires a few essential steps. First, you need to obtain an API key from OpenAI. This key acts as your project's credential, allowing it to access OpenAI's powerful AI models.

To do that, head over to platform.openai.com/api-keys.
The OpenAI API Key: Your Gateway to AI
Your OpenAI API Key is your digital passport to a world of AI possibilities. It allows your applications to communicate with OpenAI's models, enabling you to perform tasks such as image analysis, text generation, and more. Creating a secure key is paramount for your project.
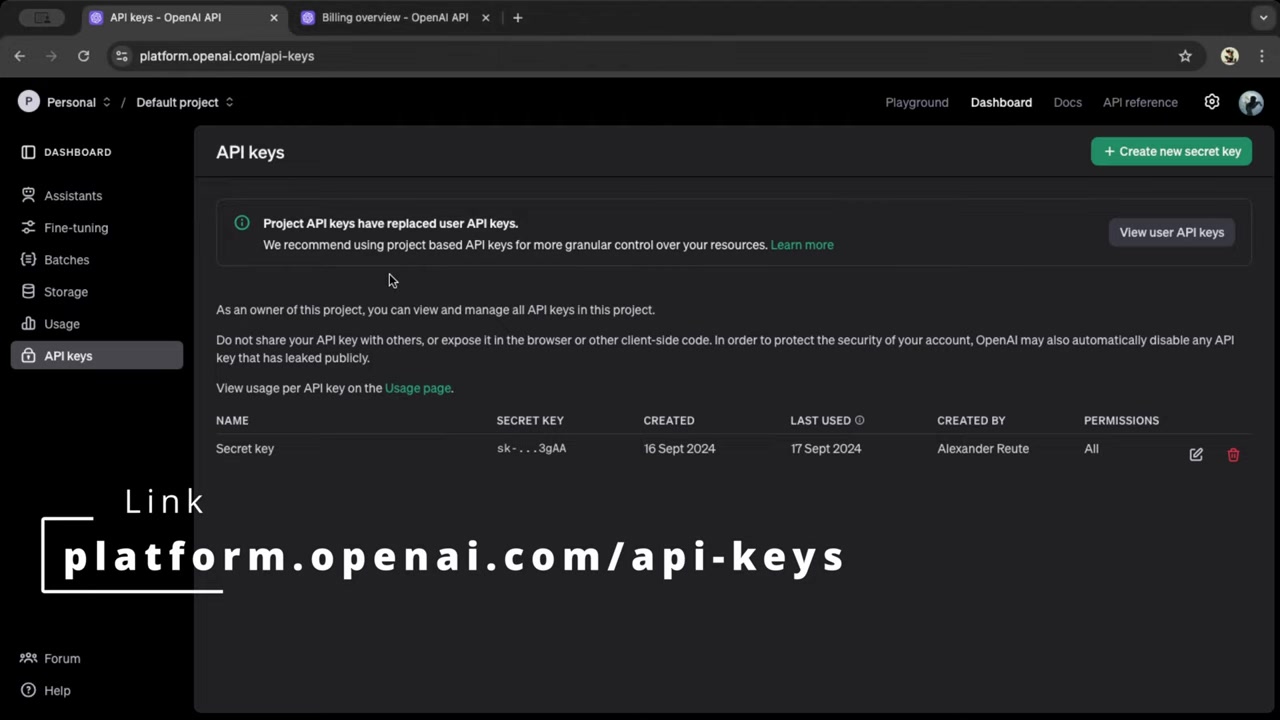
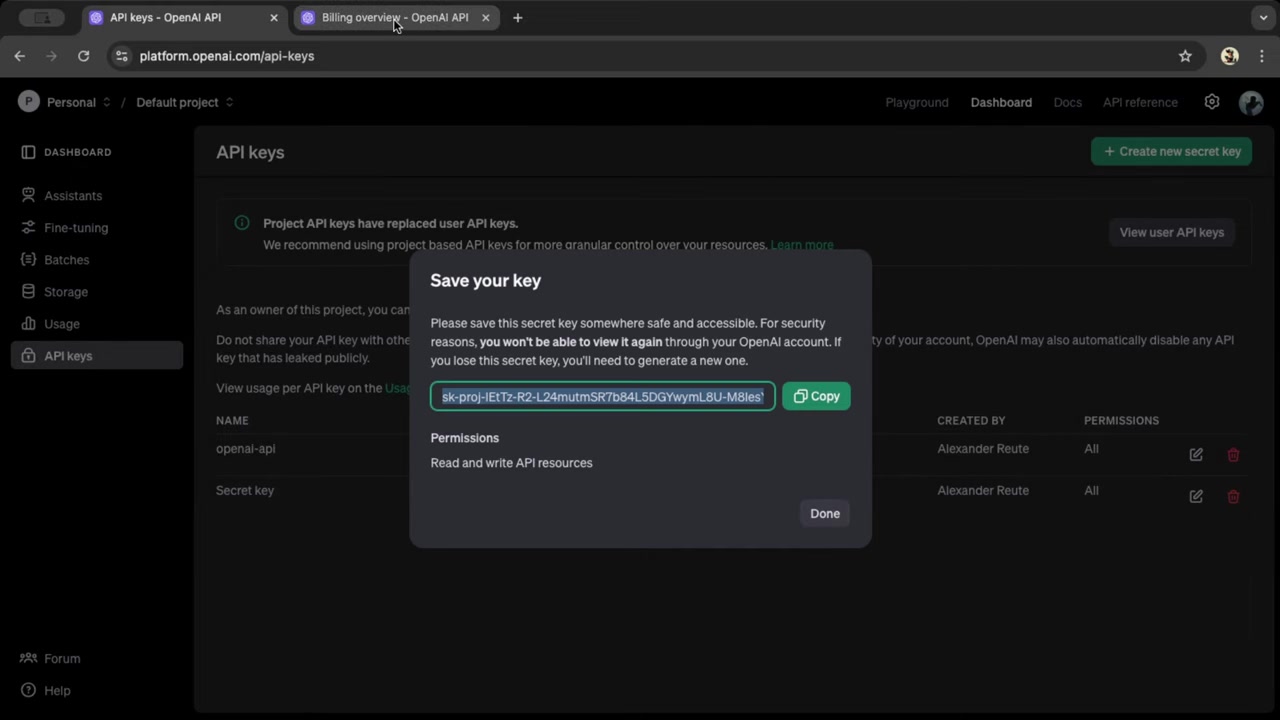
Click the "Create new secret key" button, providing a descriptive name for your key and then click create secret key. Once generated, keep the key accessible, as it will be needed for coding and remember never to publicly share this key.
Billing Considerations for the OpenAI API
Important to note: while the OpenAI API opens doors to incredible AI capabilities, it does not offer a completely free tier. Understanding and setting up billing is crucial to ensure your project can run without interruption.
You'll need to configure a payment method and add credit to your OpenAI account. You can navigate to billing by going to platform.openai.com/settings. Select billing in the left hand menu, add your payment method or enable auto recharge.
Setting Up Your Python Environment
With your API key in HAND and billing configured, it's time to set up your Python environment. The following steps Outline the initial setup. Make sure you have Python installed. It is recommended to utilize a virtual environment to manage dependencies for the project.
Key Steps:
- Install Required Libraries: Use pip to install the
openaiandpython-dotenvlibraries. Thepython-dotenvlibrary will help manage environmental variables. - Creating a
.envFile: To store API keys securely, create a.envfile and set your API key as an environment variable (e.g.,OPENAI_API_KEY=YOUR_API_KEY). - Importing Libraries: Import necessary libraries in your Python script.
This is the sample code structure to get started.
Text-to-Text interactions with the OpenAI API
Now we're ready to dive into the API related code. Let's start by setting up text-to-text interaction
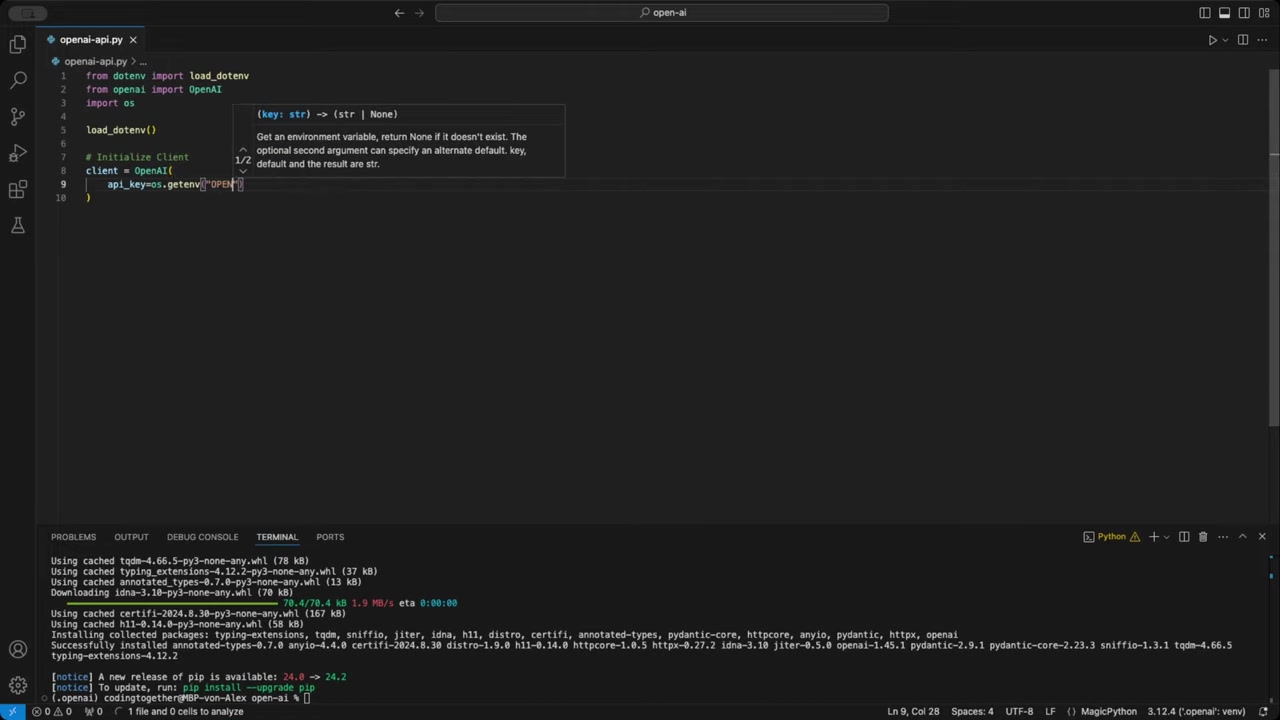
. The code example stores the API key in a .env file and set up the .env module to access this key in the code. If you are unfamilar with this setup, see the link in the description. This code will then Prompt the OpenAI API and return a basic response.
from dotenv import load_dotenv
import os
import openai

load_dotenv()

client = openai.OpenAI(
    api_key=os.getenv("OPENAI_API_KEY")
)

chat_completion = client.chat.completions.create(
    model="gpt-4o",
    max_tokens=300,
    messages=[
        {
            "role": "user",
            "content": [
                {
                    "type": "text",
                    "text": "How are you?"
                }
            ]
        }
    ]
)
print(chat_completion.choices[0].message.content)
Refactoring for Clarity
Refactoring is essential for making your code clean, maintainable, and easy to understand. Taking the time to refactor can significantly improve the overall quality and readability of your project. A cleaner, better-structured codebase translates to less time spent debugging and a more enjoyable development experience.
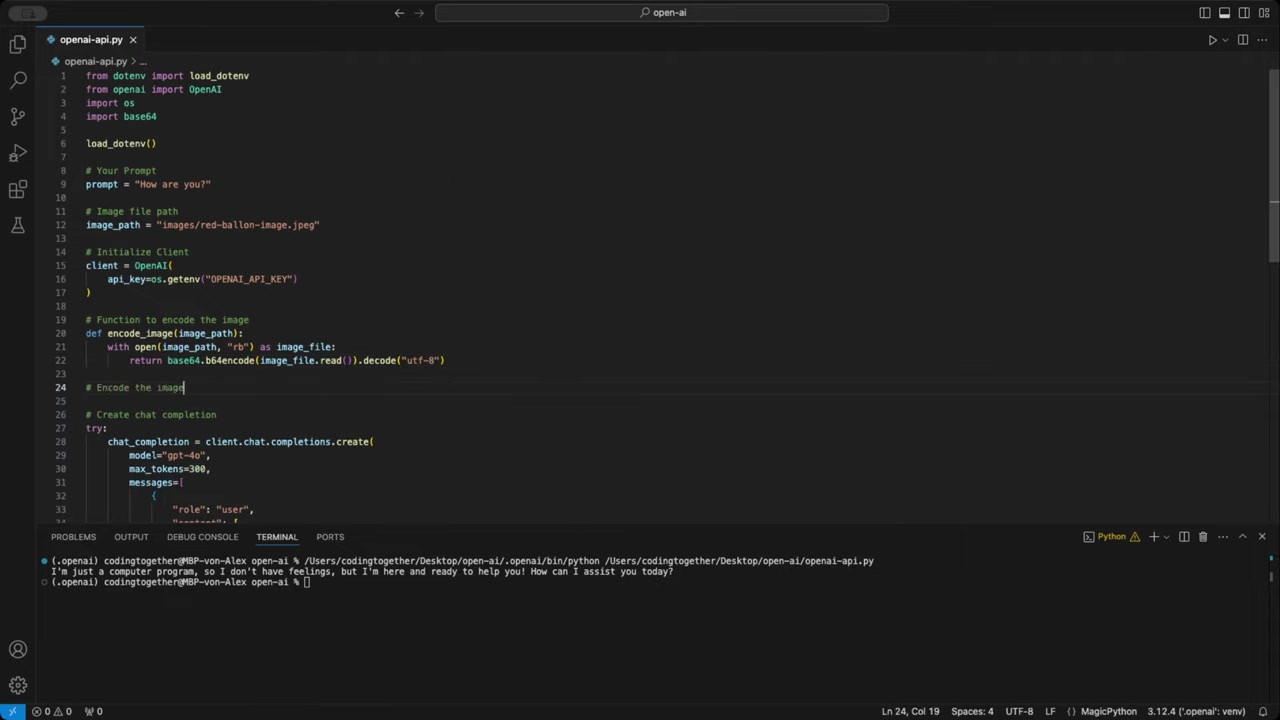
This includes extracting prompt text, adding descriptions for upload, and more robust request structure.
Enhancing Functionality with Image Inputs
Encoding Images for OpenAI API
To send images to the OpenAI API, you must encode them into a Base64 STRING, which is a text-based representation of the image data. This allows the API to handle the image data within a JSON format
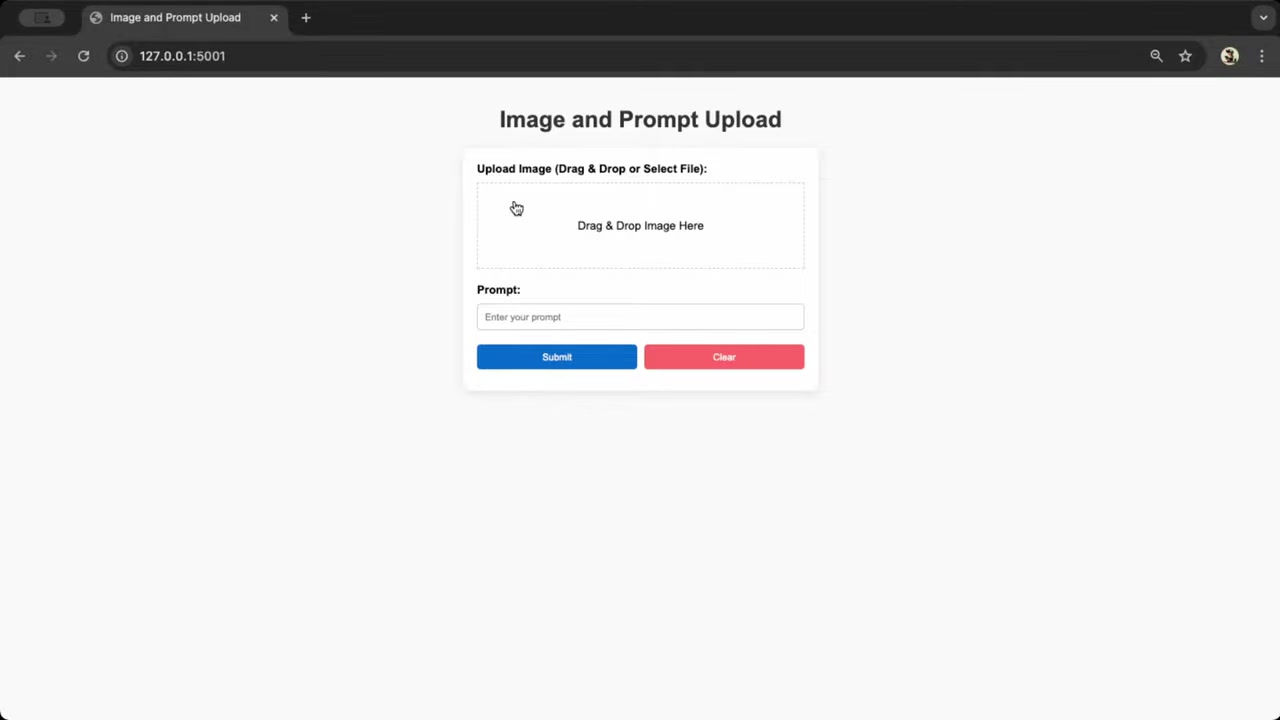
.Here's how to encode an image using Python:
How to Process and Incorporate into your Code
Encoding the image involves several key steps and code implementation, described as follows:
- Defining the Function: Begin by defining the encode_image function, which takes the image path as an argument.
- Reading Image Data: Open the image file in binary-read mode ('rb') to read the raw bytes.
- Encoding to Base64: Use the base64 module to encode the binary data into a Base64 string.
- Decoding to UTF-8: Decode the Base64 bytes into a UTF-8 string for JSON compatibility.
- Returning the Encoded String: Return the resulting Base64-encoded string.
import base64
def encode_image(image_path): with open(image_path, "rb") as image_file: return base64.b64encode(image_file.read()).decode('utf-8')
After that, we will then need to update the main section of the code to include the functions from above.Incorporating Image Data into your request to the API
With the encoding code in place, let's incorporate the image data to be processed by the API in your OpenAI API request.
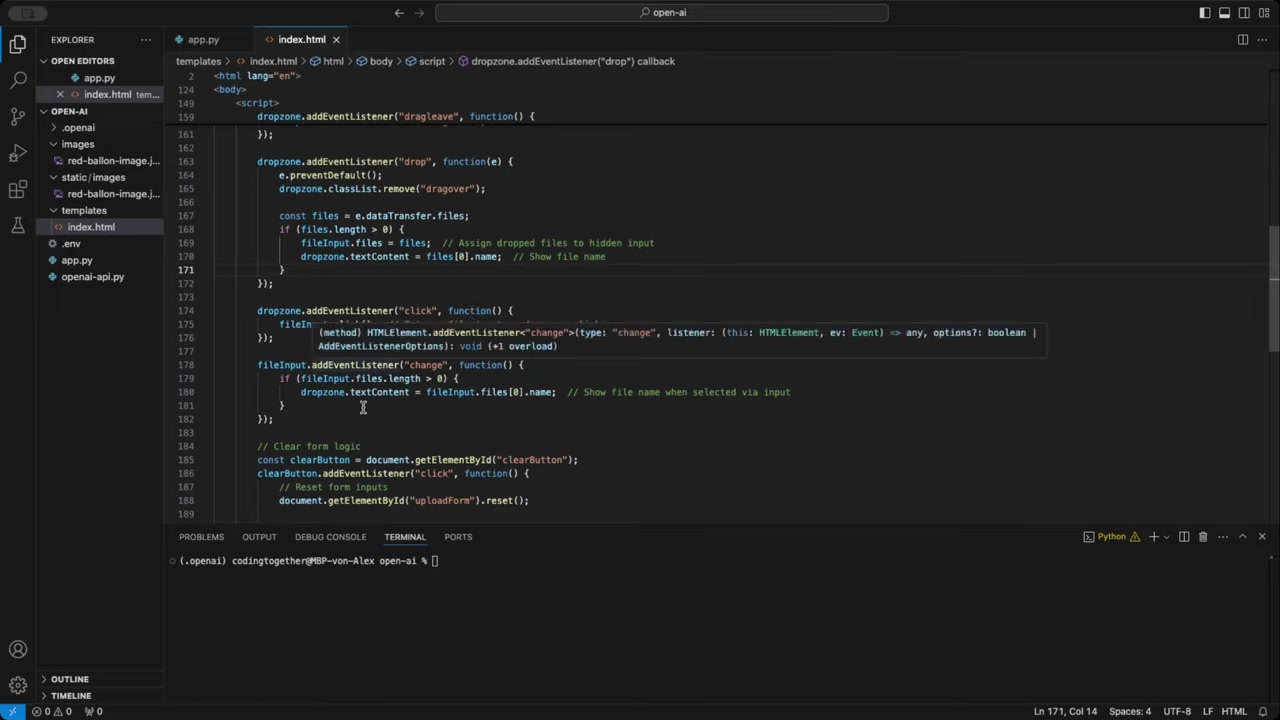
This is accomplished via a new set of lines of code, containing type and url parameters. See below for reference:
base64_image = encode_image(image_path)

chat_completion = client.chat.completions.create(
    model="gpt-4o",
    max_tokens=300,
    messages=[
        {
            "role": "user",
            "content": [
                {
                    "type": "text",
                    "text": "What do you see on this image?"
                },
                {
                    "type": "image_url",
                    "image_url": f"data:image/jpeg;base64,{base64_image}"
                }
            ]
        }
    ]
)
print(chat_completion.choices[0].message.content)





Most people like



































Report
Please select a reason for reporting
- 13 Reasons to Switch from Snapchat to Text Messaging
- 7 Powerful Speech to Text Apps to Boost Productivity
- 10 Best Speech to Text Tools for Effortless Transcription
- 13 Free Tools to Easily Transcribe Audio to Text
- 15 Surprising Ways Google's Speech-to-Text Boosts Productivity
- 7 Best Free Online Audio to Text Transcription Tools
- 9 Tips to Transcribe Speech to Text Faster and Better
- 13 Best Speech to Text Software for Windows 10 in 2023
- 7 Tips for Choosing the Best Transcriber for Audio to Text
- 11 Reasons Why Dragon Speech-to-Text Apps are Game-Changers
- 6 Secrets to Enhance Your Speech to Text Transcription
- 6 Brilliant Ways to Boost Productivity with Talk-to-Text on Your MacBook
- 6 Ways Transcription Software Converts Audio to Text
- 8 Tips to Transcribe Speech to Text Like a Pro
- 6 Reasons IBM Watson Speech to Text is a Game-Changer
- 14 Powerful Ways Talk-to-Text Improves Your Workflow
- 12 Top Windows Speech-to-Text Software for Efficient Transcription
- 12 Game-Changing Benefits of Apple's Speech to Text Technology
- 9 Powerful Use Cases for AWS Speech to Text Technology
- 10 Easy Steps to Transcribe YouTube Videos to Text
- transcription audio en texte
- online audio transcription
- free audio file transcription
- free ai audio transcription
- audio transcription service
- audio transcription online free
- audio transcription free online
- audio to transcription software
- audio and transcript
- ai audio transcription free
- voice recording to text converter
- translate voice recording to text
- record voice to text
- audio recording to text converter
- voice recording and transcription
- chatgpt voice to text
- gmail voice to text
- speech to text reader
- speech to text ai free
- speech to talk
- Revolutionizing Storytelling: From Novels to Screenplays with AI
- Create Engaging Animated Explainer Videos with a Free AI Tool
- Stop Multi-Subscribing: Benchmark Top AI Visual Models in One Canvas
- Best Seedance 2.5 API Provider: Every Price on the Market, Checked at Source
- AI OnlyFans: How to Generate $30,000/Month (Legally)
- Transform Your Script into an Engaging Video with AI Video Maker!
- AI Marketing Automation: A Comprehensive Guide for Small Businesses
- Midjourney Alternative for Anime Art Creators: Why PixAI May Be Better for Character Workflows
- 10 Things Most People Get Wrong About AI Image Search
- AI Girlfriend Apps: Top Choices Redefining Relationships 2025
- Python Random Name Generator Tutorial
- Generate Unique Names with Python Random Name Generator
- Code a JavaScript Name Generator
- Create a Fun Name Generator App - Easy JavaScript Project!
- Experience Roblox's Avatar Creation for Karl Jacobs!
- May TBR Game: How a Letter Generator Chooses My Reads
- AI Celebrity Chat: Hilarious Pick-Up Lines & Chatbot Chaos!
- Embrace Chaos with the Random Makeup Challenge
- Boost Audience Engagement with the Wheel of Names
- Engage Your Audience with the Wheel of Names!

Copyright ©2026 toolify