































Table of Contents
- Key Points
- Creating a Print-Ready Pamphlet in Microsoft Word
- How to Design Pamphlets
- Pros and Cons of Using Microsoft Word for Pamphlet Design
- FAQ
- Related Questions


Creating a Print-Ready Pamphlet in Microsoft Word
Setting Up Your Document for Print
Before you begin designing, it's crucial to set up your Microsoft WORD document correctly. This ensures that your finished pamphlet or leaflet will print as intended. First, you'll need to determine the appropriate page size for your project. For a single-page leaflet, the A5 size is a common choice as it is half the size of an A4 sheet, making it economical for printing and distribution. Go to the 'Layout' tab.
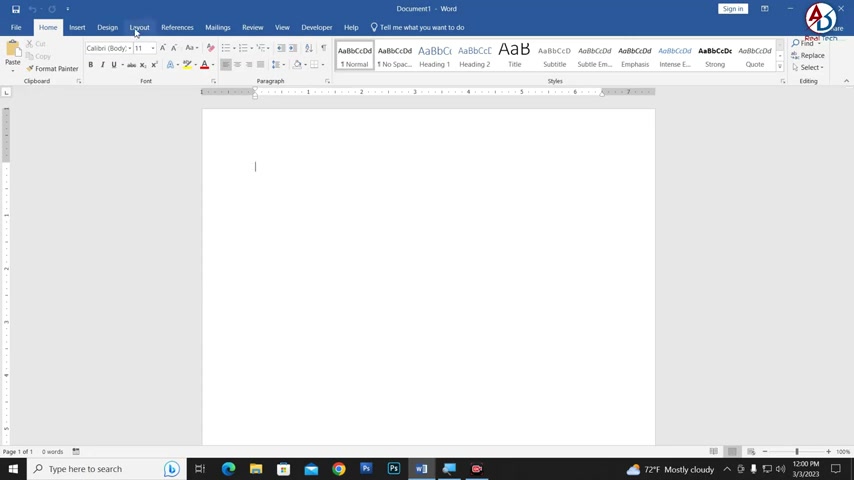
Then, select ‘Size’ and choose ‘A5’. This sets the Dimensions of your working area.
Next, you will adjust the margins. Narrow margins maximize the usable space on the page, allowing for more content and a less cramped design. Click on ‘Margins’ under the ‘Layout’ tab and select ‘Narrow’. This sets all margins to 0.5 inches. Proper pamphlet creation relies heavily on these foundational steps to create a print-ready Microsoft Word leaflet.
Crafting an Attractive Design
With the document settings configured, you can now focus on the visual design of your pamphlet. The first step is to create a background for your text. This can be achieved by inserting a Shape, such as a rectangle, that covers the entire page. Go to the 'Insert' tab, click ‘Shapes’, and select the rectangle tool. Drag the Cursor across the page to create a rectangle that fills the entire A5 space.
Consider using gradient fills to add depth and visual interest to your rectangle, this gradient color design can make the design appealing. Right-click on the rectangle and select ‘Format Shape’. In the ‘Format Shape’ panel, choose ‘Gradient fill’ under the ‘Fill’ options. Customize the gradient stops to create a unique color Blend. A subtle gradient of green to yellow, for instance, can create a fresh and inviting feel.
Add a bold color band at the top by inserting another rectangle for a visual header. This will serve as a container for the name. Remember to change the colour, if the Outline shape is appearing odd then adjust to match well. Use different font size to make the main design eye-catching.
Adding Text and Images for Impact
Now it's time to populate your pamphlet with compelling content. Start by adding the name of your school, company, or event. Use the 'Insert' tab to add a text box over your design. Select the ‘WordArt’ option for a more Stylized look. Type your text. Choose a bold font that is easy to read, such as Arial Black and increase the Font size until it is prominent.
Then, you can add an image as well! Choose images that are high quality and Relevant to the content. Compress images to the size appropriate. Then finally, add your points, bullet points and necessary contact details!






Most people like





































Report
Please select a reason for reporting
- 13 Reasons to Switch from Snapchat to Text Messaging
- 7 Powerful Speech to Text Apps to Boost Productivity
- 10 Best Speech to Text Tools for Effortless Transcription
- 13 Free Tools to Easily Transcribe Audio to Text
- 15 Surprising Ways Google's Speech-to-Text Boosts Productivity
- 7 Best Free Online Audio to Text Transcription Tools
- 9 Tips to Transcribe Speech to Text Faster and Better
- 13 Best Speech to Text Software for Windows 10 in 2023
- 7 Tips for Choosing the Best Transcriber for Audio to Text
- 11 Reasons Why Dragon Speech-to-Text Apps are Game-Changers
- 6 Secrets to Enhance Your Speech to Text Transcription
- 6 Brilliant Ways to Boost Productivity with Talk-to-Text on Your MacBook
- 6 Ways Transcription Software Converts Audio to Text
- 8 Tips to Transcribe Speech to Text Like a Pro
- 6 Reasons IBM Watson Speech to Text is a Game-Changer
- 14 Powerful Ways Talk-to-Text Improves Your Workflow
- 12 Top Windows Speech-to-Text Software for Efficient Transcription
- 12 Game-Changing Benefits of Apple's Speech to Text Technology
- 9 Powerful Use Cases for AWS Speech to Text Technology
- 10 Easy Steps to Transcribe YouTube Videos to Text
- transcription audio en texte
- online audio transcription
- free audio file transcription
- free ai audio transcription
- audio transcription service
- audio transcription online free
- audio transcription free online
- audio to transcription software
- audio and transcript
- ai audio transcription free
- voice recording to text converter
- translate voice recording to text
- record voice to text
- audio recording to text converter
- voice recording and transcription
- chatgpt voice to text
- gmail voice to text
- speech to text reader
- speech to text ai free
- speech to talk
- How SEO and Marketing Dashboards Empower Agencies to Drive Results
- How to Use AI Tools to Find Internal Linking Opportunities Across a Business Website
- Discover Your Perfect Haircut with AI Hairstyle Apps
- Free Reputation Calculator Tools: How They're Adapting to Score AI Visibility, Not Just Rankings
- Design Professional Flyers for Free on Your Phone
- Best Free Flyer Maker Apps for Android: Design Like a Pro
- How to Know If Your Business Is Ready for an AI Customer Service Agent
- Revolutionizing Storytelling: From Novels to Screenplays with AI
- Create Engaging Animated Explainer Videos with a Free AI Tool
- Stop Multi-Subscribing: Benchmark Top AI Visual Models in One Canvas
- My Brand New Logo: AI-Powered Logo Design for Startups
- Create Stunning Logos with Free AI Logo Generator!
- AI Logo Maker: Design a Stunning Logo in Minutes
- Elevate Your Zoom Experience with Enhanced Name Tags by Warmly
- Top 5 AI Logo Makers in 2025: Design a Stunning Brand
- Creative Fabrica's AI Tools: Flow, Studio, and Font Generator
- Create Stunning Logos with Canva's Free AI Logo Generator
- Create Professional and Memorable Logos with LogoMaker.ai
- Design Your Own Font: A Step-by-Step Guide with Vectornator Pro
- AI Font Generator: Revolutionizing Typeface Design with AI

Copyright ©2026 toolify