































Table of Contents


Creating Your QR Code Attendance System
Why Use a QR Code Attendance System?
Traditional methods of tracking student attendance can be time-consuming and disruptive. Calling out names or circulating a sign-in sheet eats into valuable learning time and can be prone to errors. A QR code attendance system offers a modern, efficient alternative.
Benefits of using QR Codes for Attendance:
- Speed: Students can check in Instantly by scanning a QR code with their smartphone . No more waiting in lines or disrupting the class.
- Accuracy: Automated data capture eliminates manual errors and ensures accurate attendance records.
- Security: Unique QR codes for each student prevent fraudulent check-ins.
- Cost-Effective: This method utilizes free or low-cost tools, making it accessible to any classroom.
- Efficiency: Teachers save time and can focus on instruction rather than administrative tasks.
This solution will allow teachers and educators to take advantage of a quick and secure classroom attendance system.
Step 1: Generating QR Codes with Google Slides
The first step involves creating student ID cards with unique QR codes.
Google Slides provides a simple and free platform to design these IDs.
- Create a New presentation: Open Google Slides by going to
slides.new. - Customize Page Setup: Navigate to
File > Page Setup. Select "Custom" and set the Dimensions to match a typical smartphone screen (e.g., 6.5 cm x 15.5 cm). This ensures that the ID card is easily viewable on a phone. - Design the Student ID: Design a template, for example, add your school logo or school board details. You can include placeholders for student photos, names, and an expiry date. Use double curly brackets
{{ }}to denote these placeholders. For example,{{Image}}for the student's photo,{{FirstName}} {{LastName}}for the name, and{{ExpiryDate}}for the validity period. - Add a QR Code Placeholder: Insert another image placeholder and label it
{{QRCode}}. This is where a unique QR code will be generated for each student. - Save the ID Card Template: Name your Google Slides presentation something descriptive like "Student ID Cards."
- We highly suggest setting up a size similar to what you might find on a cell phone. This means you are working vertically
Step 2: Setting Up Your Data in Google Sheets
Now you are going to setup google sheets, this will enable a good backend setup of data, here are the steps.
- Create a New Google Sheet: Open Google Sheets by going to
sheets.new. Name it something descriptive like "Attendance Data". - Set Up Column Headers: Create columns for the following data points that match your template for the student ID card in google slide:
StudentID,FirstName,LastName,DateOfBirth,Photo,Program,ExpiryDate, and importantly,QRCode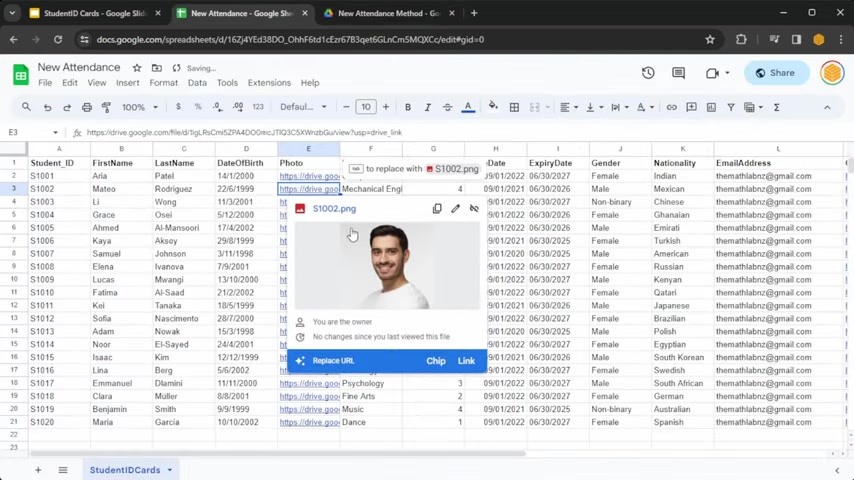
. You can add more columns, if your student ID card includes them.
- Populate Student Data: Fill the rows with the Relevant information for each student. For the "Photo" column, insert the shareable Google Drive link of each student's photo.
- Generate QR Codes:
- Navigate to
Extensions > Add-ons > Get add-ons. - Search for and install the "Document Studio" add-on by Digital Inspiration.
- After installation, navigate to
Extensions > Document Studio > Open - In the
QRCodecolumn, enter the formula=QRCODE(StudentID). This will generate a QR code based on each student's unique ID, that the system can use. - If it still doesn't come up, type
=QRCODEto find that the document has been added.
- Navigate to
Step 3: Automating the Attendance System with AppSheet
AppSheet will be used to scan your system with your phone, it can make your attendance system efficient.
- Create an App from Google Sheets: In your "Attendance Data" Google Sheet, go to
Extensions > AppSheet > Create an app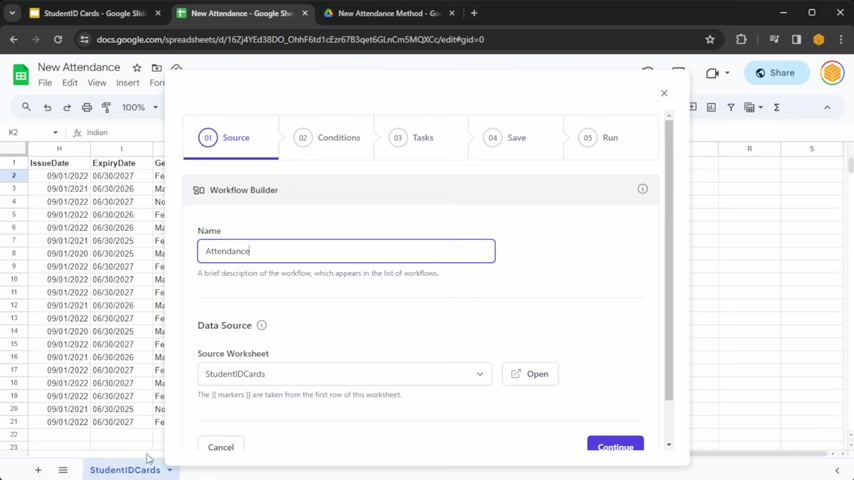
. AppSheet will automatically generate a basic app based on your spreadsheet data.
- Customize Your App:
- In the AppSheet editor, navigate to
Data. If you do not already have your excel document linked to AppSheet, press the+Add data Button. To connect to your Google Sheet. The scanner must be setup before the student table is set up . - Create two tabels:
ScannerandStudents. For the scanned data that has been put into the scanner sheet. - Select all the information for scanner and students such as name and student ID.
- If you want to have a separate list based on different classes or something like that, it is also possible.
- In scanner for data type, select all the data and show to prevent people from changing. The exception is the field that contains the student id, which you will need to check. This requires you to enable the scanner.
- In the AppSheet editor, navigate to
- Configure the Scanner: In the AppSheet editor, navigate to
Views. Change to a form by selecting “form” in the View type and use Scanner to connect from excel. - Testing: Download appsheet on the appstore to take advantage of the app, and use the scan to see how the data is flowing





Most people like


































Report
Please select a reason for reporting
- 13 Reasons to Switch from Snapchat to Text Messaging
- 7 Powerful Speech to Text Apps to Boost Productivity
- 10 Best Speech to Text Tools for Effortless Transcription
- 13 Free Tools to Easily Transcribe Audio to Text
- 15 Surprising Ways Google's Speech-to-Text Boosts Productivity
- 7 Best Free Online Audio to Text Transcription Tools
- 9 Tips to Transcribe Speech to Text Faster and Better
- 13 Best Speech to Text Software for Windows 10 in 2023
- 7 Tips for Choosing the Best Transcriber for Audio to Text
- 11 Reasons Why Dragon Speech-to-Text Apps are Game-Changers
- 6 Secrets to Enhance Your Speech to Text Transcription
- 6 Brilliant Ways to Boost Productivity with Talk-to-Text on Your MacBook
- 6 Ways Transcription Software Converts Audio to Text
- 8 Tips to Transcribe Speech to Text Like a Pro
- 6 Reasons IBM Watson Speech to Text is a Game-Changer
- 14 Powerful Ways Talk-to-Text Improves Your Workflow
- 12 Top Windows Speech-to-Text Software for Efficient Transcription
- 12 Game-Changing Benefits of Apple's Speech to Text Technology
- 9 Powerful Use Cases for AWS Speech to Text Technology
- 10 Easy Steps to Transcribe YouTube Videos to Text
- transcription audio en texte
- online audio transcription
- free audio file transcription
- free ai audio transcription
- audio transcription service
- audio transcription online free
- audio transcription free online
- audio to transcription software
- audio and transcript
- ai audio transcription free
- voice recording to text converter
- translate voice recording to text
- record voice to text
- audio recording to text converter
- voice recording and transcription
- chatgpt voice to text
- gmail voice to text
- speech to text reader
- speech to text ai free
- speech to talk
- Meshy AI: How to Create 3D Models from Text and Images
- How SEO and Marketing Dashboards Empower Agencies to Drive Results
- How to Use AI Tools to Find Internal Linking Opportunities Across a Business Website
- Discover Your Perfect Haircut with AI Hairstyle Apps
- Free Reputation Calculator Tools: How They're Adapting to Score AI Visibility, Not Just Rankings
- Design Professional Flyers for Free on Your Phone
- Best Free Flyer Maker Apps for Android: Design Like a Pro
- How to Know If Your Business Is Ready for an AI Customer Service Agent
- Revolutionizing Storytelling: From Novels to Screenplays with AI
- Create Engaging Animated Explainer Videos with a Free AI Tool
- Meshy AI: How to Create 3D Models from Text and Images
- ASOMobile Helps Teams Benchmark App Store Screenshots Against Competitors
- How to Match LMS Software With Your Organization's Training Plan
- Revolutionizing Email Marketing Agency with AI
- How to Convert BTC to HNT
- Unleashing the Power of AI: Cognizant's Roadmap for Transformation
- Frame to Video Review: A Practical Look at Turning Two Still Frames Into Motion
- NVIDIA NIM: Revolutionizing Supply Chain Data Analysis with AI
- Top AI Tools That Help Brands Stand Out Offline (Not Just Online)
- Top 5 Cold Email Software: Maximize Your Outreach in 2025

Copyright ©2026 toolify