































Table of Contents
- Key Points
- Getting Started with the Background Remover Addon in Blender
- Advanced Tips for Reference Image Modeling
- Setting Up Your Blender Workspace and Using the Background Remover
- Pros and Cons of Using the Background Remover Addon
- FAQ
- Related Questions


Getting Started with the Background Remover Addon in Blender
Introducing the AI-Powered Background Remover
The Background Remover tool is an innovative addon for Blender that simplifies the process of removing backgrounds from images. This tool is based on an AI-powered API, which means you don't need extensive technical skills to achieve professional results. The key is its ease of use. Installation is a breeze, and the setup is incredibly straightforward. This addon is particularly beneficial for artists and designers who frequently use reference images in their 3D modeling workflow.
Installing the Background Remover Addon
Installing the Background Remover is like installing any other Blender addon.
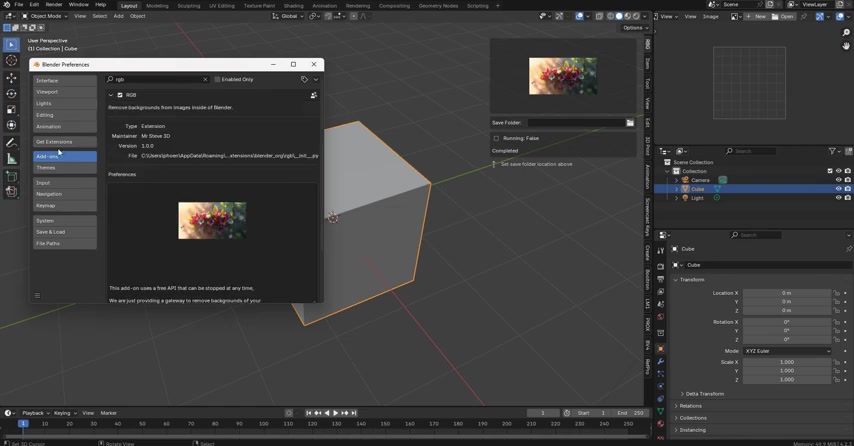
Once you've downloaded the addon, navigate to Edit > Preferences > Add-ons. Click the 'Install' button and select the addon file. Enable the addon by checking the box next to its name. After enabling the addon, you may need to install additional modules. The addon will Prompt you to install the 'gradio client,' which is essential for the AI-powered background removal functionality. Clicking the install button will automatically download and install the necessary components, usually within 5-10 seconds. Once installed, you can either close the preferences window or proceed to set your save folder.
Configuring the Save Folder for Background Removal Results
Setting a save folder is crucial for quickly accessing your background-removed images. You can set the save folder directly within the addon preferences or in the N-panel.
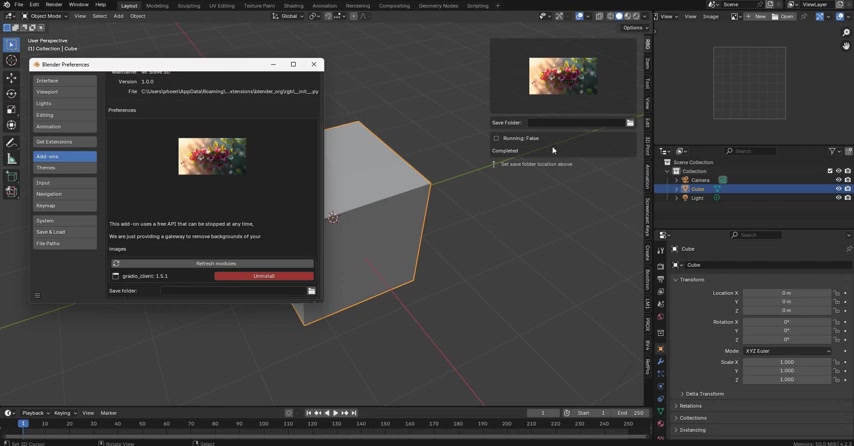
The save folder location in the addon preferences is the same as the one in the N-panel. Click the folder icon, and a file browser will appear. Choose your desired save location and click 'Accept'. This ensures that all images processed with the Background Remover are automatically saved to your specified location, saving you time and keeping your project organized.
Setting Up Your Blender Workspace and Using the Background Remover
Splitting Your Workspace for Efficient Image Editing
For a streamlined workflow, it’s recommended to split your Blender workspace.
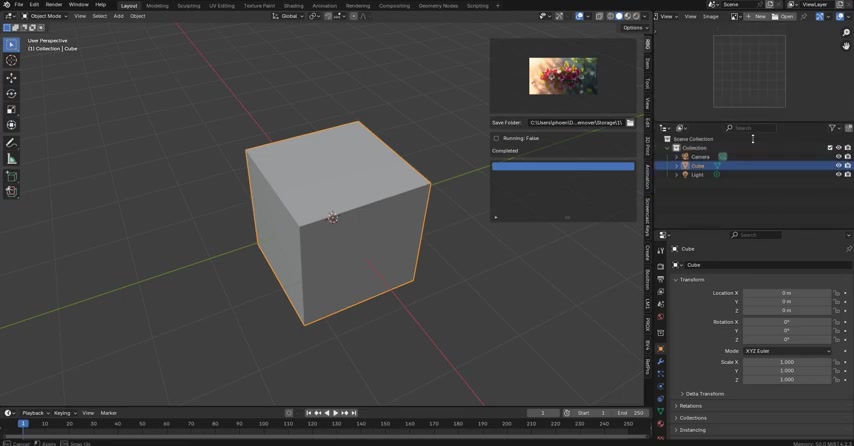
This allows you to view and manage your images efficiently while working on your 3D models. Start by positioning your Cursor at the corner of a panel until you see a double arrow. Right-click and select 'Horizontal Split'. This divides the panel into two separate areas. In the new panel, change the editor type to 'Image Editor'. This setup allows you to have your 3D Viewport and Image Editor visible simultaneously.
Loading an Image into the Image Editor
Now that your workspace is set up, you need to load the image you want to process. In the image editor panel, click 'Open' and navigate to the location of your image.
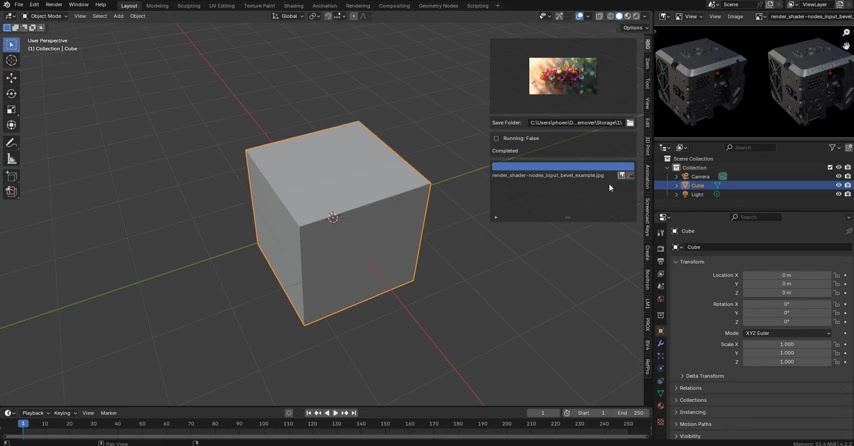
Select the image and click 'Open Image'. The image will now appear in the Image Editor, ready for background removal. It’s essential to load the image into the Image Editor because the addon directly interacts with images loaded this way.
Removing the Background with the Addon
With the image loaded into the Image Editor, you can now use the Background Remover. In the N-panel, locate the filename of your loaded image, usually found near the 'Save Folder' settings.
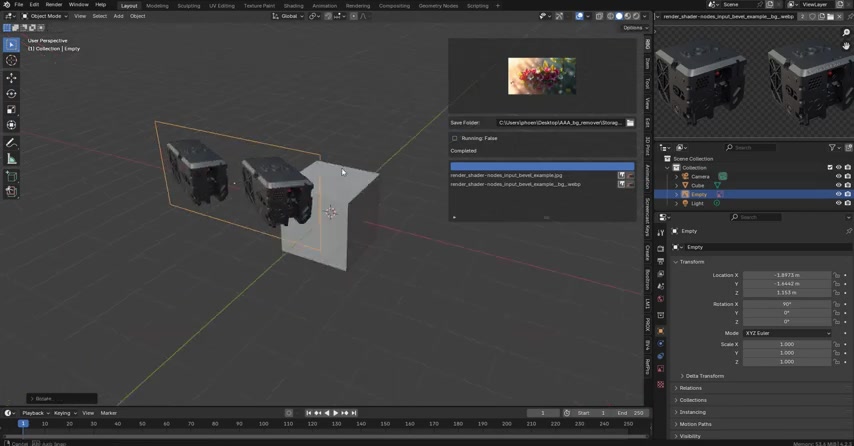
Next to the filename, you will see a button labeled 'Remove BG'. Click this button. The addon will then begin processing the image, sending it to the AI-powered API for background removal. You will see a 'Running: True' message, indicating that the process is active. Depending on your computer and internet connection, the process may take a few seconds. Once completed, the addon will save the image with the background removed as a WebP file in your specified save folder.
Importing and Using the Background-Removed Image
After the background is removed, the resulting WebP image is saved in your chosen folder. You can now import this image into your Blender scene as a reference. To do this, simply drag and drop the WebP file from your file explorer into the 3D Viewport. This creates an 'Empty' object in Blender that displays the image. To further customize the image, select the Empty object and go to the 'Object Data Properties' tab. Here, you can adjust settings like opacity, allowing you to fine-tune how the reference image appears in your scene. Adjust the opacity to your liking and use the image as a clean reference for your modeling projects.






Most people like































Report
Please select a reason for reporting
- 13 Reasons to Switch from Snapchat to Text Messaging
- 7 Powerful Speech to Text Apps to Boost Productivity
- 10 Best Speech to Text Tools for Effortless Transcription
- 13 Free Tools to Easily Transcribe Audio to Text
- 15 Surprising Ways Google's Speech-to-Text Boosts Productivity
- 7 Best Free Online Audio to Text Transcription Tools
- 9 Tips to Transcribe Speech to Text Faster and Better
- 13 Best Speech to Text Software for Windows 10 in 2023
- 7 Tips for Choosing the Best Transcriber for Audio to Text
- 11 Reasons Why Dragon Speech-to-Text Apps are Game-Changers
- 6 Secrets to Enhance Your Speech to Text Transcription
- 6 Brilliant Ways to Boost Productivity with Talk-to-Text on Your MacBook
- 6 Ways Transcription Software Converts Audio to Text
- 8 Tips to Transcribe Speech to Text Like a Pro
- 6 Reasons IBM Watson Speech to Text is a Game-Changer
- 14 Powerful Ways Talk-to-Text Improves Your Workflow
- 12 Top Windows Speech-to-Text Software for Efficient Transcription
- 12 Game-Changing Benefits of Apple's Speech to Text Technology
- 9 Powerful Use Cases for AWS Speech to Text Technology
- 10 Easy Steps to Transcribe YouTube Videos to Text
- transcription audio en texte
- online audio transcription
- free audio file transcription
- free ai audio transcription
- audio transcription service
- audio transcription online free
- audio transcription free online
- audio to transcription software
- audio and transcript
- ai audio transcription free
- voice recording to text converter
- translate voice recording to text
- record voice to text
- audio recording to text converter
- voice recording and transcription
- chatgpt voice to text
- gmail voice to text
- speech to text reader
- speech to text ai free
- speech to talk
- Revolutionizing Storytelling: From Novels to Screenplays with AI
- Create Engaging Animated Explainer Videos with a Free AI Tool
- Stop Multi-Subscribing: Benchmark Top AI Visual Models in One Canvas
- Best Seedance 2.5 API Provider: Every Price on the Market, Checked at Source
- AI OnlyFans: How to Generate $30,000/Month (Legally)
- Transform Your Script into an Engaging Video with AI Video Maker!
- AI Marketing Automation: A Comprehensive Guide for Small Businesses
- Midjourney Alternative for Anime Art Creators: Why PixAI May Be Better for Character Workflows
- 10 Things Most People Get Wrong About AI Image Search
- AI Girlfriend Apps: Top Choices Redefining Relationships 2025
- Python Random Name Generator Tutorial
- Generate Unique Names with Python Random Name Generator
- Code a JavaScript Name Generator
- Create a Fun Name Generator App - Easy JavaScript Project!
- Experience Roblox's Avatar Creation for Karl Jacobs!
- May TBR Game: How a Letter Generator Chooses My Reads
- AI Celebrity Chat: Hilarious Pick-Up Lines & Chatbot Chaos!
- Embrace Chaos with the Random Makeup Challenge
- Boost Audience Engagement with the Wheel of Names
- Engage Your Audience with the Wheel of Names!

Copyright ©2026 toolify