































Table of Contents
- Key Points
- Mastering the Unreal Engine 5 Rendering Workflow
- AI Upscaling for Unreal Engine 5 Renders
- How to Optimize Color Grading with DaVinci Resolve After Upscaling
- Pros and Cons of Using AI Upscaling in UE5 Rendering
- Frequently Asked Questions
- Related Questions



Mastering the Unreal Engine 5 Rendering Workflow
Unreal Engine 5: Initial Setup for Movie Rendering
To begin your rendering journey in Unreal Engine 5, it's essential to properly configure the Movie Render Queue. This powerful tool allows you to export high-quality cinematics and image sequences, catering to diverse project needs. Here's a detailed walkthrough:
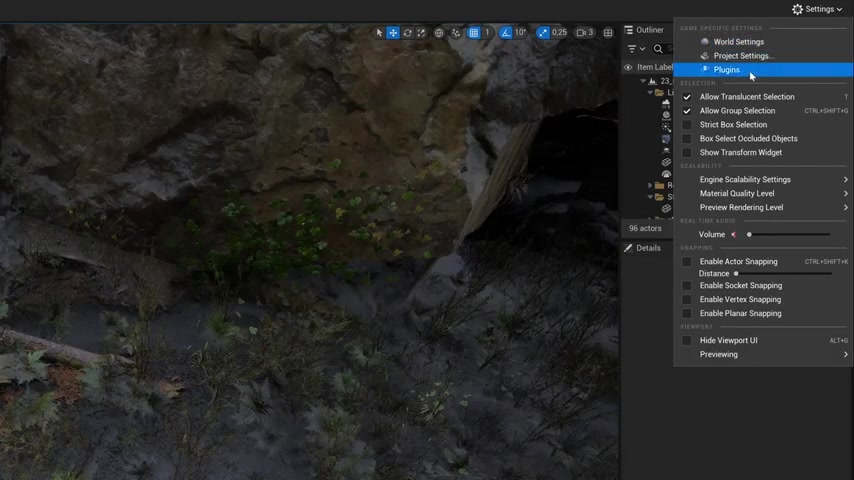
- Activating the Movie Render Queue Plugin: First, ensure the Movie Render Queue plugin is enabled. Navigate to Edit > Plugins and search for “Movie Render Queue.” Activate the plugin and restart Unreal Engine if prompted. This step is fundamental for unlocking the advanced rendering features UE5 offers.
- Accessing the Render Queue: After enabling the plugin, you can access the render queue through the Cinematics dropdown menu. Choose Movie Render Queue. This will open a dedicated window for managing your render jobs.
- Adding a Render Job: To begin rendering your scene, click on + Render. This will Prompt you to select the sequence or level you want to render. Select your master sequence to initiate the rendering process.
By following these steps, you lay the groundwork for achieving stunning visuals and optimized render times within Unreal Engine 5. The Movie Render Queue is your central hub for controlling and customizing the entire rendering pipeline. Remember to experiment with the different settings to find the perfect balance between quality and performance for your specific project requirements. Key UE5 rendering techniques, proper setup and optimal UE5 configurations are paramount.
Understanding Key Unreal Engine 5 Export Settings
Unreal Engine 5 offers a multitude of export settings that significantly impact the final render quality and file size. Choosing the right format and configuring the settings correctly are vital for achieving optimal results. Let's explore the key settings to consider:
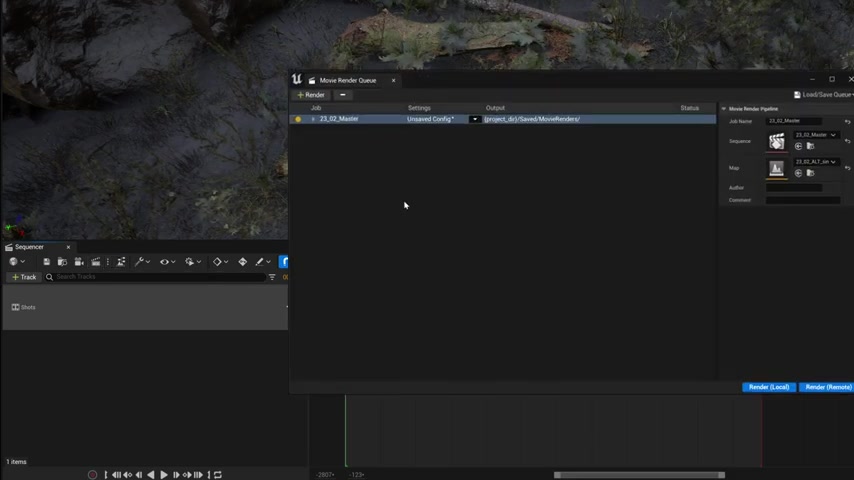
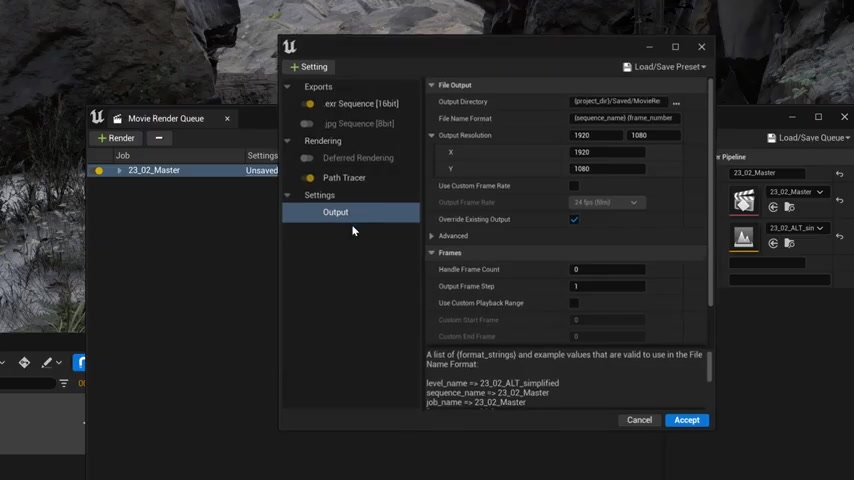
- File Format Selection: Selecting the right file format is crucial. UE5 supports various formats, including JPEG, PNG, and EXR sequences. While JPEG offers small file sizes, its compression can introduce artifacts, making it unsuitable for final renders. PNG provides lossless compression, retaining image quality but resulting in larger files. EXR is the recommended format for final renders due to its high dynamic range and ability to store more detailed information, particularly in bright light areas.
- EXR Compression: When using EXR, you can choose the compression method. For final renders, it’s best to set the compression to None to avoid any loss of detail. Although this increases file size, it ensures maximum control during post-production.
- Deferred Rendering vs. Path Tracer: Unreal Engine 5 offers two primary rendering modes: Deferred Rendering and Path Tracer. Deferred Rendering is the default, offering a faster rendering process and a viewport representation that closely matches the final output. However, it might not be as accurate in terms of lighting compared to Path Tracer. Path Tracer, similar to Cycles in Blender, uses ray tracing to simulate light more accurately, resulting in more realistic visuals. The Path Tracer requires more computational power, increasing render times significantly. For superior UE5 visualization control and greater post-production flexibility, EXR is paramount.
| File Format | Compression | Recommended Use Case |
|---|---|---|
| JPEG | Lossy | Quick previews, non-critical assets |
| PNG | Lossless | Intermediate files, assets requiring good image quality |
| EXR | None | Final renders, high dynamic range, post-production |
Understanding and adjusting these export settings are fundamental for optimizing the rendering process in Unreal Engine 5. Experimentation is key to finding the perfect balance between quality and efficiency for your specific project. Effective UE5 rendering optimization begins here.
Rendering Modes: Deferred vs. Path Tracer
Unreal Engine 5 provides two distinct rendering modes: Deferred Rendering and Path Tracer. Understanding the nuances of each mode is critical for achieving the desired visual fidelity and performance in your projects.
Deferred Rendering:
- What it is: Deferred rendering is the default rendering mode in UE5. It prioritizes speed and efficiency, making it suitable for real-time applications and Game development. What you see in the viewport is very close to what you get in the final render.
- Pros: Faster render times, real-time capabilities, viewport accuracy.
- Cons: Can lack the lighting accuracy of path tracing, may require more manual tweaking.
Path Tracer:
- What it is: Path Tracer is a more advanced rendering mode that utilizes ray tracing to simulate light interactions more accurately. It's similar to Cycles in Blender and offers more realistic lighting and shadows.
- Pros: Superior lighting accuracy, more realistic visuals, better for cinematic rendering.
- Cons: Significantly slower render times, requires powerful hardware.
To switch to Path Tracer mode, you need to enable Hardware Ray Tracing in the project settings under Edit > Project Settings > Platforms > Windows > Targeted RHIs. Then, in the Movie Render Queue settings, select Path Tracer as the rendering method.
Remember that Path Tracer is significantly more demanding on your hardware. However, it provides a level of realism that is difficult to achieve with Deferred Rendering, especially in scenes with complex lighting scenarios. To preview path tracing inside the editor set the view mode to path tracing in the viewport drop down menu. Select the path tracing from the drop down list. Master your UE5 lighting workflows by understanding these core components.
Game Overrides and Anti-Aliasing: Enhancing UE5 Visuals
To significantly boost render quality beyond the default settings, Unreal Engine 5 offers Game Overrides and Anti-Aliasing options within the Movie Render Queue. These tools enable you to bypass scalability limitations and control image smoothness, further refining your final visuals.
Game Overrides:
- Functionality: Game Overrides allow you to override the current engine scaling settings, ensuring the render utilizes maximum quality settings, regardless of viewport configurations. This is particularly useful when building a scene with reduced scalability to avoid overloading your system.
- Cinematic Quality Settings: By enabling Game Overrides and setting the engine to Cinematic Quality, you force the render to use the most detailed Level of Detail (LOD) settings, ensuring that every asset is rendered with maximum fidelity.
Anti-Aliasing:
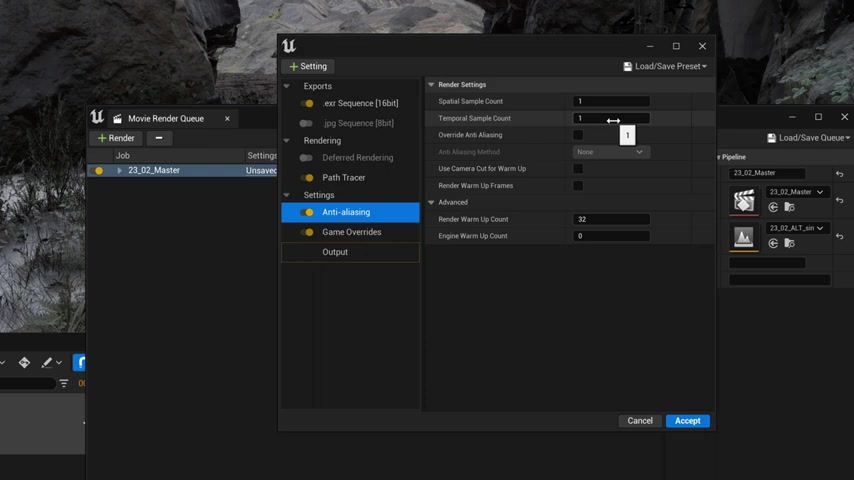
- Functionality: Anti-aliasing settings control the amount of sampling used for each frame, reducing jagged edges and creating smoother visuals. This is particularly important for high-resolution renders.
- Spatial and Temporal Samples: You can adjust the Spatial Sample Count and Temporal Sample Count to control the quality of anti-aliasing. For Deferred Rendering, using either spatial or temporal samples can improve image quality. However, for Path Tracing, it is recommended to use both for best results.
- Override Anti-Aliasing: Ensure you check the Override Anti-Aliasing option to enable your custom settings. Without this, UE5 might ignore your specified sampling values.
Utilizing both Game Overrides and Anti-Aliasing within the Movie Render Queue gives you granular control over your render quality. Experiment to find the right balance between visual fidelity and performance, ensuring your final output is both stunning and efficient. Tailor UE5 quality control with these pro techniques.
Console Variables: Pushing UE5 Rendering Limits
To further fine-tune the rendering process in Unreal Engine 5, console variables offer a powerful set of tools to push the quality even further. One particularly useful command is screenpercentage, which allows you to upscale the render internally before exporting, enhancing visual fidelity.
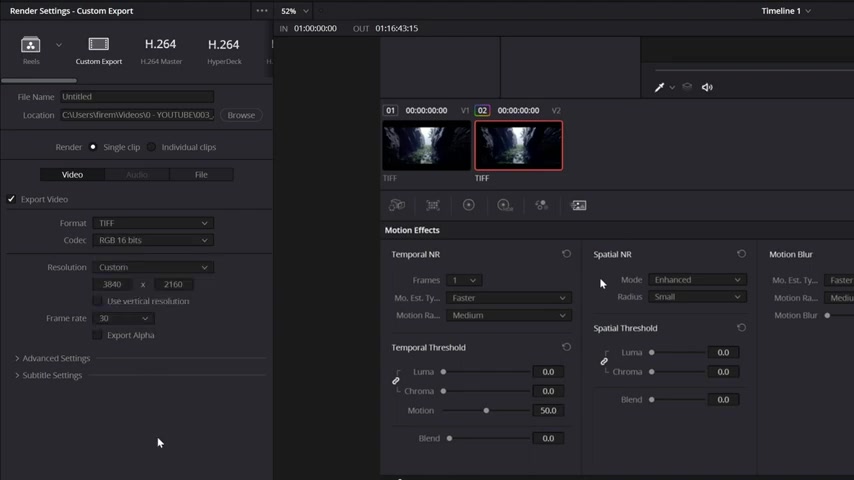
screenpercentageCommand: This command scales the render resolution internally. For instance, settingscreenpercentageto 150 renders the scene at 1.5 times the target resolution before downsampling it to the desired output resolution. This effectively increases the level of detail and reduces aliasing artifacts.- Syntax: To use this command, add a Console Variables setting to your render job in the Movie Render Queue. Add the line
r.screenpercentage 150(or your desired percentage) to the Start Console Commands list.
However, exercise caution when using screenpercentage, as it can significantly increase render times. It’s crucial to test its impact on performance before rendering an entire sequence. Balancing visual quality and render time is key. This allows you to refine your UE5 visual effects achieving a high-quality final result without excessive rendering time. Proper UE5 workflow efficiency depends on this balance.
AI Upscaling for Unreal Engine 5 Renders
Understanding the AI Upscaling Workflow
AI upscaling is a powerful technique for enhancing the resolution of your Unreal Engine 5 renders without incurring the significant time costs associated with rendering at higher resolutions natively. By rendering at a lower resolution and then using AI algorithms to intelligently increase the resolution, you can achieve visually stunning results while optimizing render times.
Here’s a breakdown of the key benefits:
- Reduced Render Times: By rendering at a lower resolution (e.g., 1080p instead of 4K), you significantly decrease the computational load, resulting in much faster render times.
- Enhanced Visual Quality: AI upscaling algorithms can intelligently fill in missing details and enhance existing ones, producing a final image that closely resembles a native high-resolution render.
- Post-Production Flexibility: AI upscaling allows you to experiment with different resolutions and upscaling factors during post-production, giving you more control over the final look.
However, it's essential to choose the right AI upscaling tool and model to achieve optimal results. The choice of upscaling software and model will heavily influence the final visual quality. Also de-noising is important after upscaling but should not be done before, as the de-noising can cause unwanted artifacts in the upscaled image.
Introducing chaiNNer: A Free AI Upscaling Tool
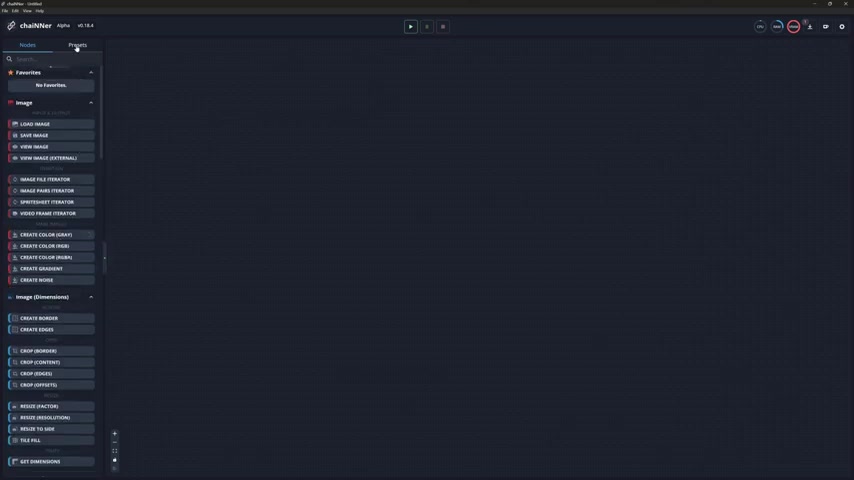
chaiNNer is a free and open-source image processing GUI aimed at making chaining image processing tasks (especially upscaling) easy, intuitive, and customizable. It is a powerful tool that allows you to create custom image processing pipelines, including AI upscaling, de-noising, and color correction.
Core Features:
- Node-Based Interface: chaiNNer uses a node-based interface, allowing you to connect different image processing modules to create custom workflows.
- AI Upscaling Support: It supports various AI upscaling models, allowing you to choose the best one for your specific needs.
- Batch Processing: chaiNNer can process entire image sequences in batch, making it ideal for upscaling Unreal Engine 5 renders.
- Free and Open Source: chaiNNer is completely free to use and open source, making it accessible to everyone.
chaiNNer supports a vast array of pre-trained models tailored for various content types, from realistic scenes to stylized animations. These models are freely available for download and integration into your chaiNNer workflow. Use the model database mentioned in the video to select the model that best fits your type of content. This will allow you to produce great looking upscaled renders with your UE5 AI capabilities.
Step-by-Step Guide to Using chaiNNer for AI Upscaling
To effectively use chaiNNer for upscaling your Unreal Engine 5 renders, follow these steps:
- Install Dependencies: After launching chaiNNer, install any required dependencies (such as PyTorch, NCNN, and ONNX) using the built-in dependency manager. Click on download icon to download and install the dependencies.
- Load the Image Sequence: Drag and drop the Image File Iterator and Load Image (Iterator) nodes onto the canvas. Connect these nodes to load your image sequence. Set the correct path in the image iterator node.
- Add the Upscaling Node: Drag and drop the Upscale Image node onto the canvas. Connect it to the Load Image node. Select an AI upscaling model (e.g., RealESRGAN) from the Model drop down menu.
- Save the Upscaled Images: Drag and drop the Save Image node onto the canvas. Connect it to the Upscale Image node. Specify the output directory and the desired image format (e.g., PNG, TIFF).
- Run the Pipeline: Press the Play button to start the upscaling process. chaiNNer will iterate through the image sequence, upscale each frame, and save the results to the specified output directory.
By following these steps, you can harness the power of AI upscaling to enhance the resolution of your Unreal Engine 5 renders. Remember to experiment with different AI upscaling models and settings to achieve the best possible results for your specific project. Learn UE5 AI tips to produce better looking renders. The steps for using chaiNNer are shown below:
| Step | Action | Description |
|---|---|---|
| 1 | Load Image Sequence | Drag Image File Iterator and Load Image nodes, set path to images. |
| 2 | Add Upscaling | Add Upscale Image node, select AI model (RealESRGAN). |
| 3 | Set Output | Add Save Image node, define output path and format (PNG, TIFF). |
| 4 | Run Pipeline | Press Play to upscale the image sequence. |





Most people like





































Report
Please select a reason for reporting
- 13 Reasons to Switch from Snapchat to Text Messaging
- 7 Powerful Speech to Text Apps to Boost Productivity
- 10 Best Speech to Text Tools for Effortless Transcription
- 13 Free Tools to Easily Transcribe Audio to Text
- 15 Surprising Ways Google's Speech-to-Text Boosts Productivity
- 7 Best Free Online Audio to Text Transcription Tools
- 9 Tips to Transcribe Speech to Text Faster and Better
- 13 Best Speech to Text Software for Windows 10 in 2023
- 7 Tips for Choosing the Best Transcriber for Audio to Text
- 11 Reasons Why Dragon Speech-to-Text Apps are Game-Changers
- 6 Secrets to Enhance Your Speech to Text Transcription
- 6 Brilliant Ways to Boost Productivity with Talk-to-Text on Your MacBook
- 6 Ways Transcription Software Converts Audio to Text
- 8 Tips to Transcribe Speech to Text Like a Pro
- 6 Reasons IBM Watson Speech to Text is a Game-Changer
- 14 Powerful Ways Talk-to-Text Improves Your Workflow
- 12 Top Windows Speech-to-Text Software for Efficient Transcription
- 12 Game-Changing Benefits of Apple's Speech to Text Technology
- 9 Powerful Use Cases for AWS Speech to Text Technology
- 10 Easy Steps to Transcribe YouTube Videos to Text
- transcription audio en texte
- online audio transcription
- free audio file transcription
- free ai audio transcription
- audio transcription service
- audio transcription online free
- audio transcription free online
- audio to transcription software
- audio and transcript
- ai audio transcription free
- voice recording to text converter
- translate voice recording to text
- record voice to text
- audio recording to text converter
- voice recording and transcription
- chatgpt voice to text
- gmail voice to text
- speech to text reader
- speech to text ai free
- speech to talk
- How SEO and Marketing Dashboards Empower Agencies to Drive Results
- How to Use AI Tools to Find Internal Linking Opportunities Across a Business Website
- Discover Your Perfect Haircut with AI Hairstyle Apps
- Free Reputation Calculator Tools: How They're Adapting to Score AI Visibility, Not Just Rankings
- Design Professional Flyers for Free on Your Phone
- Best Free Flyer Maker Apps for Android: Design Like a Pro
- How to Know If Your Business Is Ready for an AI Customer Service Agent
- Revolutionizing Storytelling: From Novels to Screenplays with AI
- Create Engaging Animated Explainer Videos with a Free AI Tool
- Stop Multi-Subscribing: Benchmark Top AI Visual Models in One Canvas
- 5 Data Problems That Stall AI Projects in Financial Compliance
- Master Storyboard Drawing: Expert Tips for Non-artists
- The Future of Smart Glasses: Explained & Assembling Guide
- DeepL Translator: The AI-Powered Translation Tool
- AI Video Upscaling: Top Tools Compared for Enhanced Quality
- Bridging the Gap: How One Indie Developer Solved the "Art Asset Nightmare" Using AI Style Transfer
- How I Direct Consistent AI Clips: A Hands-On Guide to Multi-Model Generation
- My Honest Review of VideoAI: The Ultimate Character Voice Generator I've Been Using Lately
- Why do so many AI tools underdeliver for online stores?
- My Brand New Logo: AI-Powered Logo Design for Startups

Copyright ©2026 toolify