































Table of Contents
- Key Points
- Setting Up Your AI Background Removal Project with Python
- Coding Your AI Background Remover: A Step-by-Step Tutorial
- Open Source and Free: Leverage the Power of Cost-Effective AI
- Weighing the Options: Pros and Cons of Python AI Background Removal
- Transform Your Visuals: Diverse Applications of AI Background Removal
- Frequently Asked Questions (FAQ)
- Related Questions


Setting Up Your AI Background Removal Project with Python
What is AI-Powered Background Removal?
AI-powered background removal leverages the capabilities of artificial intelligence to automatically identify and isolate the subject of an image from its surrounding background. Unlike traditional methods that rely on manual selection or color-based segmentation, AI models are trained on vast datasets to understand complex Patterns and accurately distinguish between foreground and background elements. This process, known as image segmentation, enables seamless background removal with minimal human intervention. The combination of Image Segmentation and AI dramatically improves the accuracy, speed, and efficiency of background removal, making it accessible to a wide range of users.
This technology is particularly useful in scenarios where manual editing is time-consuming or impractical. For instance, in e-commerce, consistent product backgrounds are essential for maintaining a professional brand image. AI background removal can automate this task, saving significant time and resources. Similarly, in Graphic Design and content creation, AI facilitates the creation of visually appealing compositions by isolating key elements and placing them against various backgrounds. By leveraging AI, background removal becomes a powerful tool for enhancing visual content and streamlining creative workflows.

Libraries and Tools You'll Need
To embark on this journey of creating an ai Background Remover, you'll need to equip yourself with the right tools and libraries. Python, with its extensive ecosystem, provides the perfect foundation for this project.
-
OpenCV (cv2): OpenCV stands for Open Source Computer Vision Library. It is a comprehensive library for image and video processing. It provides tools for image manipulation, analysis, and more.

-
NumPy (np): NumPy is the fundamental Package for numerical computation in Python. It provides support for arrays and matrices, along with mathematical functions to operate on these arrays efficiently.
-
PyTorch: PyTorch is an open-source machine learning framework based on the Torch library, used for applications such as computer vision and natural language processing.
-
Torchvision: Torchvision is a library that works in tandem with PyTorch, providing datasets, model architectures, and image transformations commonly used in computer vision tasks. It simplifies the process of working with pre-trained models and datasets.
-
DeepLabV3: The DeepLabV3 model is a state-of-the-art deep learning model for semantic image segmentation, developed by Google. It is based on convolutional neural networks (CNNs) and excels at accurately identifying and segmenting different objects within an image, making it ideal for background removal.
These libraries will form the backbone of our AI background removal system. By leveraging their combined capabilities, we'll be able to process images, load and run the AI model, and create seamless background removal effects.
Coding Your AI Background Remover: A Step-by-Step Tutorial
Step 1: Install the Necessary Libraries
Before diving into the code, ensure that you have installed all the required libraries. Using pip, Python's package installer, you can easily install OpenCV, NumPy, PyTorch, and Torchvision. Open your terminal or command Prompt and run the following commands:
pip install opencv-python numpy torch torchvisionInstalling these packages in a virtual environment is highly recommended to avoid version conflicts with other projects. Once the installation is complete, you're ready to move on to the next step.
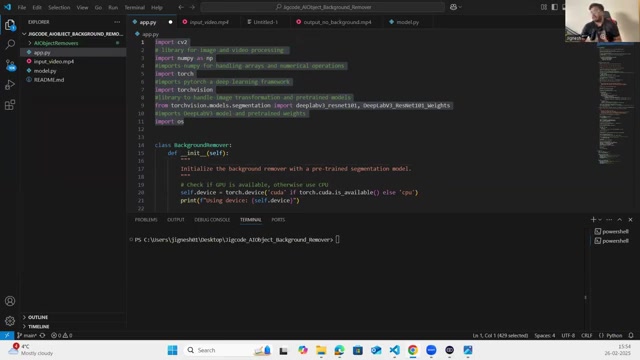
Step 2: Import Libraries
Now that we have installed the required libraries, we need to import the libraries into our Python script.
import cv2 #Library for image and video processing
import numpy as np #Library for handling arrays and numerical operations
import torch #Imports PyTorch, a deep-learning framework
import torchvision #Library to handle image transformations and pretrained models
from torchvision.models.segmentation import DeepLabV3_ResNet101, DeepLabV3_ResNet101_Weights
import os
With these import statements, you're now ready to harness the power of these libraries in your project.
Step 3: Define the BackgroundRemover Class
Here is code from 38 to 57. We will define a class called “BackgroundRemover” to encapsulate all the functionalities related to background removal. This class will handle model initialization, preprocessing, and background removal processes.
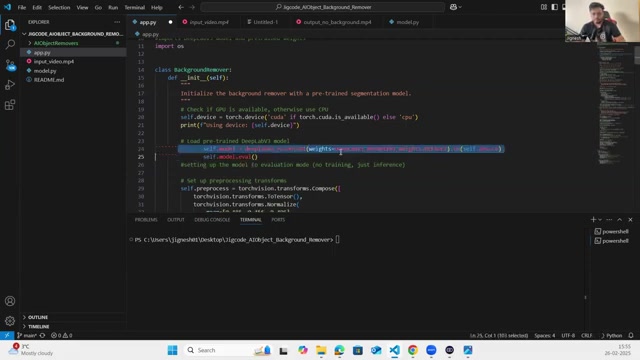
class BackgroundRemover:
    def __init__(self):
        # Initialize the background remover with a pre-trained segmentation model.
        # Check if GPU is available, otherwise use CPU
        self.device = torch.device('cuda' if torch.cuda.is_available() else 'cpu')
        print(f"Using device: {self.device}")

        # Load pre-trained DeepLabV3 model
        self.model = DeepLabV3_ResNet101(weights=DeepLabV3_ResNet101_Weights.DEFAULT).to(self.device)
        self.model.eval()

        # Set up preprocessing transformations
        self.preprocess = torchvision.transforms.Compose([
            torchvision.transforms.ToTensor(),
            torchvision.transforms.Normalize(mean=[0.485, 0.456, 0.406], std=[0.229, 0.224, 0.225])
        ])
Step 4: Implement Function for Mask Channel, Generating Segmentation Mask
A segmentation mask identifies people in the image.
def get_person_mask(self, image):
    # Generate a segmentation mask that identifies people in the image.
    # Convert BGR to RGB (OpenCV uses BGR, but our model expects RGB)
    image_rgb = cv2.cvtColor(image, cv2.COLOR_BGR2RGB)

    # Preprocess image for the model and add a batch dimension
    input_tensor = self.preprocess(image_rgb).unsqueeze(0).to(self.device)

    # Get model prediction
    with torch.no_grad():
        output = self.model(input_tensor)['out'][0]

    # Generate segmentation map
    segmentation_map = torch.argmax(output, dim=0).cpu().numpy()

    # Create binary mask for person class (15)
    mask = (segmentation_map == 15).astype(np.uint8)
    return mask
Step 5: Implement remove_background Function
Here is the code for remove_background. The aim of the code is to remove the background from an image, only keeping the person.
def remove_background(self, image, bg_color=None, use_checkerboard=True):
    # Remove the background from an image, keeping only the person.

    # Get person mask
    person_mask = self.get_person_mask(image)

    # Create a 3-channel mask for blending
    mask_3channel = np.stack([person_mask] * 3, axis=2)

    # Create background
    if use_checkerboard:
        checker_size = 20
        h, w = image.shape[:2]
        background = np.zeros((h, w, 3), dtype=np.uint8)
        for i in range(0, h, checker_size):
            for j in range(0, w, checker_size):
                if (i // checker_size + j // checker_size) % 2 == 0:
                    background[i:i + checker_size, j:j + checker_size] = [200, 200, 200]  # Light gray
                else:
                    background[i:i + checker_size, j:j + checker_size] = [100, 100, 100]  # Dark gray
    else:
        # Use solid color
        if bg_color is None:
            bg_color = (0, 255, 0)  # Green by default
        background = np.ones_like(image) * np.array(bg_color, dtype=np.uint8)

    # Blend the foreground (person) with the background
    result = image * mask_3channel + background * (1 - mask_3channel)

    return result.astype(np.uint8)
Step 6: Complete the Process and Utilize Background Remover
The process function is used to process a single frame from a video and create an output with the background removed:
def process_single_frame(self, input_path, output_path, frame_number=0, bg_color=None, use_checkerboard=True):
    # Process a single frame from a video and create an output with background removed.
    print(f"Processing frame {frame_number} from {input_path}")

    # Open the video
    cap = cv2.VideoCapture(input_path)
    if not cap.isOpened():
        raise ValueError(f"Could not open video at {input_path}")

    # Get video properties
    width = int(cap.get(cv2.CAP_PROP_FRAME_WIDTH))
    height = int(cap.get(cv2.CAP_PROP_FRAME_HEIGHT))
    fps = cap.get(cv2.CAP_PROP_FPS)

    # Ensure output directory exists
    os.makedirs(os.path.dirname(output_path), exist_ok=True)

    # Skip to the desired frame
    cap.set(cv2.CAP_PROP_POS_FRAMES, frame_number)

    # Read the frame
    ret, frame = cap.read()
    if not ret:
        cap.release()
        raise ValueError(f"Could not read frame {frame_number} from video")

    # Remove background
    processed_frame = self.remove_background(frame, bg_color, use_checkerboard)

    # Save as MP4 video (short clip)
    fourcc = cv2.VideoWriter_fourcc(*'mp4v')
    out = cv2.VideoWriter(output_path, fourcc, fps, (width, height))

    # Write the processed frame to output video (multiple times to create a short video)
    for _ in range(int(fps * 3)):
        out.write(processed_frame)

    out.release()

    print(f"Video saved to {output_path}")

    # Release resources
    cap.release()

    return processed_frame






Most people like




































Report
Please select a reason for reporting
- 13 Reasons to Switch from Snapchat to Text Messaging
- 7 Powerful Speech to Text Apps to Boost Productivity
- 10 Best Speech to Text Tools for Effortless Transcription
- 13 Free Tools to Easily Transcribe Audio to Text
- 15 Surprising Ways Google's Speech-to-Text Boosts Productivity
- 7 Best Free Online Audio to Text Transcription Tools
- 9 Tips to Transcribe Speech to Text Faster and Better
- 13 Best Speech to Text Software for Windows 10 in 2023
- 7 Tips for Choosing the Best Transcriber for Audio to Text
- 11 Reasons Why Dragon Speech-to-Text Apps are Game-Changers
- 6 Secrets to Enhance Your Speech to Text Transcription
- 6 Brilliant Ways to Boost Productivity with Talk-to-Text on Your MacBook
- 6 Ways Transcription Software Converts Audio to Text
- 8 Tips to Transcribe Speech to Text Like a Pro
- 6 Reasons IBM Watson Speech to Text is a Game-Changer
- 14 Powerful Ways Talk-to-Text Improves Your Workflow
- 12 Top Windows Speech-to-Text Software for Efficient Transcription
- 12 Game-Changing Benefits of Apple's Speech to Text Technology
- 9 Powerful Use Cases for AWS Speech to Text Technology
- 10 Easy Steps to Transcribe YouTube Videos to Text
- transcription audio en texte
- online audio transcription
- free audio file transcription
- free ai audio transcription
- audio transcription service
- audio transcription online free
- audio transcription free online
- audio to transcription software
- audio and transcript
- ai audio transcription free
- voice recording to text converter
- translate voice recording to text
- record voice to text
- audio recording to text converter
- voice recording and transcription
- chatgpt voice to text
- gmail voice to text
- speech to text reader
- speech to text ai free
- speech to talk
- How SEO and Marketing Dashboards Empower Agencies to Drive Results
- How to Use AI Tools to Find Internal Linking Opportunities Across a Business Website
- Discover Your Perfect Haircut with AI Hairstyle Apps
- Free Reputation Calculator Tools: How They're Adapting to Score AI Visibility, Not Just Rankings
- Design Professional Flyers for Free on Your Phone
- Best Free Flyer Maker Apps for Android: Design Like a Pro
- How to Know If Your Business Is Ready for an AI Customer Service Agent
- Revolutionizing Storytelling: From Novels to Screenplays with AI
- Create Engaging Animated Explainer Videos with a Free AI Tool
- Stop Multi-Subscribing: Benchmark Top AI Visual Models in One Canvas
- 5 Data Problems That Stall AI Projects in Financial Compliance
- Master Storyboard Drawing: Expert Tips for Non-artists
- The Future of Smart Glasses: Explained & Assembling Guide
- DeepL Translator: The AI-Powered Translation Tool
- AI Video Upscaling: Top Tools Compared for Enhanced Quality
- Bridging the Gap: How One Indie Developer Solved the "Art Asset Nightmare" Using AI Style Transfer
- How I Direct Consistent AI Clips: A Hands-On Guide to Multi-Model Generation
- My Honest Review of VideoAI: The Ultimate Character Voice Generator I've Been Using Lately
- Why do so many AI tools underdeliver for online stores?
- My Brand New Logo: AI-Powered Logo Design for Startups

Copyright ©2026 toolify