
















Building a Large Format 3D Printer: A Comprehensive Guide

Updated on Oct 06,2025

Embark on a journey of constructing a large format 3D printer in your garage! This guide delves into the fourth part of a fascinating project, focusing on the practicalities of tying up loose ends and setting up a pellet conveyance system for continuous printing. We'll uncover essential modifications, tackle challenges, and even peek at the economic factors involved in bringing this large-scale 3D printing vision to life. It’s time to roll up your sleeves and dive into the world of DIY 3D printing with expert Dr. D-Flo.

Key Points

Relocating the emergency stop button for safety and accessibility.

Upgrading the bed glass clamping system for stability.

Installing a thermal fuse for bed heater protection.

Wiring up the touch probe for nozzle distance accuracy.

Implementing a pellet conveyance system for constant plastic flow.

Examining the power consumption of the printer.

Discussing the environmental considerations of large-scale 3D printing.

Essential Modifications and Upgrades to a Large Format 3D Printer

Addressing Loose Ends Before Large-Scale 3D Printing

Before diving into extensive printing with the large format 3D printer, it's essential to address any lingering adjustments and ensure all systems are running smoothly. Dr. D-Flo acknowledges skipping a few important steps in the previous build, driven by eagerness to start printing. This section focuses on rectifying those oversights to ensure long-term printer reliability and safety. The initial sprints are all done now it's time to do some long haul work.

One of the first vital modifications included relocating the emergency stop button to the front of the printer for easy access. Creating a machined aluminum housing provides secure placement for the button and incorporates AC indicator lights. This housing not only is durable but useful as well. These indicator lights, wired parallel to the extruder and bed heaters, offer real-time visual feedback on the heating element's activity. This simple yet effective modification increases awareness and safety during printing.

Enhancing Bed Stability with Custom Clamps

The original binder clip system used to secure the glass bed proved inadequate, leading to slippage during printer movements. To resolve this, Dr. D-Flo designed and machined six custom aluminum clamps, each equipped with two plastic bolts for adjustable clamping force. This upgrade significantly enhances bed stability and prevents unwanted movement during large-scale prints.

Ensuring the glass bed is stable reduces wobble and therefore increases quality in the print. A stable base is vital for every building and so it is with 3D printers as well.

Upgrading the Thermal Fuse for Enhanced Safety

Addressing a previous oversight, a new thermal fuse with spade connectors and mounting holes was installed. The fuse was chosen for its ability to be electrically isolated while reducing the costs of needing specialized crimping tools. This upgrade enhances the bed heaters safety and reliability by providing a robust safety mechanism.

Integrating the Touch Probe for Precision Nozzle Alignment

A touch probe is now wired up for the D-Flo large-format 3D printer. This now allows setting a consistent distance between the nozzle and the build surface of the printer.

To improve functionality, Dr. D-Flo machined a magnetic base for the touch probe, allowing for easy repositioning and preventing damage in the event of accidental extruder contact. This upgrade improves first layer adhesion, as well as consistency and accuracy during the printing process. The addition to this build is easy to work with, functional, and effective.

Reinforcing the Base with Custom In-Plates

For aesthetics and improved structural integrity, custom in-plates were milled and bolted onto the base of the printer frame. These plates reinforce the connection between the base and frame, enhancing overall stability. Dr. D-Flo even encourages to subscribe, because when he hits 100,000, he plans on doing a life size Benchy build! The project keeps growing with these updates.

Enhancements to the Electrical Cabinet

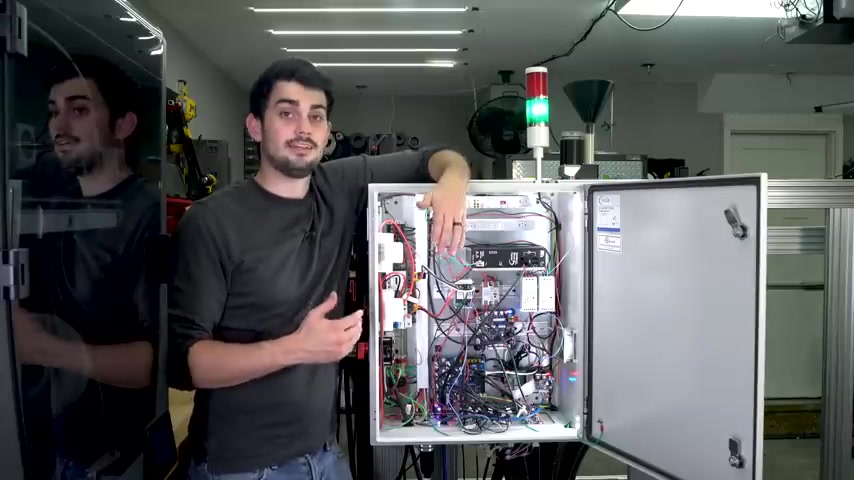
Several key improvements have been implemented within the electrical cabinet to optimize performance and safety. These upgrades include

  • Upgrading to a dual Solid State Relay (SSR) for switching the 220V lines to the bed for improved response and reliability.
  • Enhanced air circulation thanks to Noctua Redux intake and exhaust fans installed
  • Install power meters to measure the exact amount of power this 3D printer uses. By tracking the amount of power consumption in the different parts, it will allow more data to improve on designs and efficiencies.

These upgrades contribute to improved airflow and performance and give some more useful data.

Implementing Stack Light System for Real-Time Status Indication

To improve operational awareness, a stack light system was introduced. The light is programmed to glow red when the printer is hot, and green when the components are all cooled. This visual indication adds a convenient safety measure. Dr. D-Flo goes on to note the speed at which all these elements are cooling, and mentions the firmware installed is highly tunable, even down to being able to run code in the background.

Pellet Conveyance System Installation

Massive Dimension Material Conveyance Unit

To address the challenge of keeping plastic flowing to a large scale 3D printer, Dr. D-Flo installs a pellet conveyance system from Massive Dimension, designed to transport pellets from a reservoir to the extruder.

The use of a Pellet Conveyance system means that you don't have to be loading small tubes or manually loading your filament in your 3D Printer, this system increases the speed of large-scale printing projects significantly, it also increases efficiency. Massive shout out to the awesome team over at Massive Dimension for sponsoring the project and providing the machine for this 3D printer build!
.

Most pellet conveyance systems use a Venturi vacuum system, Dr. D-Flo provides a list of what's installed in this project

How to Use:

Installing and Setting Up the Massive Dimension Material Conveyance Unit.

This silver box houses the Venturi vacuum for the 3D printer. The Venturi allows drawing pellets in a constant flow through compressed air. Setting up the conveyance systems is not the end, though. The air itself must be considered. When the compressed air and liquid pass through the choke, it results in negative vacuum pressure which Dr. D-Flo explains will result in any humidity or water being sucked into the machine.

To fix the humidity problem, Dr. D-Flo used air drying equipment with a 2hp compressor with a 20-gallon auxiliary tank. The air would pass through tubing allowing the air to cool enough to allow all excess humidity to condensate out. This then went to a Motor Guard, as Dr. D-Flo describes, "a glorified toilet paper roll.

The Filabot Reclaimer for Filament Recycling

In an effort to promote more environmentally conscious 3D Printer builds, Dr. D-Flo uses the Filabot Reclaimer, which cuts up pieces using a Reciprocating saw, then grinds the remnants up with the machine. This recycling means Dr. D-Flo saves money and time, along with helping save the environment.

Cost Breakdown

Estimating the Operating Costs

While building this massive D-Flo 3D Printer, it's been crucial to consider its operating costs.

The most recent white chair build, the chair weighs 17.85 kg of PLA pellets at $8 per kg which leads to a material cost of around $142.80 to just build the white chair.

The large format printer consumes around 16.5 kWh from the bed, and 7.2 kWh from the extruder and motors which led to a power draw total of 23.7 kWh which led to a cost of $2.37 per kilowatt with Tennessee Power costs.

The total power cost of the White Chair was $145.17

FAQ

What is a Pellet Conveyance System?
A pellet conveyance system is a system used to transport material from one location to the extruder using Vacuum power. This will increase efficiency for printing larger scale objects.
Why did Dr. D-Flo switch the emergency stop button?
The switch was originally in a location that was not as easily accessible, by moving it to the front, it increases the safety and awareness of the printer.
What is the best infill for a 3D printer build?
Every project has its own use case, therefore there is no golden ratio. For the White chair project, having minimal infill with rectilinear geometry produced a stable and functional chair.
How much did it cost to create this White Chair?
It cost $145.17 to have all PLA pellets and electricity during printing which was only $2.37, with the material cost being so cheap it's hard to determine the average cost as they are being bought in such massive quantities. If you are printing this at home with typical PLA filament you would be looking at paying much more

Related Questions

Is 3D Printing With Pellets More Efficient Than Filament?
Whether 3D printing with pellets is more efficient than filament depends on various factors, including the size and scale of the print, the materials used, and the specific needs of the project. Material Cost: Pellets are often significantly cheaper than filaments. This is because the filament manufacturing process adds an extra step. For large-scale projects, the cost savings on materials can be substantial.[t: 217] Dr. D-Flo provides a good example of this by highlighting what it costs for material in his video. Material Options: Pellets offer a wider range of material options compared to filaments. While standard filaments like PLA and ABS are readily available, specialized filaments can be expensive and limited in availability. Pellet-based systems can accommodate a variety of engineering-grade polymers and custom blends. Print Speed and Volume: Pellet extrusion systems can typically achieve higher print speeds and larger volumes compared to filament-based printers. The large format 3D printer excels due to the higher volumetric flow rate which can deliver with pellets, allowing for faster completion times for large-scale objects. If you are doing many smaller objects then your everyday 3D printer should be just fine. Recycling and Sustainability: Pellet extrusion is very useful when recycling and promoting a sustainable system. Single use plastics cannot easily be separated with current mechanical recycling, pellet systems can cut up the remnant plastic and add it to a separate blend to extrude more items, increasing the life of plastic that would otherwise become waste.

Most people like



















