































Table of Contents
- Key Points
- Stable Diffusion on Google Cloud
- Step-by-Step Deployment Guide
- Accessing and Configuring Stable Diffusion
- Google Cloud Pricing Considerations for Stable Diffusion
- Advantages and Disadvantages of Google Cloud Deployment
- Frequently Asked Questions
- Related Questions



Stable Diffusion on Google Cloud
Why Deploy Stable Diffusion on the Cloud?
Deploying Stable Diffusion on Google Cloud offers significant advantages over local deployment. Local setups often require a dedicated, high-end GPU, such as the Nvidia RTX 4090
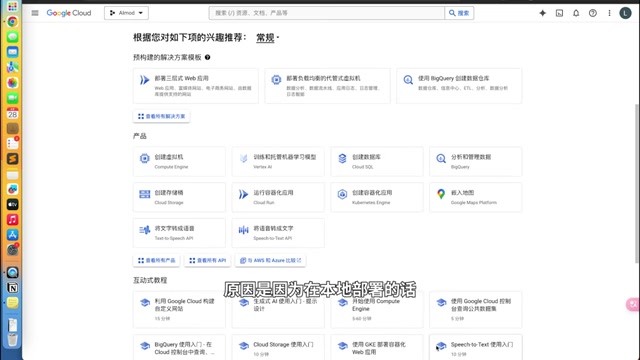
. While powerful for gaming, these cards aren't optimized for AI inference, leading to slower performance compared to professional AI GPUs like the T4 or L4. Google Cloud provides access to these specialized GPUs, allowing for faster and more efficient AI computations.
Another key benefit is cost savings. Instead of investing in expensive hardware that might sit idle, you can leverage Google Cloud's on-demand compute resources. Simply spin up a virtual machine with the necessary GPU power when you need it and shut it down when you're done. This pay-as-you-go model eliminates the upfront costs and ongoing maintenance associated with local hardware.
Stable Diffusion is a potent tool for creating images, and cloud deployment makes it more accessible and cost-effective. By utilizing the cloud, users are able to take advantage of scalable computing, allowing them to produce AI-generated art with increased speed. By utilizing the cloud, even novice AI enthusiasts can access potent computing tools without substantial financial investment.
Let's further consider two main methods of leveraging Google Cloud for Stable Diffusion
Google Colab vs. Virtual Machines: Choosing the Right Approach
Google offers two primary methods for accessing GPU power: Google Colab and Compute Engine virtual machines.
Google Colab provides a free, easy-to-use environment for running Python code, including AI models. However, it has limitations. While it offers a 'one-click' deployment
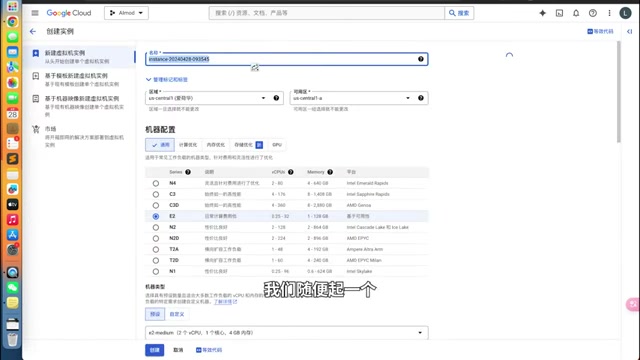
, it requires waiting around 10 mins before each execution.
Compute Engine virtual machines, on the other hand, offer more control and dedicated resources. Once configured, they provide an always-on environment, eliminating the need to re-run setup scripts every time. They are more streamlined than Google Colab. This guide will focus on the virtual machine approach, as it offers a superior user experience for deploying Stable Diffusion.
The choice between Google Colab and virtual machines depends on your needs and technical expertise. For beginners or those with limited resources, Google Colab provides a valuable starting point. However, for serious AI art creators seeking consistent performance and greater control, virtual machines are the preferred option. Here is a comparison table of the two options:
| Feature | Google Colab | Compute Engine VM |
|---|---|---|
| Cost | Free (with limitations) | Pay-as-you-go |
| Setup | Easy, 'one-click' deployment | Requires initial configuration |
| Performance | Variable, depends on available resources | Dedicated resources, more consistent performance |
| Control | Limited | Full control over the environment |
| Persistence | Session-based, setup required for each run | Always-on, persistent environment |
| Use Case | Experimentation, small projects | Production, large projects, consistent performance |
Step-by-Step Deployment Guide
Creating a Virtual Machine Instance
Let's walk through the process of creating and configuring a virtual machine on Google Cloud for Stable Diffusion.
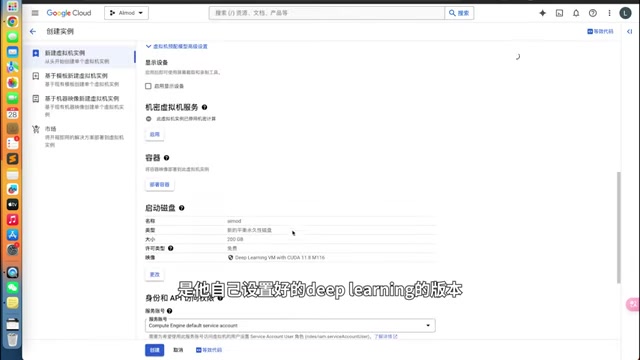
Step 1: Navigate to Compute Engine
From the Google Cloud Console, navigate to Compute Engine > VM instances. Click Create Instance to begin the process.
Step 2: Configure the Instance
- Give your instance a descriptive name.
- Select a region close to your location to minimize latency. Availability for GPUs may vary based on location.
- Choose a machine configuration that includes a GPU. Click the GPU tab. Select L4 as the GPU type and 1 as the Number of GPUs.
- Increase the vCPU and Memory to 8 vCPU and 32 GB memory for more efficent processing.
- Other configuration options are up to the user's preferences.
Step 3: Configure the Boot Disk
- In the Boot disk section, click Change to select a different image.
- Choose Deep Learning on Linux image. This image comes pre-configured with many of the necessary dependencies for AI workloads.
- Increase the disk size to at least 200 GB to accommodate the Stable Diffusion model and datasets.
Step 4: Set up Firewall Rules
- Under the Firewall section, enable both Allow HTTP traffic and Allow HTTPS traffic. This will allow you to access the Stable Diffusion web interface from your browser.
Step 5: Create a Static External IP Address
- Open the Networking tab and click on Network Interfaces to click on Edit.
- Then on the bottom on the page, click on Add IP address. Input a name for the static IP, and select Static for the type.
- Click Done and then click Create to launch your instance.
With the virtual machine created, the next steps involve setting up the firewall to allow external access and connecting to the instance via SSH.
Accessing and Configuring Stable Diffusion
Connecting to the Virtual Machine via SSH
Once the instance is created, connect to it via SSH. This can be done directly from the Google Cloud Console.
- Navigate to Compute Engine > VM instances.
- Find your newly created instance and click the SSH button in the Connect column.
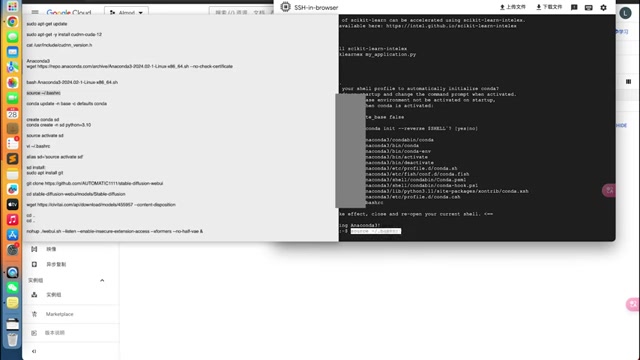
This will open a terminal window in your browser, allowing you to interact with the virtual machine's command line.
Authorize it when a pop-up appears.
Installing NVIDIA Drivers and CUDA
The Deep Learning on Linux image comes with most necessary drivers. However, you may need to install the NVIDIA driver.
To verify the drivers and cuda are installed, you can run the nvidia-smi to confirm.
If it prompts to install the NVIDIA driver, select 'yes' and wait for installation to finish. This process will take a few mins, then restart the VM.
If there are problems, copy and paste the below to install the NVIDIA Driver manually:
sudo apt update
curl -s -L "https://raw.githubusercontent.com/GoogleCloudPlatform/compute-gpu-installation/main/linux/install_gpu_driver.py" | sudo python3
sudo python3 install_gpu_driver.py
Install and Update cuDNN
The steps for cuDNN may not be already pre-installed with your desired version. Copy the lines below and follow the steps:
sudo apt-get update
sudo apt-get install -y install cudnn-local-repo-debian12-12.4.1.1_1.0-1_amd64.deb
sudo cp /var/cudnn-local-repo-*/cudnn-*keyring.gpg /usr/share/keyrings/
sudo apt-get update
sudo apt-get install -y cuda
Then run the command: cat /usr/include/cudnn_version.h to confirm it's running
This should return an error and not a version, telling the user they do not have cuDNN installed correctly.
To fix this, enter the following copied commands:
wget https://developer.download.nvidia.com/compute/cuda/repos/debian12/x86_64/cuda-local-repo-debian12-12-4-1_525.105.17-1_amd64.deb
sudo dpkg -i cuda-local-repo-debian12-12-4-1_525.105.17-1_amd64.deb
sudo cp /var/cuda-local-repo-debian12-12-4-1/cuda-*keyring.gpg /usr/share/keyrings/
sudo apt-get update
sudo apt-get install -y cuda

sudo apt-get install -y cudnn
The version you install is reliant on the number after debian- the current number is 12 in this example, so your version will change based on the image.
Lastly, to ensure it's correctly installed use the command cat /usr/include/cudnn_version.h and you should now see the version numbers!
Install and Activate Conda
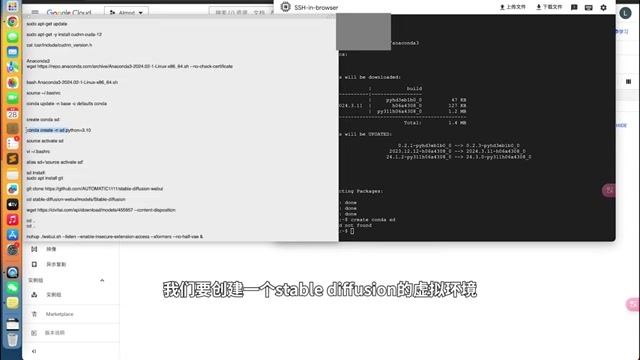
Copy and paste the code below in the correct order. The first line downloads Conda, and the following lines use the tool:
wget https://repo.anaconda.com/archive/Anaconda3-2024.02-1-Linux-x86_64.sh
bash Anaconda3-2024.02-1-Linux-x86_64.sh
source ~/.bashrc
conda update --base --name defaults conda
conda create --name sd python=3.10
source activate sd
Type 'yes' and hit enter when prompted and hit enter on any other prompts it gives you.
To test if it is installed correctly, use conda --version. If it returns with numbers you will know it's worked.
Installing and Configuring Stable Diffusion
To install Stable Diffusion, clone the Stable Diffusion repository with:
git clone https://github.com/AUTOMATIC1111/stable-diffusion-webui
cd stable-diffusion-webui
To enable access, you will need to update webui-user.sh and the parameters. To do this:
nano webui-user.shAdd the code below, after the git pull section. This provides extra memory and enables external access.
export COMMANDLINE_ARGS="--xformers --listen --enable-insecure-extension-access --no-half-vae"Press CTRL+S to save, and then press CTRL+X to exit the editor. Lastly, paste this code to get it up and running:
mkohup webui.shWebUI should be fully running when it shows an output that has the two points:
- Running on local URL: http://0.0.0.0:7860
- Running on public URL: http://xxxxxxxx.grad.live
Access the Stable Diffusion Web Interface
Copy and paste the External IP from the VM, along with the port :7860
For example: 34.135.169.157:7860
Use that link to access it on another tab in your browser!
Change to Chinese Language
Follow these steps to change the output to Chinese Language:
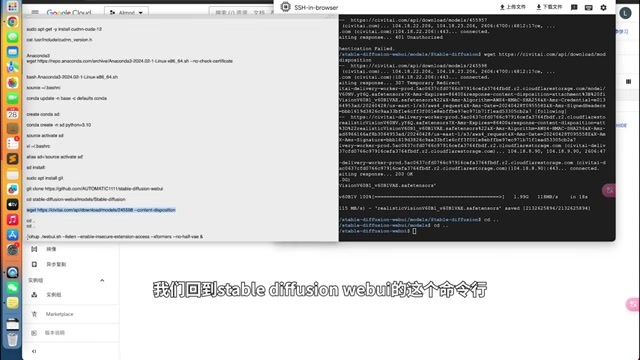
Step 1: Go to Civitai.com and select Models
Step 2: Pick your desired checkpoint file, and copy the ID after /models
Step 3: Enter this ID to download your models using this command:
wget https://civitai.com/api/download/models/XXXXXReplace XXXXX with your respective number to successfully download the checkpoint file.
Step 4: Then, go to https://github.com/VinsonLaro/stable-diffusion-webui-chinese
and go to Extensions to click Install from URL. Here, input the GitHub link and click Install
Step 5: Return to Installed and click Apply and Restart UI. Afterwards, when it has loaded, click on Settings and change the dropdown that mentions Localization to 中文英语 . Make sure to click to Apply Settings followed by hitting the Reload UI button that pops up.








Most people like































Report
Please select a reason for reporting
- 13 Reasons to Switch from Snapchat to Text Messaging
- 7 Powerful Speech to Text Apps to Boost Productivity
- 10 Best Speech to Text Tools for Effortless Transcription
- 13 Free Tools to Easily Transcribe Audio to Text
- 15 Surprising Ways Google's Speech-to-Text Boosts Productivity
- 7 Best Free Online Audio to Text Transcription Tools
- 9 Tips to Transcribe Speech to Text Faster and Better
- 13 Best Speech to Text Software for Windows 10 in 2023
- 7 Tips for Choosing the Best Transcriber for Audio to Text
- 11 Reasons Why Dragon Speech-to-Text Apps are Game-Changers
- 6 Secrets to Enhance Your Speech to Text Transcription
- 6 Brilliant Ways to Boost Productivity with Talk-to-Text on Your MacBook
- 6 Ways Transcription Software Converts Audio to Text
- 8 Tips to Transcribe Speech to Text Like a Pro
- 6 Reasons IBM Watson Speech to Text is a Game-Changer
- 14 Powerful Ways Talk-to-Text Improves Your Workflow
- 12 Top Windows Speech-to-Text Software for Efficient Transcription
- 12 Game-Changing Benefits of Apple's Speech to Text Technology
- 9 Powerful Use Cases for AWS Speech to Text Technology
- 10 Easy Steps to Transcribe YouTube Videos to Text
- transcription audio en texte
- online audio transcription
- free audio file transcription
- free ai audio transcription
- audio transcription service
- audio transcription online free
- audio transcription free online
- audio to transcription software
- audio and transcript
- ai audio transcription free
- voice recording to text converter
- translate voice recording to text
- record voice to text
- audio recording to text converter
- voice recording and transcription
- chatgpt voice to text
- gmail voice to text
- speech to text reader
- speech to text ai free
- speech to talk
- How to Use AI Tools to Find Internal Linking Opportunities Across a Business Website
- Discover Your Perfect Haircut with AI Hairstyle Apps
- Free Reputation Calculator Tools: How They're Adapting to Score AI Visibility, Not Just Rankings
- Design Professional Flyers for Free on Your Phone
- Best Free Flyer Maker Apps for Android: Design Like a Pro
- How to Know If Your Business Is Ready for an AI Customer Service Agent
- Revolutionizing Storytelling: From Novels to Screenplays with AI
- Create Engaging Animated Explainer Videos with a Free AI Tool
- Stop Multi-Subscribing: Benchmark Top AI Visual Models in One Canvas
- Best Seedance 2.5 API Provider: Every Price on the Market, Checked at Source
- Top AI Social Media Management Tools: Automate Your Content Strategy
- Free AI Text to Video Generator: Create Stunning Videos from Text
- Discover 17 ChatGPT Alternatives: A Comprehensive Comparison
- Character.AI vs. Janitor AI: Which AI Chat Platform Reigns Supreme?
- Top Virtual Assistant Companies in 2026: Reviews, Pricing, and Plans Compared
- Unveiling FaceCheck.ID: Revolutionizing Reverse Image Searches with AI
- 11 Best AI Dialers in 2026: Features, Pricing, Pros and Cons
- How I Direct Consistent AI Clips: A Hands-On Guide to Multi-Model Generation
- A Realistic Review of the Photo Generator Image Tool
- Playwright MCP Server: Automated Web Testing with Agent Mode

Copyright ©2026 toolify