































Table of Contents
- Key Points
- Setting Up Your Face Detection Environment
- Implementing Face Detection with Python and OpenCV
- Pros and Cons of Haar Cascades for Face Detection
- Frequently Asked Questions
- Related Questions



Setting Up Your Face Detection Environment
Installing OpenCV with Python
The first step towards face detection is ensuring that OpenCV (cv2) is correctly installed in your Python environment. OpenCV is a comprehensive library of programming functions mainly aimed at real-time computer vision. To install OpenCV, you will utilize pip, the Python package installer.
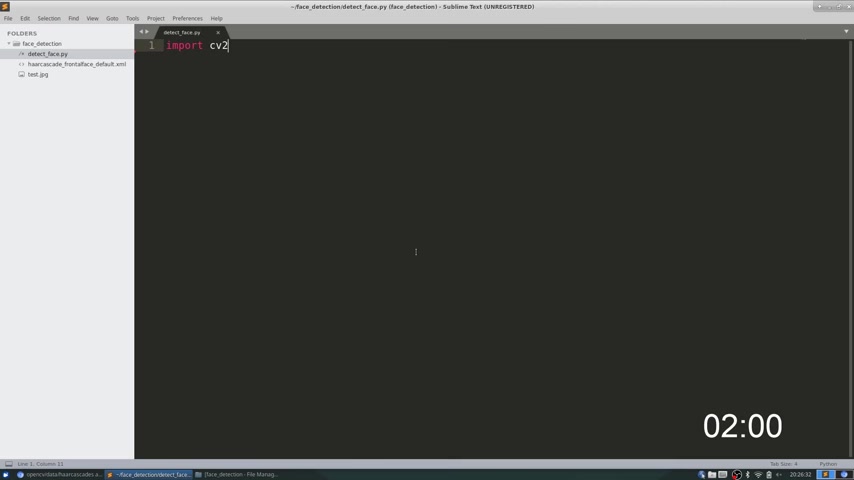
Open your terminal or command Prompt and execute the following command:
pip install opencv-pythonThis command downloads and installs the necessary OpenCV packages for Python. Verify the installation by importing the cv2 module in a Python script:
import cv2

print(cv2.__version__)
If no errors are raised and the OpenCV version number is printed, the installation was successful. Ensuring the correct environment setup is paramount for smooth execution and leveraging the power of OpenCV face detection.
Understanding Haar Cascades for Face Detection
Haar cascades form the backbone of this face detection process. Haar cascades are machine learning-based classifiers trained to detect specific objects, such as faces, within an image. The underlying concept leverages a cascade function trained with a set of input data, typically a large dataset of images containing faces and non-faces. OpenCV provides several pre-trained Haar cascade classifiers for detecting various objects, including faces, eyes, and smiles.
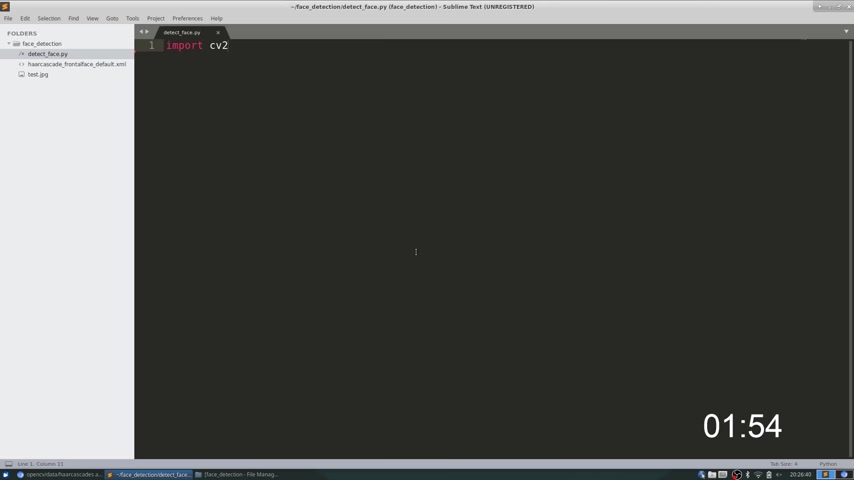
You can find these classifiers in the OpenCV GitHub repository under the 'data/haarcascades' directory. For face detection, the most commonly used classifier is haarcascade_frontalface_default.xml.
Key aspects of Haar Cascades:
- Feature Extraction: Haar-like features are used to identify edges, lines, and other relevant characteristics in an image.
- Adaboost: This algorithm selects the most informative features and trains a strong classifier.
- Cascade Structure: The classifiers are arranged in a cascade to quickly discard non-face regions, improving efficiency.
By understanding how Haar cascades function, you gain insights into optimizing your face detection implementation for performance and accuracy.
Downloading the Haar Cascade Classifier
To perform face detection, you'll need to download the haarcascade_frontalface_default.xml file from the OpenCV GitHub repository.
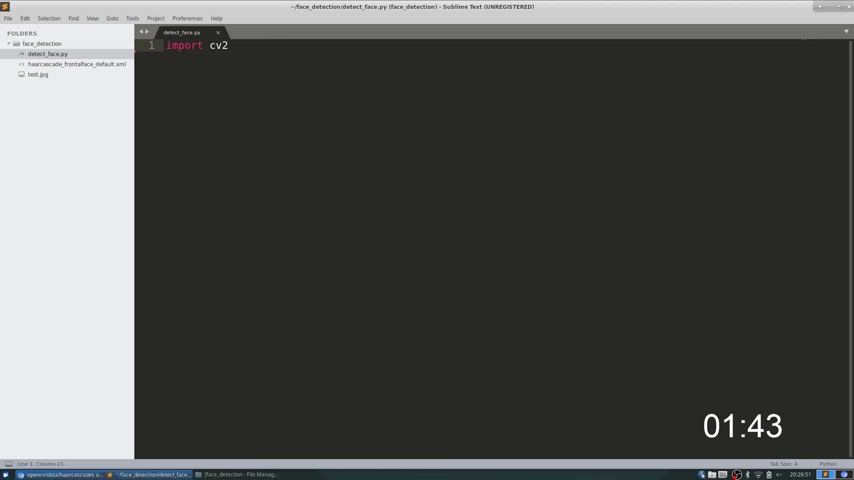
This file contains the pre-trained classifier that OpenCV will use to identify faces. To download this file follow these steps:
- Navigate to the OpenCV GitHub repository (opencv/opencv).
- Go to the data/haarcascades directory.
- Locate the haarcascade_frontalface_default.xml file.
- Click on the file to view its content.
- Click the 'Raw' button to display the raw XML content.
- Right-click on the page and select 'Save As' to save the file to your local directory.
Store this file in the same directory as your Python script for easy access. Having the Haar cascade classifier is essential as it enables OpenCV to accurately detect faces in images and videos, forming the core of your face detection system.
Implementing Face Detection with Python and OpenCV
Loading the Haar Cascade Classifier in Python
Once you've downloaded the Haar cascade classifier, the next step is to load it into your Python script using OpenCV.

This allows the program to utilize the pre-trained classifier for detecting faces in images and videos. Here's how you can load the classifier:
import cv2

face_cascade = cv2.CascadeClassifier('haarcascade_frontalface_default.xml')
This code initializes a cv2.CascadeClassifier object and loads the haarcascade_frontalface_default.xml file. Ensure that the file path matches the location where you saved the Haar cascade file.Loading the cascade classifier is crucial to prepare OpenCV for detecting faces in your application, setting the stage for advanced image processing and computer vision tasks.
Loading Images for Face Detection
Before detecting faces, you'll need to load an image using OpenCV.
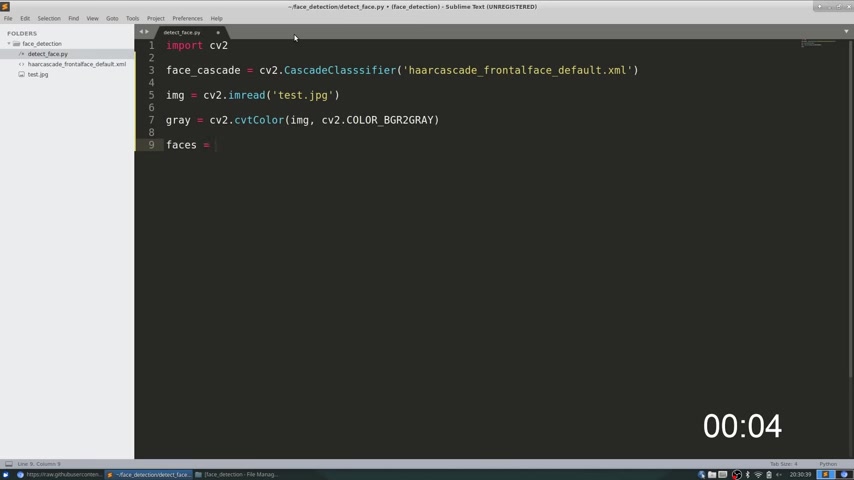
The cv2.imread() function loads an image from the specified file path. Below is an example of how to load an image named test.jpg:
img = cv2.imread('test.jpg')After loading the image, it's often converted to grayscale because face detection algorithms perform more efficiently on grayscale images. Here’s how to convert an image to grayscale:
gray = cv2.cvtColor(img, cv2.COLOR_BGR2GRAY)Note that OpenCV processes images in BGR (Blue, Green, Red) format by default, not the more common RGB.Therefore, the cv2.COLOR_BGR2GRAY flag is used.Converting the image to grayscale is an important pre-processing step that reduces computational complexity and improves the accuracy of face detection.
Performing Face Detection
With the Haar cascade classifier loaded and the image converted to grayscale, you can now perform face detection using the detectMultiScale() method.
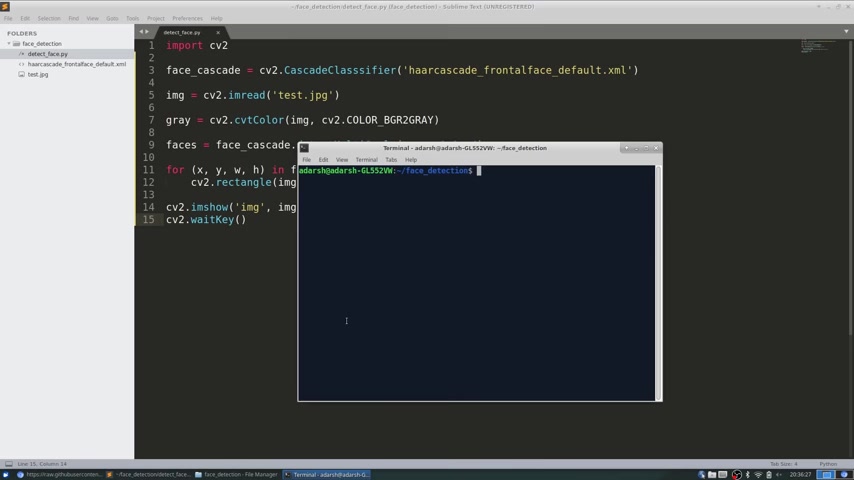
This function scans the image for potential faces using the Haar cascade features.
faces = face_cascade.detectMultiScale(gray, scaleFactor=1.1, minNeighbors=4)The detectMultiScale() function takes several parameters:
- gray: The grayscale image in which to detect faces.
- scaleFactor: Parameter specifying how much the image size is reduced at each image scale. A value of 1.1 is commonly used.
- minNeighbors: Parameter specifying how many neighbors each candidate rectangle should have to retain it. Higher values result in fewer detections but with higher quality.
Experimenting with these parameters can significantly impact detection accuracy and performance. Adjusting the scale factor and minimum neighbors is essential to optimizing face detection for different scenarios and image qualities.
Drawing Rectangles Around Detected Faces
After detecting faces, the next step is to visually highlight them by drawing rectangles around the detected regions.
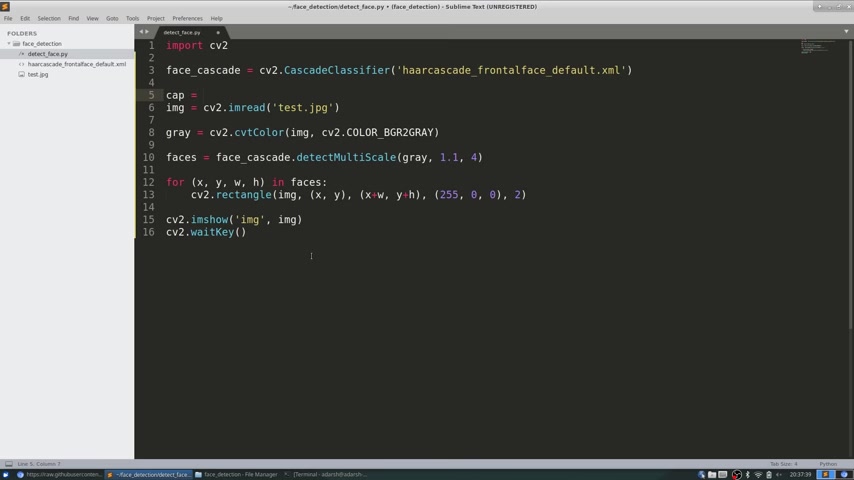
The detectMultiScale() method returns a list of coordinates (x, y, w, h) for each detected face, where x and y are the coordinates of the top-left corner, and w and h are the width and height of the rectangle. Here’s how you can draw rectangles around the faces:
for (x, y, w, h) in faces:
    cv2.rectangle(img, (x, y), (x+w, y+h), (255, 0, 0), 2)
This code iterates through the list of detected faces and draws a blue rectangle (BGR value (255, 0, 0)) around each face with a thickness of 2 pixels. Drawing rectangles around the detected faces is an essential part of visually verifying the accuracy of face detection and making the results easily understandable.
Displaying the Result
To display the image with the detected faces, you can use the cv2.imshow() function.
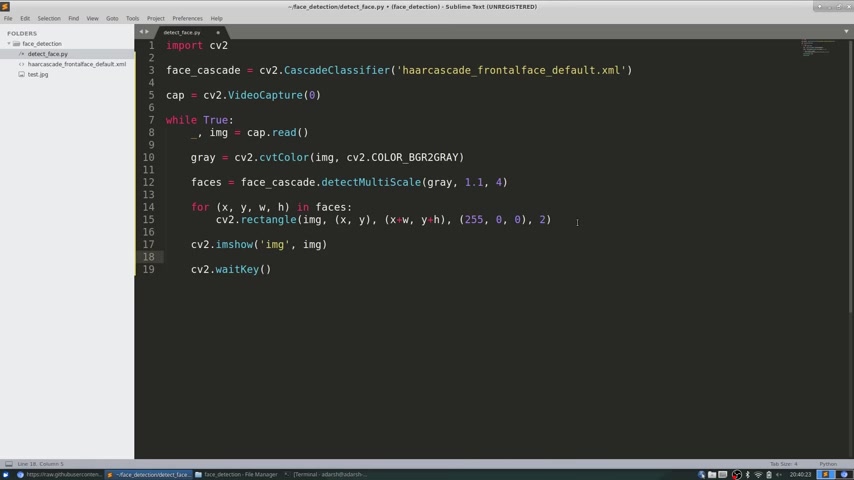
This function opens a window and displays the image. Here’s the code:
cv2.imshow('img', img)
cv2.waitKey(0)- cv2.imshow('img', img): Displays the image in a window titled 'img'.
- cv2.waitKey(0): Waits indefinitely for a key press to close the window. Setting the value to 0 makes the window stay open until a key is pressed.
Combining face detection with displaying the results enables real-time feedback and allows for immediate adjustments to improve detection accuracy.
Implementing Face Detection in Videos
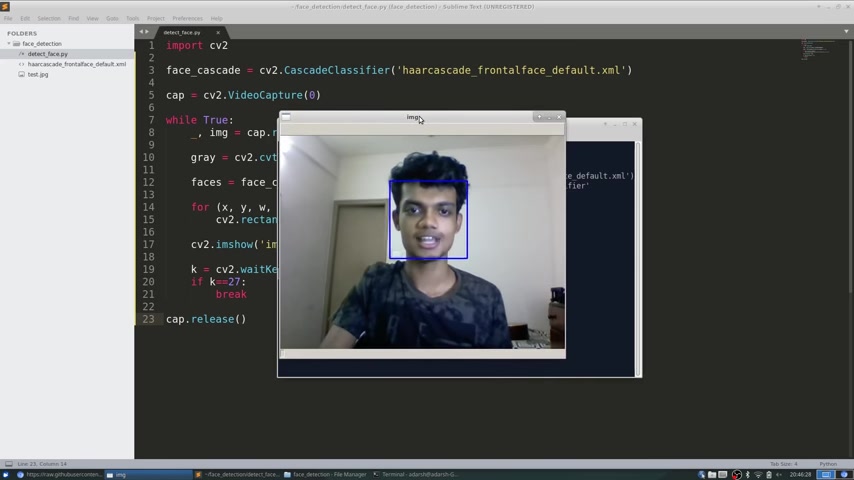
Face detection can be extended to video streams using OpenCV, enabling real-time facial recognition and analysis. Here’s how to implement face detection in videos:
-
Capture Video: Utilize cv2.VideoCapture(0) to access the default webcam.
-
Read Frames: Capture individual frames from the video stream using cap.read() within a loop.
-
Process Frames: Apply the same face detection steps (grayscale conversion, detectMultiScale, drawing rectangles) to each frame.
-
Display Video: Show the processed video stream with detected faces using cv2.imshow().
Here’s the code implementation:
cap = cv2.VideoCapture(0)

while True:
    _, img = cap.read()
    gray = cv2.cvtColor(img, cv2.COLOR_BGR2GRAY)
    faces = face_cascade.detectMultiScale(gray, 1.1, 4)

    for (x, y, w, h) in faces:
        cv2.rectangle(img, (x, y), (x+w, y+h), (255, 0, 0), 2)

    cv2.imshow('img', img)
    k = cv2.waitKey(30) & 0xff
    if k == 27:
        break

cap.release()
Integrating face detection into video streams opens up possibilities for real-time surveillance, interactive applications, and dynamic facial analysis.









Most people like


























Report
Please select a reason for reporting
- 13 Reasons to Switch from Snapchat to Text Messaging
- 7 Powerful Speech to Text Apps to Boost Productivity
- 10 Best Speech to Text Tools for Effortless Transcription
- 13 Free Tools to Easily Transcribe Audio to Text
- 15 Surprising Ways Google's Speech-to-Text Boosts Productivity
- 7 Best Free Online Audio to Text Transcription Tools
- 9 Tips to Transcribe Speech to Text Faster and Better
- 13 Best Speech to Text Software for Windows 10 in 2023
- 7 Tips for Choosing the Best Transcriber for Audio to Text
- 11 Reasons Why Dragon Speech-to-Text Apps are Game-Changers
- 6 Secrets to Enhance Your Speech to Text Transcription
- 6 Brilliant Ways to Boost Productivity with Talk-to-Text on Your MacBook
- 6 Ways Transcription Software Converts Audio to Text
- 8 Tips to Transcribe Speech to Text Like a Pro
- 6 Reasons IBM Watson Speech to Text is a Game-Changer
- 14 Powerful Ways Talk-to-Text Improves Your Workflow
- 12 Top Windows Speech-to-Text Software for Efficient Transcription
- 12 Game-Changing Benefits of Apple's Speech to Text Technology
- 9 Powerful Use Cases for AWS Speech to Text Technology
- 10 Easy Steps to Transcribe YouTube Videos to Text
- transcription audio en texte
- online audio transcription
- free audio file transcription
- free ai audio transcription
- audio transcription service
- audio transcription online free
- audio transcription free online
- audio to transcription software
- audio and transcript
- ai audio transcription free
- voice recording to text converter
- translate voice recording to text
- record voice to text
- audio recording to text converter
- voice recording and transcription
- chatgpt voice to text
- gmail voice to text
- speech to text reader
- speech to text ai free
- speech to talk
- Create Engaging Animated Explainer Videos with a Free AI Tool
- Stop Multi-Subscribing: Benchmark Top AI Visual Models in One Canvas
- Best Seedance 2.5 API Provider: Every Price on the Market, Checked at Source
- AI OnlyFans: How to Generate $30,000/Month (Legally)
- Transform Your Script into an Engaging Video with AI Video Maker!
- AI Marketing Automation: A Comprehensive Guide for Small Businesses
- Midjourney Alternative for Anime Art Creators: Why PixAI May Be Better for Character Workflows
- 10 Things Most People Get Wrong About AI Image Search
- AI Girlfriend Apps: Top Choices Redefining Relationships 2025
- How to Reduce Quoting Errors in Salesforce with AI-Assisted Quote Creation
- AI Resume Builders: EnhanceCV, ResumeNerd AI, & Teal Compared
- ResumeAI: Crafting ATS-Optimized Resumes with AI
- AI in Resume Writing: A New Era for Job Seekers
- AI Resume Tools: Streamline Your Job Search and Land Your Dream Role
- AI Resume Optimization: The Right Way to Land Interviews
- Crafting a Killer Resume with AI: A Step-by-Step Guide
- Crafting a Winning Resume: AI Tools and Expert Tips
- AI Job Search: Level Up Your Career with AI Automation
- Empower Your Career Journey: Dynamic Resumes with AI
- AI Resume Builder: Create Professional Resumes Effortlessly

Copyright ©2026 toolify