































Table of Contents
- Key Points
- Understanding Model Context Protocol (MCP)
- Setting Up and Using GitHub Copilot with MCP Servers
- Step-by-Step Guide: Creating an issue using the MCP Github Tooling
- Pricing of GitHub Copilot
- Pros and Cons of Using Copilot with MCP
- Core Features of GitHub Copilot
- GitHub Copilot: use Cases
- Frequently Asked Questions (FAQ)
- Related Questions


Understanding Model Context Protocol (MCP)
What is Model Context Protocol (MCP)?
Model Context Protocol (MCP) is an open standard that enables seamless integration between Large Language Model (LLM) applications and external data sources.
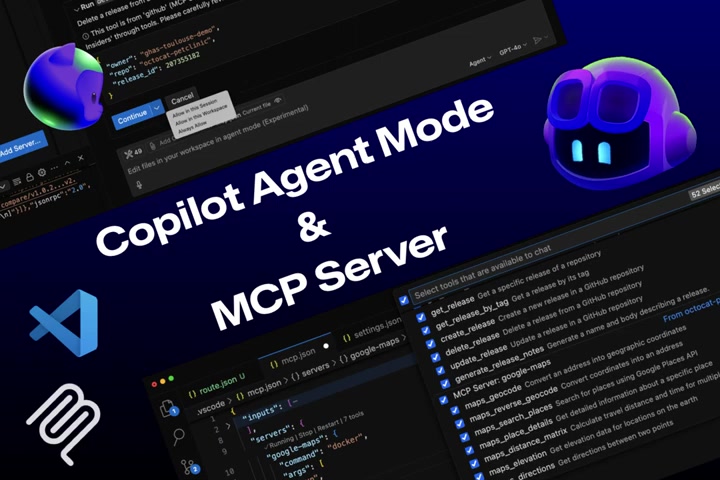
Think of it as a bridge connecting your AI-powered coding assistant with a wealth of external knowledge, allowing it to understand and assist you better. This is critical for tasks that require context beyond the immediate codebase. MCP allows LLM applications to connect with external servers to gain more information about data sources, knowledge bases, and any application you want to interact with, thus extending the capabilities of tools such as Github COPILOT. The official website is modelcontextprotocol.io. It provides a standardized way to connect LLMs with the context they need.
MCP Architecture and How it Works
MCP architecture generally involves a client, one or more MCP servers, and external data sources.
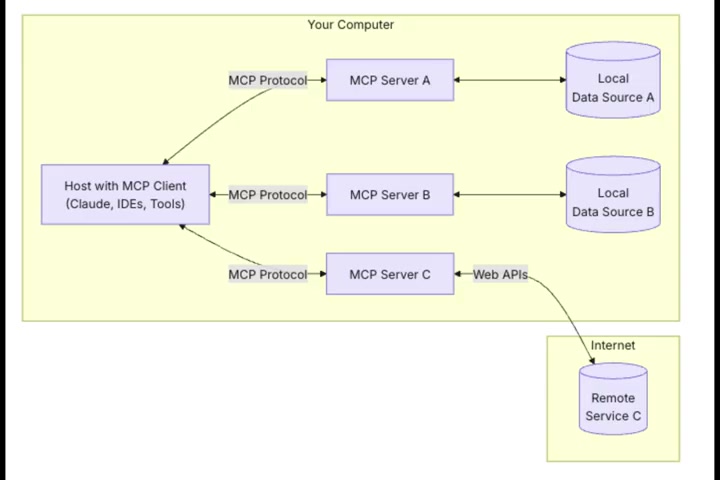
The client (e.g., GitHub Copilot in VS Code) uses the MCP protocol to communicate with MCP servers. The servers, in turn, interact with various external data sources, such as databases, APIs, or knowledge graphs, to fetch Relevant information. This information is then relayed back to the client, enriching its understanding of the current coding task. The Diagram displayed illustrates this, showcasing a client interacting with several servers to access local and remote data sources. The core idea behind MCP is that the LLM application (like Copilot) becomes more effective when it is aware of the context surrounding the task. By leveraging external data through MCP servers, Copilot can provide more accurate suggestions, identify potential issues, and automate tasks more intelligently.
Existing MCP Servers and Their Capabilities
The power of MCP lies in its extensibility and the growing ecosystem of MCP servers. Many servers are available, connecting to various data sources and applications.
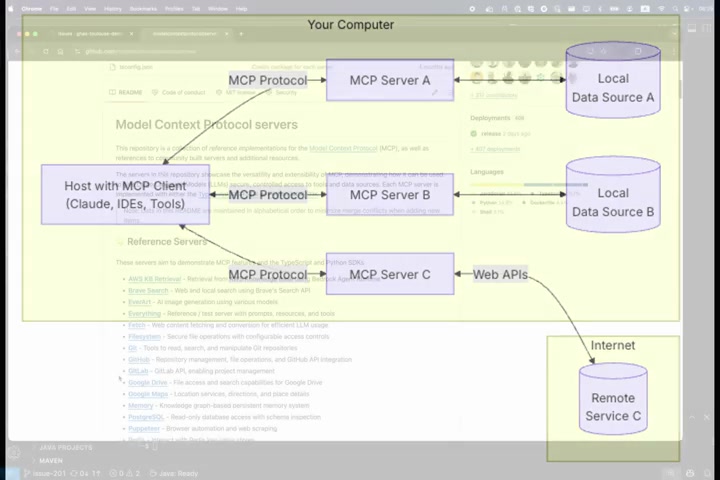
These servers include:
- AWS KB Retrieval: Retrieves information from AWS Knowledge Base.
- Brave Search: Provides web and local search results using Brave's Search API.
- Google Maps: provides location services, directions, and place details.
- PostgreSQL: Connects to PostgreSQL databases with schema inspection.
- Redis: Interacts with Redis key-value stores.
- Sentry: Retrieves and analyzes issues from Sentry.io.
- ClickHouse: Connects to ClickHouse database server.
This list is continuously growing, offering developers a wide range of options to integrate contextual data into their coding workflows. MCP is not restricted to any specific type of application and is focused on giving more context for precise access to schema and data when an application is being built.
Setting Up and Using GitHub Copilot with MCP Servers
Installing and Configuring an MCP Server in VS Code
The following steps will get you setup to run MCP Servers in VS Code with Github Copilot:
-
Install VS Code: Ensure you have VS Code installed on your system.
-
Install the Github Copilot Extension: Add the Github Copilot extension to your VS Code install.
-
Create a .vscode Directory: If one doesn't already exist.
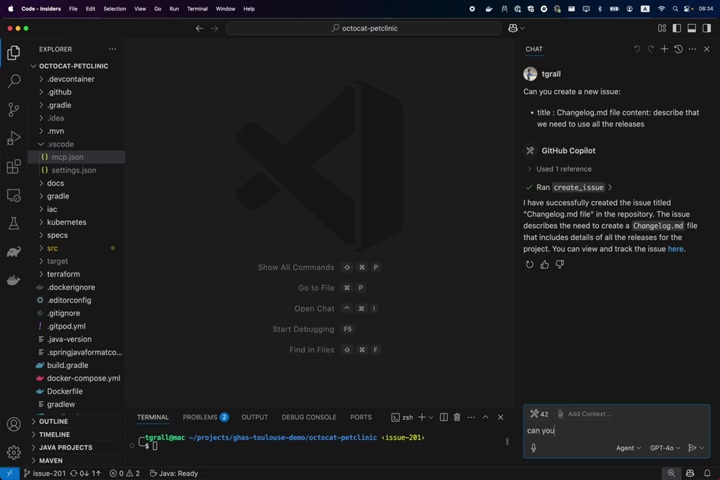
This directory stores workspace-specific settings.
-
Create an mcp.json File: Inside the
.vscodedirectory, create a file namedmcp.json. This file will contain the configuration for your MCP servers. -
Add the Github MCP Configuration: Below is an example of a basic configuration for a GitHub MCP server in a docker instance, you can see this Docker and NPX example configuration below, to be added to the
mcp.jsonfile:
{
    "inputs": [
        {
            "type": "promptString",
            "id": "github-key",
            "description": "GitHub PAT"
        }
    ],
    "servers": [
        {
            "github": {
                "command": "docker",
                "args": [
                    "run",
                    "-i",
                    "--rm",
                    "-e",
                    "GITHUB_PERSONAL_ACCESS_TOKEN",
                    "mcp/github"
                ],
                "env": {
                    "GITHUB_PERSONAL_ACCESS_TOKEN": "${input:github-key}"
                }
            }
        }
    ]
}
{
"inputs": [
{
"type": "promptString",
"id": "github-key",
"description": "GitHub PAT"
}
],
"servers": [
{
"github": {
"command": "npx",
"args": [
"@modelcontextprotocol/server-github"
],
"env": {
"GITHUB_PERSONAL_ACCESS_TOKEN": "${input:github-key}"
}
}
}
]
}- Add Your GitHub Personal Access Token (PAT): Note that to enable the server you need to replace `` with a generated token.
- Update the Tools: Refresh the tools inside VS Code with Github Copilot by clicking reload on the tools button.
Here's an example of the configurations for Claude Desktop as well. This shows MCP is being used by other platforms also.
{
  "mcpServers": {
    "github": {
      "command": "docker",
      "args": [
        "run",
        "-i",
        "--rm",
        "-e",
        "GITHUB_PERSONAL_ACCESS_TOKEN",
        "mcp/github"
      ],
      "env": {
        "GITHUB_PERSONAL_ACCESS_TOKEN": "YOUR_TOKEN"
      }
    }
  }
}
Using GitHub Copilot with MCP Servers: A Practical Example
To see how Copilot interacts with an MCP server, consider creating and managing GitHub issues.
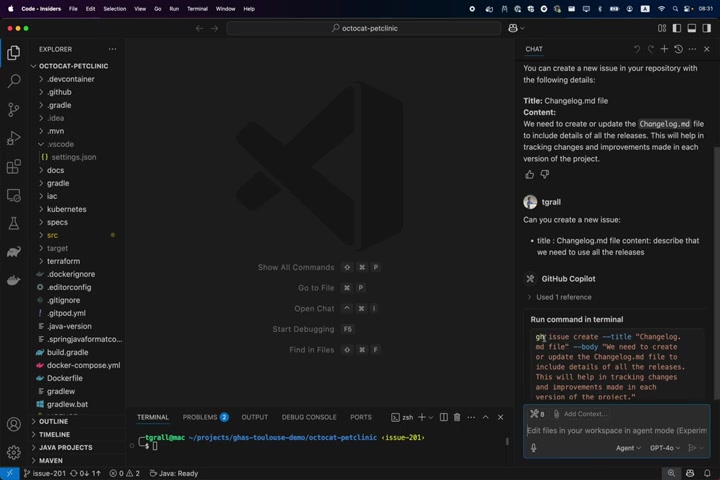
First, without MCP, attempting to create an issue directly via Copilot chat results in a description of the issue within the chat but no actual action taken on the repository. This is where MCP integration shines.
- Enable Agent Mode: Switch to Agent Mode in Copilot Chat
- Select Tools: Pick the necessary tool or functionality that will be made available inside the agent's toolset.
- Prompt Copilot: Enter the Github PAT token when prompted, to connect the tool set to your Github and give it the correct authorization to make changes.
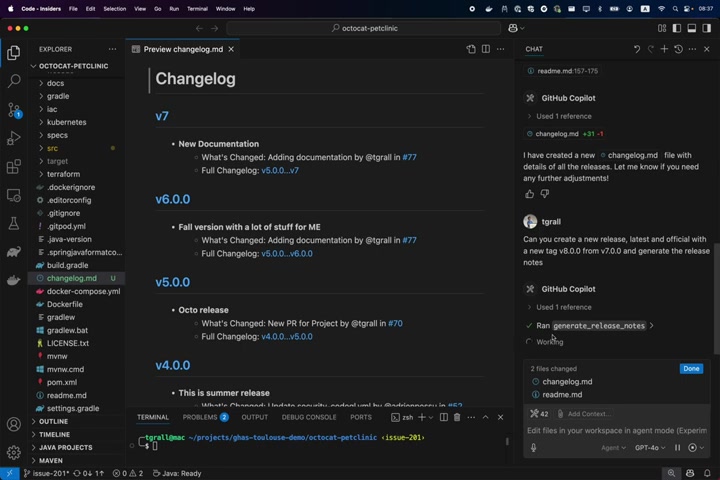
- Create a new Change Log: Ask Copilot to create a new issue. Copilot, now armed with the necessary tools from the Github MCP server can then read existing release information to create the Changelog.md file.
Key Takeaway: The difference is that Agent Mode with MCP Servers provides the Github Copilot with the tooling and information it needs to actually take actions rather than give a description of what is happening.
Step-by-Step Guide: Creating an issue using the MCP Github Tooling
Install VS Code and Github Copilot
First, you have to make sure both VS Code and the Github Copilot extension is installed on your system. Follow the instructions on the VS Code marketplace to download and install the Github Copilot extension, and follow instructions from Microsoft about VS Code download and installation.
Create an MCP Configuration File
With VS Code open, create a new file inside the .vscode folder. Call this file mcp.json. This file needs to have the JSON contents added to it in order for Copilot to know how to interface with Github.
As a reminder, the contents of mcp.json are as follows, with `` needing to be replaced:
{
    "inputs": [
        {
            "type": "promptString",
            "id": "github-key",
            "description": "GitHub PAT"
        }
    ],
    "servers": [
        {
            "github": {
                "command": "docker",
                "args": [
                    "run",
                    "-i",
                    "--rm",
                    "-e",
                    "GITHUB_PERSONAL_ACCESS_TOKEN",
                    "mcp/github"
                ],
                "env": {
                    "GITHUB_PERSONAL_ACCESS_TOKEN": "${input:github-key}"
                }
            }
        }
    ]
}
Update The Available Toolsets and Refresh
Ensure that your mcp.json is saved in the .vscode directory. This will enable Copilot to interface with the tools. To refresh, navigate to where you ask Copilot your query, and click the tool symbol.
It will ask you for your Github PAT token, enter that here, then you can refresh and you should see Github toolsets available. You will also want to select that those tools remain available for this workspace for future use.
You're off to the Races!
That's it, you're setup and able to utilize Github Copilot with MCP Github servers to automate things like issue creation, pull requests, branching, and so much more!
Follow along in the video for specific implementation examples.





Most people like



































Report
Please select a reason for reporting
- 13 Reasons to Switch from Snapchat to Text Messaging
- 7 Powerful Speech to Text Apps to Boost Productivity
- 10 Best Speech to Text Tools for Effortless Transcription
- 13 Free Tools to Easily Transcribe Audio to Text
- 15 Surprising Ways Google's Speech-to-Text Boosts Productivity
- 7 Best Free Online Audio to Text Transcription Tools
- 9 Tips to Transcribe Speech to Text Faster and Better
- 13 Best Speech to Text Software for Windows 10 in 2023
- 7 Tips for Choosing the Best Transcriber for Audio to Text
- 11 Reasons Why Dragon Speech-to-Text Apps are Game-Changers
- 6 Secrets to Enhance Your Speech to Text Transcription
- 6 Brilliant Ways to Boost Productivity with Talk-to-Text on Your MacBook
- 6 Ways Transcription Software Converts Audio to Text
- 8 Tips to Transcribe Speech to Text Like a Pro
- 6 Reasons IBM Watson Speech to Text is a Game-Changer
- 14 Powerful Ways Talk-to-Text Improves Your Workflow
- 12 Top Windows Speech-to-Text Software for Efficient Transcription
- 12 Game-Changing Benefits of Apple's Speech to Text Technology
- 9 Powerful Use Cases for AWS Speech to Text Technology
- 10 Easy Steps to Transcribe YouTube Videos to Text
- transcription audio en texte
- online audio transcription
- free audio file transcription
- free ai audio transcription
- audio transcription service
- audio transcription online free
- audio transcription free online
- audio to transcription software
- audio and transcript
- ai audio transcription free
- voice recording to text converter
- translate voice recording to text
- record voice to text
- audio recording to text converter
- voice recording and transcription
- chatgpt voice to text
- gmail voice to text
- speech to text reader
- speech to text ai free
- speech to talk
- How to Use AI Tools to Find Internal Linking Opportunities Across a Business Website
- Discover Your Perfect Haircut with AI Hairstyle Apps
- Free Reputation Calculator Tools: How They're Adapting to Score AI Visibility, Not Just Rankings
- Design Professional Flyers for Free on Your Phone
- Best Free Flyer Maker Apps for Android: Design Like a Pro
- How to Know If Your Business Is Ready for an AI Customer Service Agent
- Revolutionizing Storytelling: From Novels to Screenplays with AI
- Create Engaging Animated Explainer Videos with a Free AI Tool
- Stop Multi-Subscribing: Benchmark Top AI Visual Models in One Canvas
- Best Seedance 2.5 API Provider: Every Price on the Market, Checked at Source
- Top AI Social Media Management Tools: Automate Your Content Strategy
- Free AI Text to Video Generator: Create Stunning Videos from Text
- Discover 17 ChatGPT Alternatives: A Comprehensive Comparison
- Character.AI vs. Janitor AI: Which AI Chat Platform Reigns Supreme?
- Top Virtual Assistant Companies in 2026: Reviews, Pricing, and Plans Compared
- Unveiling FaceCheck.ID: Revolutionizing Reverse Image Searches with AI
- 11 Best AI Dialers in 2026: Features, Pricing, Pros and Cons
- How I Direct Consistent AI Clips: A Hands-On Guide to Multi-Model Generation
- A Realistic Review of the Photo Generator Image Tool
- Playwright MCP Server: Automated Web Testing with Agent Mode

Copyright ©2026 toolify