































Table of Contents
- Key Points
- Setting Up Your Azure AI Foundry Project
- Set Default AI Foundry Project
- AI Toolkit with Azure AI Foundry and GitHub Copilot Integration: Pros and Cons
- Frequently Asked Questions
- Related Questions



Setting Up Your Azure AI Foundry Project
Creating the Azure AI Foundry Project
Embarking on the journey of building intelligent agents with Azure AI Foundry begins with a fundamental step: project creation. The Azure AI Foundry portal serves as the launching pad, and this section provides a detailed walkthrough on how to initiate your project within this environment. This initial setup is not just a formality; it's the foundational stone upon which all subsequent development activities will rest. By creating an Azure AI Foundry project, you establish the necessary framework for managing, accessing, and deploying AI models that will ultimately power your agents.
First, navigate to the Azure AI Foundry portal. Once there, you will find a prominent 'Create new' button. Clicking this button initiates the project creation process. A window will appear, prompting you to choose a resource type. Select 'Azure AI Foundry resource', which is the recommended option for building AI agents.
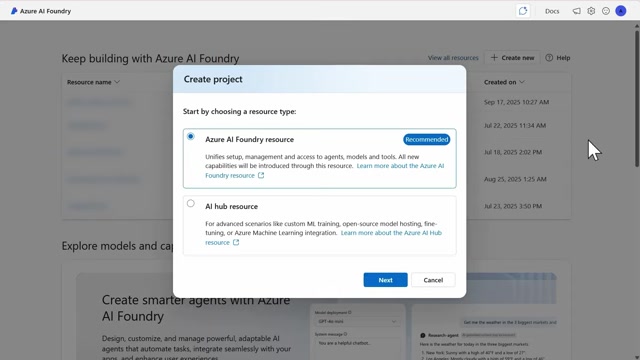
This resource type unifies the setup, management, and access to agents, models, and tools, ensuring a streamlined and cohesive development experience.
With the resource type selected, proceed to the next step by clicking 'Next'. You'll then be asked to provide a name for your project. It’s good practice to use a descriptive name that reflects the project's purpose or the type of AI agent you plan to build. For example, 'weather-agent-ghcp' could be an excellent name if you intend to create an AI agent that provides weather updates using GitHub Copilot. Ensure that the name adheres to the naming conventions specified, including length and character restrictions.
Once you’ve given your project a name, delve into the 'Advanced options' section. This area is where you configure essential details like the Azure AI Foundry resource name, subscription, resource group, and region. Note that the project name you provided earlier automatically populates the Azure AI Foundry resource name field, though you can modify it if needed. Select the appropriate Azure subscription from the dropdown menu. If you have access to multiple subscriptions, make sure to choose the one where you want to deploy your AI resources.
Decide whether to use an existing resource group or create a new one. Resource groups are logical containers that hold related Azure resources, making them easier to manage and organize. If you don't have an existing resource group or prefer to create a dedicated one for this project, select the option to create a new resource group. Finally, select the region where you want to deploy your resources. Choose a region that is geographically closest to your users or that meets your compliance requirements.
After meticulously configuring all the necessary settings, click the 'Create' button. Azure will then proceed with setting up your AI Foundry project, which may take a few minutes. Once the process is complete, the Azure AI Foundry portal will open to the project’s overview page. From here, you can explore available models, configure endpoints, and manage project settings. This successful creation marks the beginning of your AI agent development journey within the Azure AI Foundry ecosystem.
Set Default AI Foundry Project
Setting the Project
After all installations are complete, the default project has to be selected. With everything installed, it's time to make sure the right AI Foundry Project is chosen for use. Make sure your AI Foundry project is set as the default, and you can do that in two steps.
Firstly, you will need to navigate back to AI Toolkit extension view, and select Models.
In ‘My Resources’ you’ll see an option for Azure AI Foundry with an indicator saying that no project is selected. Hover over the section that says Azure AI Foundry, then right click and select Select Project. This should load the appropriate subscription, then you can choose to search for a project.
Deploy Model to Azure AI Foundry
To use local AI models with GitHub Copilot, begin within the AI Toolkit extension at the Model Catalog.
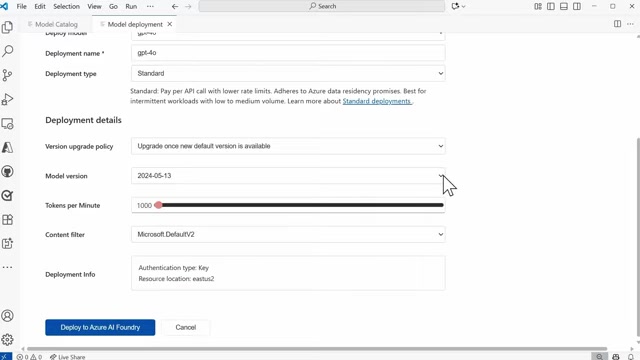
Within this Model Catalog, I’m going to filter to view all of the Azure AI Foundry models. So I’m scrolling down to the section where we have the filters. I’ll select Hosted By, and then from there, I’ll select Azure AI Foundry. Now this will provide access to all Azure AI Foundry models. At this point, you'll need to select Deploy to Azure AI Foundry.
The project name, and the connected AI resource will be auto-populated. For the deployment, I’ll use the model name. Under the Model Deployment section there are some choices you can make as well. You can select the type of deployment. The default is going to be Standard, but it does show how it adheres to Azure data residency promises. You also have options for Token Per Minute, and Content Filter. At this point, you can finally select Deploy to Azure AI Foundry.
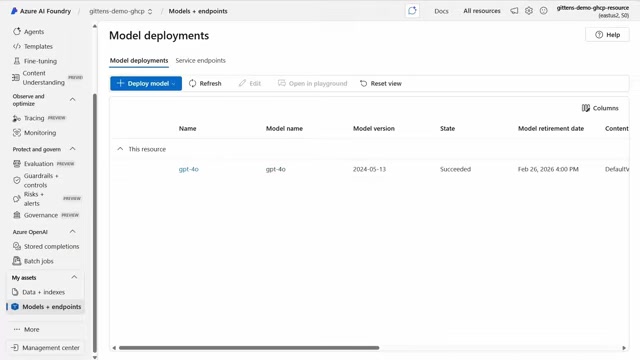
After this has deployed it will take you back to the AI Toolkit Extension View. In 'My Resources' you'll see that the project ‘gittens-demo-ghcp’ has been created, in addition to several models.




Most people like































Report
Please select a reason for reporting
- 13 Reasons to Switch from Snapchat to Text Messaging
- 7 Powerful Speech to Text Apps to Boost Productivity
- 10 Best Speech to Text Tools for Effortless Transcription
- 13 Free Tools to Easily Transcribe Audio to Text
- 15 Surprising Ways Google's Speech-to-Text Boosts Productivity
- 7 Best Free Online Audio to Text Transcription Tools
- 9 Tips to Transcribe Speech to Text Faster and Better
- 13 Best Speech to Text Software for Windows 10 in 2023
- 7 Tips for Choosing the Best Transcriber for Audio to Text
- 11 Reasons Why Dragon Speech-to-Text Apps are Game-Changers
- 6 Secrets to Enhance Your Speech to Text Transcription
- 6 Brilliant Ways to Boost Productivity with Talk-to-Text on Your MacBook
- 6 Ways Transcription Software Converts Audio to Text
- 8 Tips to Transcribe Speech to Text Like a Pro
- 6 Reasons IBM Watson Speech to Text is a Game-Changer
- 14 Powerful Ways Talk-to-Text Improves Your Workflow
- 12 Top Windows Speech-to-Text Software for Efficient Transcription
- 12 Game-Changing Benefits of Apple's Speech to Text Technology
- 9 Powerful Use Cases for AWS Speech to Text Technology
- 10 Easy Steps to Transcribe YouTube Videos to Text
- transcription audio en texte
- online audio transcription
- free audio file transcription
- free ai audio transcription
- audio transcription service
- audio transcription online free
- audio transcription free online
- audio to transcription software
- audio and transcript
- ai audio transcription free
- voice recording to text converter
- translate voice recording to text
- record voice to text
- audio recording to text converter
- voice recording and transcription
- chatgpt voice to text
- gmail voice to text
- speech to text reader
- speech to text ai free
- speech to talk
- Create Engaging Animated Explainer Videos with a Free AI Tool
- Stop Multi-Subscribing: Benchmark Top AI Visual Models in One Canvas
- Best Seedance 2.5 API Provider: Every Price on the Market, Checked at Source
- AI OnlyFans: How to Generate $30,000/Month (Legally)
- Transform Your Script into an Engaging Video with AI Video Maker!
- AI Marketing Automation: A Comprehensive Guide for Small Businesses
- Midjourney Alternative for Anime Art Creators: Why PixAI May Be Better for Character Workflows
- 10 Things Most People Get Wrong About AI Image Search
- AI Girlfriend Apps: Top Choices Redefining Relationships 2025
- How to Reduce Quoting Errors in Salesforce with AI-Assisted Quote Creation
- AI Resume Builders: EnhanceCV, ResumeNerd AI, & Teal Compared
- ResumeAI: Crafting ATS-Optimized Resumes with AI
- AI in Resume Writing: A New Era for Job Seekers
- AI Resume Tools: Streamline Your Job Search and Land Your Dream Role
- AI Resume Optimization: The Right Way to Land Interviews
- Crafting a Killer Resume with AI: A Step-by-Step Guide
- Crafting a Winning Resume: AI Tools and Expert Tips
- AI Job Search: Level Up Your Career with AI Automation
- Empower Your Career Journey: Dynamic Resumes with AI
- AI Resume Builder: Create Professional Resumes Effortlessly

Copyright ©2026 toolify