























Mastering PHP and MySQL: A Step-by-Step Tutorial

Updated on Oct 03,2025








Table of Contents
- Key Points
- Setting Up the Development Environment for PHP and MySQL
- Essential PHP Coding Techniques for MySQL Integration
- Step-by-Step Guide to Connecting PHP to MySQL and Inserting Data
- Weighing the Benefits and Drawbacks of XAMPP
- Frequently Asked Questions
- Related Questions


Setting Up the Development Environment for PHP and MySQL
Downloading and Installing XAMPP
Before diving into the code, a proper local server environment is essential. Since PHP is a server-side language, it requires a server to run effectively. XAMPP provides this local server support, making it easy to develop and test PHP applications on your machine. XAMPP comes bundled with Apache, MySQL, and PHP, creating an all-in-one solution for web developers.
Download XAMPP: Begin by searching for 'XAMPP' on Google or navigate directly to the Apache Friends website. The site automatically detects your operating system, offering the appropriate download. XAMPP is available for Windows, Linux, and macOS, ensuring compatibility across various development platforms.
Installation: The installation process is generally straightforward. However, some users may encounter issues related to User Account Control (UAC) on Windows. During the XAMPP installation, a warning might appear, suggesting you install XAMPP in a non-UAC-protected directory. This helps avoid potential permission issues during development. The recommended directory is often outside the 'Program Files' folder.
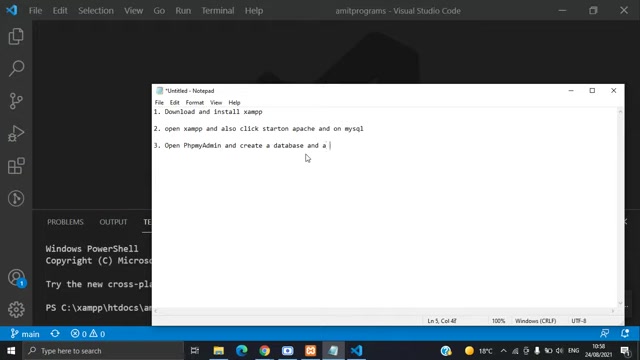
Start Apache and MySQL: After installation, launch the XAMPP Control Panel. To begin using PHP and MySQL, start both the Apache web server and the MySQL database service. These are the core components necessary to execute PHP code and interact with your database. Once started, Apache will host your PHP files, and MySQL will manage the database.
Creating a New Database in phpMyAdmin
With XAMPP set up and running, the next step involves creating a database where your application’s data will reside. phpMyAdmin, a web-based database administration tool, is included with XAMPP, simplifying the process.
Access phpMyAdmin: Open your web browser and navigate to http://localhost/phpmyadmin. This URL accesses the phpMyAdmin interface, where you can manage your MySQL databases.
Create a New Database: In phpMyAdmin, locate the 'New' button or the 'Databases' tab. Click it to create a new database. Enter a descriptive name for your database (e.g., 'php_tutorial').
Important Considerations: When naming your database, choose a name that reflects the purpose of your application. It's also crucial to select an appropriate collation for your database. Collation determines how the database sorts and compares character data. utf8mb4_general_ci is a widely used collation that supports a broad range of characters. After entering the database name and selecting the collation, click the 'Create' button to finalize the database creation process. With the database created, the focus shifts to configuring the database table.
Create Database Table in phpMyAdmin
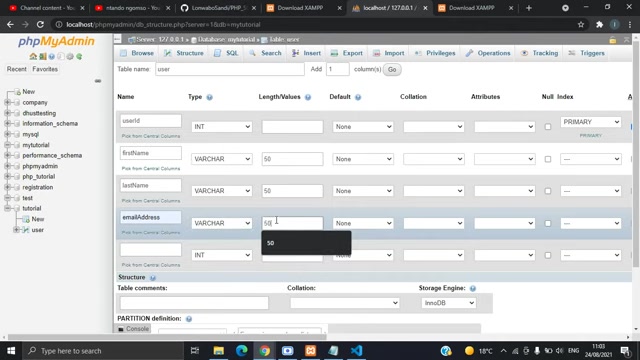
Create User table: Design a table to hold the user data for our app, we're calling this user table. First, assign a table name user in phpMyAdmin.
-
User ID (userId): This is the user's unique identification number within the application. It is defined as an integer (INT) and set to auto-increment, so the database manages its value for each new user added.
-
First Name (firstName): Stores the first name, using VARCHAR with a length of 50 to accommodate various name lengths. It uses the utf8mb4_general_ci collation to support many character sets.
-
Last Name (lastName): Similar to the first name, this holds the user's last name, with the same VARCHAR configuration and collation.
-
Email Address (emailAddress): This field stores the user’s email address, which is essential for communication. It is set as VARCHAR(50) with utf8mb4_general_ci collation.
-
Password (pass): Stores the user's password, crucial for securing the account. It's defined as VARCHAR with an increased length of 150 to handle modern, longer passwords and bcrypt hashing.
For those new to database design, there are other database types like TEXT, DATE, BOOLEAN, just to name a few. Use whatever is appropriate for your application.
Essential PHP Coding Techniques for MySQL Integration
Displaying PHP Errors for Effective Debugging
When working with PHP and MySQL, enabling error reporting is vital for efficient debugging. PHP’s error reporting feature displays any errors that occur during script execution, helping you identify and resolve issues quickly. Add the following code to the beginning of your PHP file:
<?php
error_reporting(E_ALL);
ini_set('display_errors', '1');
?>
This snippet ensures that all PHP errors are reported and displayed on the webpage.
It's useful for identifying and fixing bugs during development. Be cautious, though; in production environments, displaying errors might expose sensitive information.
This error reporting setup will provide real-time error messages as you develop and test your code. This is particularly helpful when you’re connecting to databases or running queries where minor syntax errors can cause failures. Error messages guide you to the source of the problem quickly, making debugging easier.
Connecting PHP to MySQL: Code Walkthrough
Connecting PHP to a MySQL database involves several steps, each with its own set of code requirements. First, establish the connection. This process requires careful handling to ensure your PHP application can reliably interact with the database.
<?php

error_reporting(E_ALL);
ini_set('display_errors', '1');

$mysql = mysqli_connect('localhost', 'root', '', 'mytutorial');

if (!$mysql) {
    echo "Error: Unable to connect to MySQL";
    echo ", Debugging errno: " . mysqli_connect_errno();
} else {
    echo "Success able to connect to MySQL";
}
?>
This code includes the following:
- Setting up Error Reporting: The first two lines ensure that PHP reports all errors, which is essential for debugging.
- Establishing the Connection: The
$mysql = mysqli_connect()function attempts to connect to the MySQL server using the provided credentials: host, username, password, and database name. In a local development environment, the host is typically 'localhost', the username 'root', and the password left empty. Replace'mytutorial'with the name of the database you created. - Checking the Connection: The
if (!$mysql)statement checks whether the connection was successful. If$mysqlevaluates tofalse, it means the connection failed. In this case, the script outputs an error message, including the specific error number from MySQL, which is invaluable for troubleshooting. - Successful Connection: If the connection is successful, the
elseblock outputs a success message, confirming that PHP can communicate with the MySQL database. Make sure XAMPP is running to establish this connection!








Most people like

































Report
Please select a reason for reporting
- 13 Reasons to Switch from Snapchat to Text Messaging
- 7 Powerful Speech to Text Apps to Boost Productivity
- 10 Best Speech to Text Tools for Effortless Transcription
- 13 Free Tools to Easily Transcribe Audio to Text
- 15 Surprising Ways Google's Speech-to-Text Boosts Productivity
- 7 Best Free Online Audio to Text Transcription Tools
- 9 Tips to Transcribe Speech to Text Faster and Better
- 13 Best Speech to Text Software for Windows 10 in 2023
- 7 Tips for Choosing the Best Transcriber for Audio to Text
- 11 Reasons Why Dragon Speech-to-Text Apps are Game-Changers
- 6 Secrets to Enhance Your Speech to Text Transcription
- 6 Brilliant Ways to Boost Productivity with Talk-to-Text on Your MacBook
- 6 Ways Transcription Software Converts Audio to Text
- 8 Tips to Transcribe Speech to Text Like a Pro
- 6 Reasons IBM Watson Speech to Text is a Game-Changer
- 14 Powerful Ways Talk-to-Text Improves Your Workflow
- 12 Top Windows Speech-to-Text Software for Efficient Transcription
- 12 Game-Changing Benefits of Apple's Speech to Text Technology
- 9 Powerful Use Cases for AWS Speech to Text Technology
- 10 Easy Steps to Transcribe YouTube Videos to Text
- transcription audio en texte
- online audio transcription
- free audio file transcription
- free ai audio transcription
- audio transcription service
- audio transcription online free
- audio transcription free online
- audio to transcription software
- audio and transcript
- ai audio transcription free
- voice recording to text converter
- translate voice recording to text
- record voice to text
- audio recording to text converter
- voice recording and transcription
- chatgpt voice to text
- gmail voice to text
- speech to text reader
- speech to text ai free
- speech to talk
- How to Use AI Tools to Find Internal Linking Opportunities Across a Business Website
- Discover Your Perfect Haircut with AI Hairstyle Apps
- Free Reputation Calculator Tools: How They're Adapting to Score AI Visibility, Not Just Rankings
- Design Professional Flyers for Free on Your Phone
- Best Free Flyer Maker Apps for Android: Design Like a Pro
- How to Know If Your Business Is Ready for an AI Customer Service Agent
- Revolutionizing Storytelling: From Novels to Screenplays with AI
- Create Engaging Animated Explainer Videos with a Free AI Tool
- Stop Multi-Subscribing: Benchmark Top AI Visual Models in One Canvas
- Best Seedance 2.5 API Provider: Every Price on the Market, Checked at Source
- Top AI Social Media Management Tools: Automate Your Content Strategy
- Free AI Text to Video Generator: Create Stunning Videos from Text
- Discover 17 ChatGPT Alternatives: A Comprehensive Comparison
- Character.AI vs. Janitor AI: Which AI Chat Platform Reigns Supreme?
- Top Virtual Assistant Companies in 2026: Reviews, Pricing, and Plans Compared
- Unveiling FaceCheck.ID: Revolutionizing Reverse Image Searches with AI
- 11 Best AI Dialers in 2026: Features, Pricing, Pros and Cons
- How I Direct Consistent AI Clips: A Hands-On Guide to Multi-Model Generation
- A Realistic Review of the Photo Generator Image Tool
- Playwright MCP Server: Automated Web Testing with Agent Mode

Copyright ©2026 toolify