































Table of Contents
- Key Points
- Building Your QR Code Inventory System
- Generating QR Codes with QuickChart
- How to Set Up Your AppSheet Application
- AppSheet Pricing Structure
- Pros and Cons of Using AppSheet for QR Code Inventory Management
- AppSheet Core Features for Inventory Management
- Use Cases for QR Code Inventory Systems
- Frequently Asked Questions
- Related Questions


Building Your QR Code Inventory System
Understanding the Core Components
This Tutorial focuses on creating a system that automates inventory tracking using QR codes. The core components include:
- A Product Database: This database contains all your inventory items, including details such as item name, quantity, price, and a unique product ID.
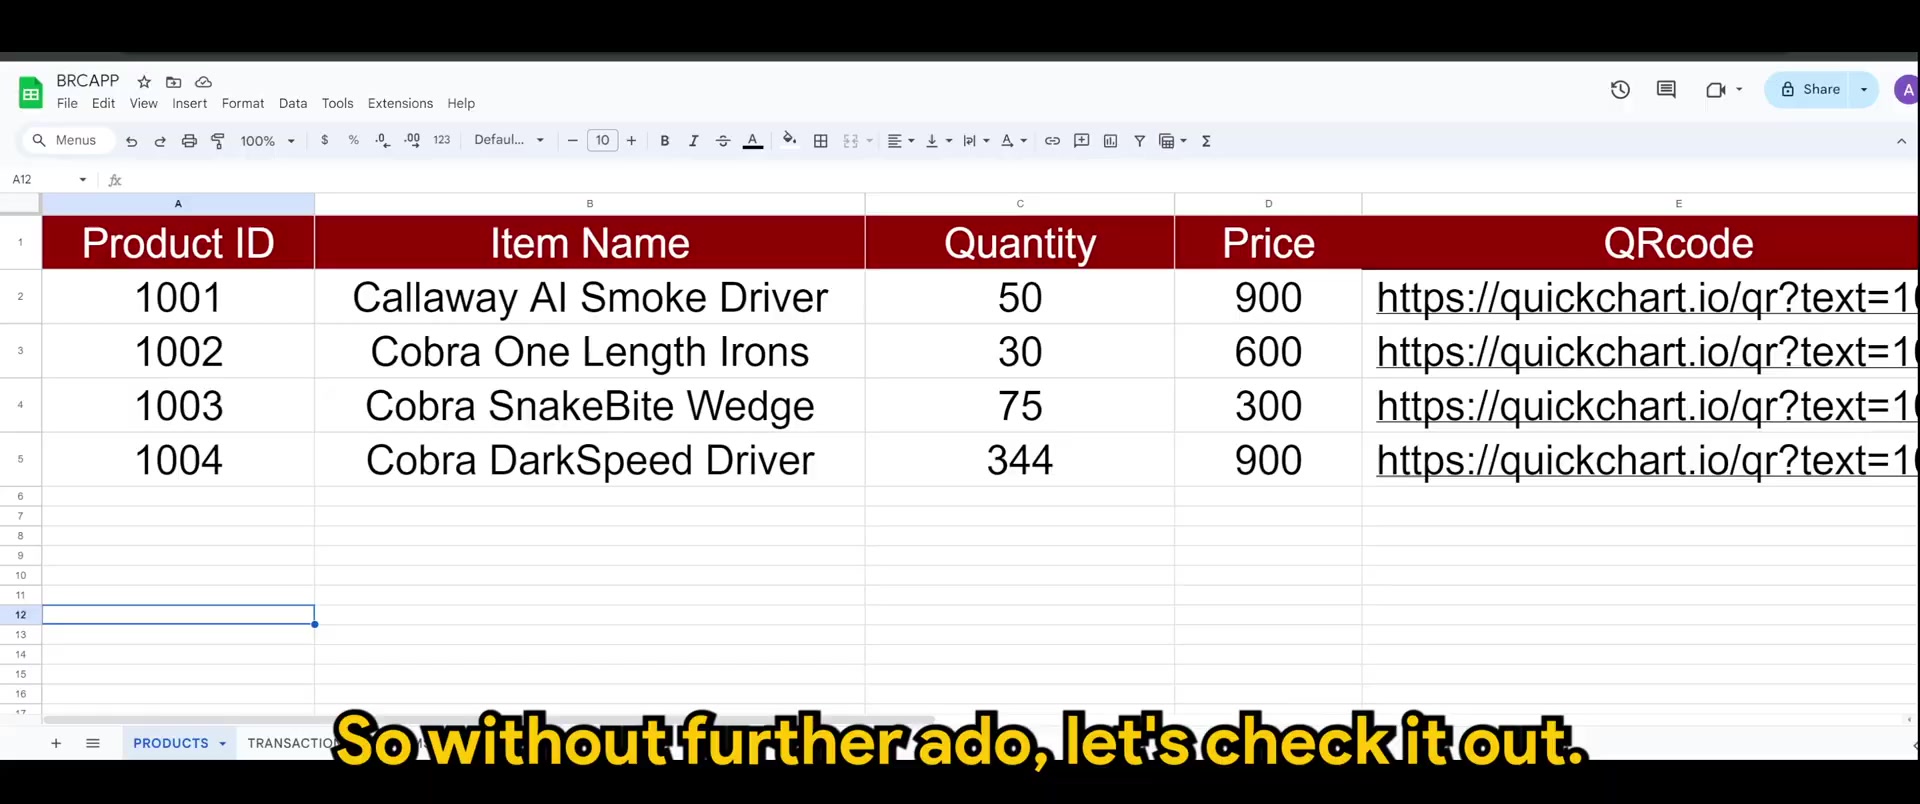
This is the backbone of your system.
- A QR Code Generator: Generates QR codes containing the product ID, which will be used for scanning.
- An AppSheet Application: A mobile app built using AppSheet that enables scanning QR codes, adding items to transactions, and generating receipts or invoices.
- A Transaction Log: Captures all transaction details, such as customer ID, date, total amount, and items purchased.
The system works by scanning a QR code, automatically retrieving the item's details from the product database, and adding it to the current transaction. This drastically reduces manual entry and improves accuracy.
Keywords: QR code, inventory system, AppSheet, product database, QR code generator, mobile app, transaction log, automation
Setting Up Your Product Database
The first step is creating a detailed product database. This database will store information about each item in your inventory. Important fields to include are:
- Product ID: A unique identifier for each product.

This is critical for linking the QR code to the correct item.
- Item Name: The name of the product.
- Quantity: The current stock level.
- Price: The price of the product.
- QR Code (or Barcode): A field containing the URL of the QR code image, which can be generated using services like QuickChart.io. This is where the quickchart website url need to be written.
Using a spreadsheet program like Google Sheets is ideal for this database. Ensure that your product IDs are unique and consistently formatted.
Keywords: product database, item name, quantity, price, QR code, Google Sheets, product ID
Generating QR Codes with QuickChart
Leveraging the QuickChart API
QuickChart.io is a powerful tool that allows you to generate charts and QR codes using a simple API. This makes it perfect for creating QR codes for your inventory items.
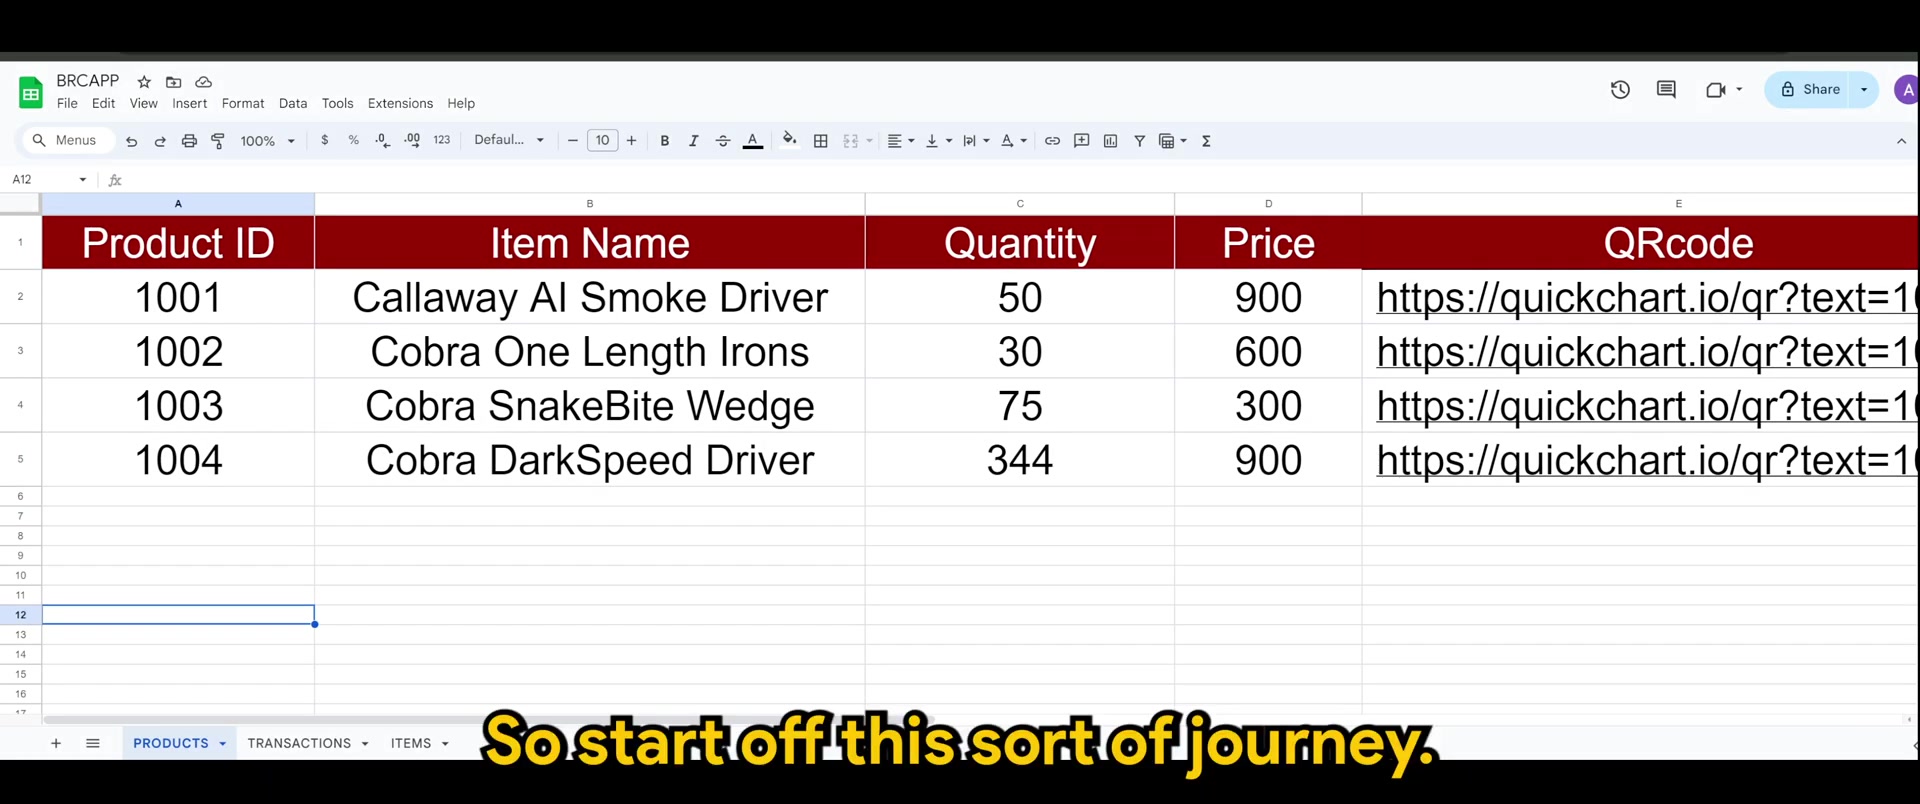
To generate QR codes, you’ll use the following formula:
https://quickchart.io/qr?text=[PRODUCT ID]Replace [PRODUCT ID] with the unique identifier of your product. You can automate this process within your spreadsheet by using a formula that concatenates the base URL with the product ID. For example, in Google Sheets, you can use:
="https://quickchart.io/qr?text="&A2where A2 is the cell containing the product ID. This will generate a unique QR code URL for each item.
| Column Header | Data Type | Description |
|---|---|---|
| Product ID | Number | Unique identifier for each product. |
| Item Name | Text | Name of the product. |
| Quantity | Number | Number of items currently in stock. |
| Price | Number | Price of the product. |
| QR Code URL | Text | URL generated for each QR code using QuickChart.io's API. |
Keywords: QuickChart.io, QR code, API, Google Sheets, formula, concatenation
Structuring Your Transaction and Items Tables
In AppSheet, you’ll need two primary tables to manage transactions:
- Transactions Table: This table will store all transaction-related information. It will include columns such as:
- Transaction ID: A unique identifier for each transaction.
- Date: The date of the transaction.
- Customer ID: An identifier for the customer.
- Total Amount: The total value of the transaction.
- Timestamp: The date and time the transaction was recorded.
- Status: Indicates whether the transaction is open or closed.
- Items Table: This table will list each item included in a particular transaction. Columns will include:
- Transaction ID: A reference to the Transactions table.
- QR Code: The scanned QR code from the product.
- Item Name: The name of the item (populated automatically).
- Quantity: The quantity of the item purchased.
- Price: The price of the item (populated automatically).
- Line Total: The total cost of the item (calculated automatically).
Keywords: AppSheet, transactions table, items table, transaction ID, customer ID, total amount, timestamp, status, QR code
How to Set Up Your AppSheet Application
Connecting Your Data
Connect AppSheet to your Google Sheets or other data source where your product and transaction data is stored. To do this:
- Create a new app in AppSheet.
- Choose your data source (e.g., Google Sheets).
- Select the spreadsheet containing your product and transaction data.
AppSheet will automatically create views based on your data structure. Review these views and adjust them to fit your specific needs.
Keywords: AppSheet, connect data, Google Sheets, data source, spreadsheet
Configuring the Scanning Feature
To enable QR code scanning in your AppSheet app:
- In the Items table, locate the 'Barcode' column.
- Set the column type to 'Text'.
- In 'Other Properties', enable the 'Scannable' option. This will allow users to scan QR codes into this column.
This configuration ensures that AppSheet recognizes the column as a QR code input field.
Keywords: QR code scanning, AppSheet, barcode column, scannable, mobile app
Automating Data Population with Formulas
AppSheet's formula capabilities allow you to automatically populate item details when a QR code is scanned. Use the Lookup() function to retrieve data from the product database.
For example, to automatically populate the 'Item Name' field, use the following formula:
LOOKUP([THISROW].[Barcode], "Products", "Product ID", "Item Name")This formula searches the 'Products' table, finds the row where 'Product ID' matches the scanned 'Barcode', and returns the corresponding 'Item Name'. Apply similar formulas to populate 'Price' and other Relevant fields.
Keywords: AppSheet formula, lookup function, barcode, product ID, item name, automation
Creating a New AppSheet Application
The first step to harnessing the power of AppSheet is setting up a new application linked to your carefully curated data.
- Initiate App Creation: Start by launching AppSheet and selecting the option to create a new application.
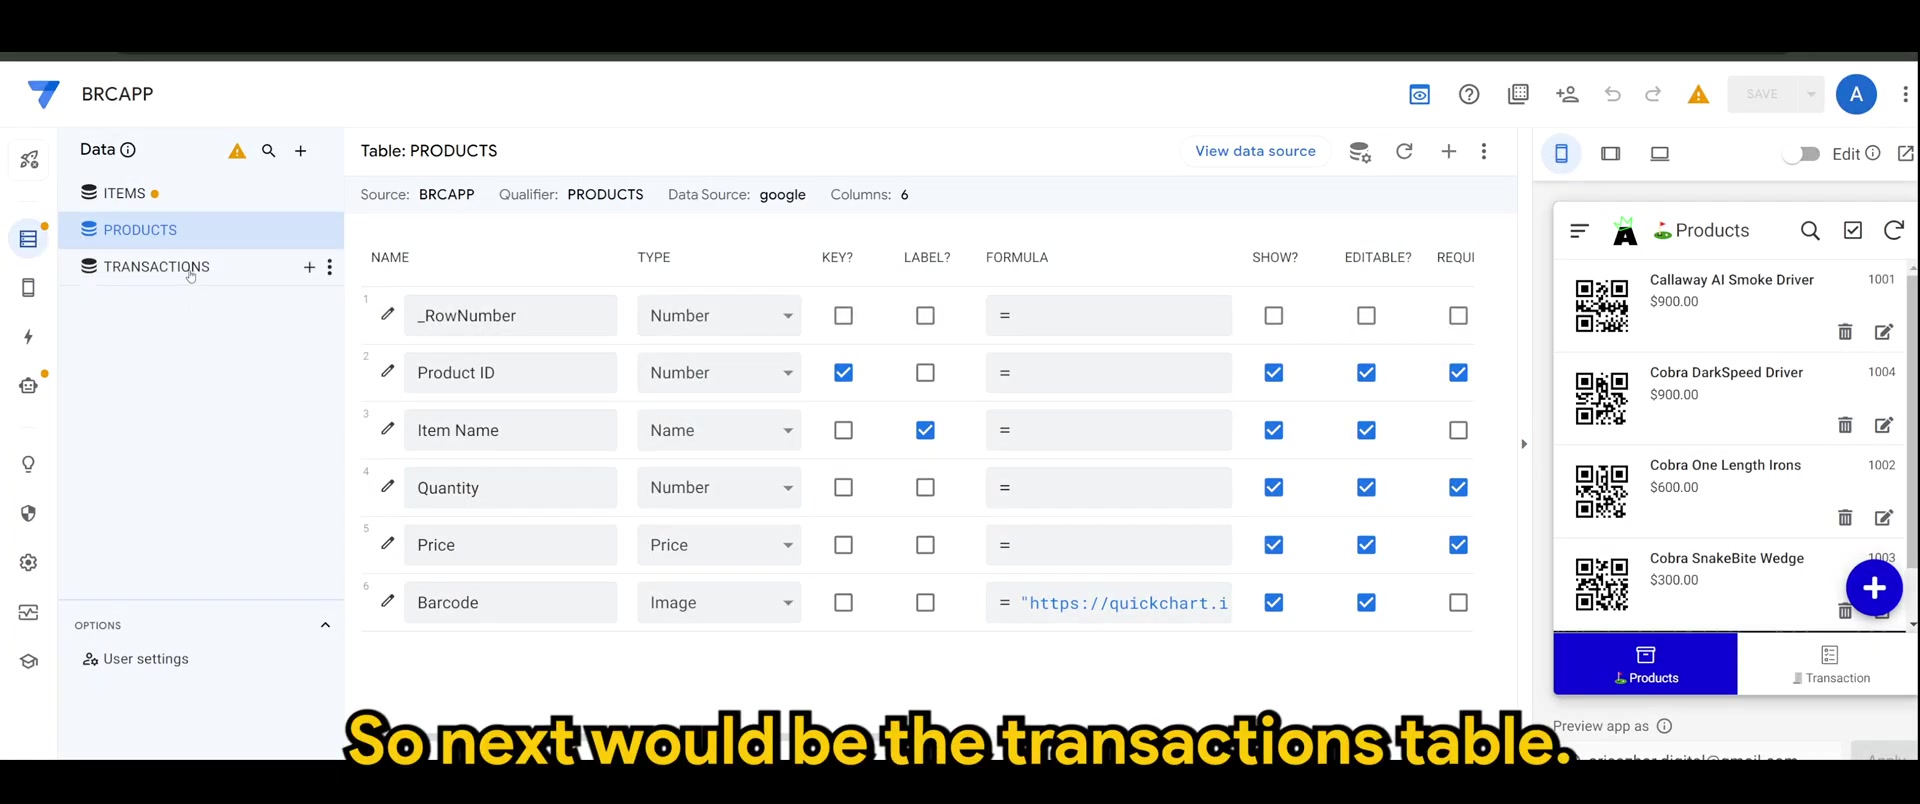
AppSheet offers a straightforward interface to guide you through this process.
- Data Source Connection: You'll be prompted to connect your app to a data source. Choose the platform where your meticulously structured data resides, whether it's Google Sheets, Excel, or another supported service.
- Spreadsheet Selection: Navigate through your files to locate and select the specific spreadsheet that houses your product database and transaction logs. This spreadsheet will serve as the foundation for your app's functionality.
After establishing the connection, AppSheet intelligently interprets your data's structure and generates initial views for your app. These views act as the primary interface for interacting with your data, and can be further customized to enhance user experience.
Keywords: AppSheet, app creation, data source, spreadsheet, data structure








Most people like
































Report
Please select a reason for reporting
- 13 Reasons to Switch from Snapchat to Text Messaging
- 7 Powerful Speech to Text Apps to Boost Productivity
- 10 Best Speech to Text Tools for Effortless Transcription
- 13 Free Tools to Easily Transcribe Audio to Text
- 15 Surprising Ways Google's Speech-to-Text Boosts Productivity
- 7 Best Free Online Audio to Text Transcription Tools
- 9 Tips to Transcribe Speech to Text Faster and Better
- 13 Best Speech to Text Software for Windows 10 in 2023
- 7 Tips for Choosing the Best Transcriber for Audio to Text
- 11 Reasons Why Dragon Speech-to-Text Apps are Game-Changers
- 6 Secrets to Enhance Your Speech to Text Transcription
- 6 Brilliant Ways to Boost Productivity with Talk-to-Text on Your MacBook
- 6 Ways Transcription Software Converts Audio to Text
- 8 Tips to Transcribe Speech to Text Like a Pro
- 6 Reasons IBM Watson Speech to Text is a Game-Changer
- 14 Powerful Ways Talk-to-Text Improves Your Workflow
- 12 Top Windows Speech-to-Text Software for Efficient Transcription
- 12 Game-Changing Benefits of Apple's Speech to Text Technology
- 9 Powerful Use Cases for AWS Speech to Text Technology
- 10 Easy Steps to Transcribe YouTube Videos to Text
- transcription audio en texte
- online audio transcription
- free audio file transcription
- free ai audio transcription
- audio transcription service
- audio transcription online free
- audio transcription free online
- audio to transcription software
- audio and transcript
- ai audio transcription free
- voice recording to text converter
- translate voice recording to text
- record voice to text
- audio recording to text converter
- voice recording and transcription
- chatgpt voice to text
- gmail voice to text
- speech to text reader
- speech to text ai free
- speech to talk
- How to Use AI Tools to Find Internal Linking Opportunities Across a Business Website
- Discover Your Perfect Haircut with AI Hairstyle Apps
- Free Reputation Calculator Tools: How They're Adapting to Score AI Visibility, Not Just Rankings
- Design Professional Flyers for Free on Your Phone
- Best Free Flyer Maker Apps for Android: Design Like a Pro
- How to Know If Your Business Is Ready for an AI Customer Service Agent
- Revolutionizing Storytelling: From Novels to Screenplays with AI
- Create Engaging Animated Explainer Videos with a Free AI Tool
- Stop Multi-Subscribing: Benchmark Top AI Visual Models in One Canvas
- Best Seedance 2.5 API Provider: Every Price on the Market, Checked at Source
- Top AI Social Media Management Tools: Automate Your Content Strategy
- Free AI Text to Video Generator: Create Stunning Videos from Text
- Discover 17 ChatGPT Alternatives: A Comprehensive Comparison
- Character.AI vs. Janitor AI: Which AI Chat Platform Reigns Supreme?
- Top Virtual Assistant Companies in 2026: Reviews, Pricing, and Plans Compared
- Unveiling FaceCheck.ID: Revolutionizing Reverse Image Searches with AI
- 11 Best AI Dialers in 2026: Features, Pricing, Pros and Cons
- How I Direct Consistent AI Clips: A Hands-On Guide to Multi-Model Generation
- A Realistic Review of the Photo Generator Image Tool
- Playwright MCP Server: Automated Web Testing with Agent Mode

Copyright ©2026 toolify