































Table of Contents
- Key Points
- Getting Started with Image Recognition in .NET Core
- Enhancing Your ML.NET Image Recognition Application
- Step-by-Step Implementation of Image Recognition
- Pricing for ML.NET
- Pros and Cons of Using ML.NET for Image Recognition
- Core Features of ML.NET for Image Recognition
- Practical Use Cases for ML.NET Image Recognition
- Frequently Asked Questions about ML.NET Image Recognition
- Related Questions and Advanced Topics


Getting Started with Image Recognition in .NET Core
What is ML.NET?
ML.NET is an open-source, cross-platform machine learning framework developed by Microsoft. It allows .NET developers to build, train, and deploy custom machine learning models without needing prior expertise in machine learning. With ML.NET, you can perform tasks like classification, regression, anomaly detection, and image recognition, all within the .NET ecosystem. The ML.NET framework integrates seamlessly with existing .NET applications, making it easy to add intelligent features to your projects. Image Recognition, a key application of ML.NET, enables software to identify objects, people, places, and actions in images, opening up possibilities for various industries including Healthcare, retail, and security.
Prerequisites for Image Recognition Implementation
Before diving into the implementation, ensure you have the following:
- Visual Studio: Install Visual Studio 2019 or a later version with .NET Core support.
- .NET Core SDK: Make sure the .NET Core SDK is installed on your machine.
- Basic C# Knowledge: Familiarity with C# programming is essential for understanding and modifying the code.
- ML.NET Model Builder Extension: This extension simplifies the model creation process.
- Image Datasets: Prepare a set of images categorized into different folders for training your AI model.

You will need images to train your image recognition model, as well as other images to test the model.
With these components in place, you're ready to start building your image recognition application.
Step-by-Step Implementation of Image Recognition
Step 1: Installing the ML.NET Extension
The initial step involves installing the ML.NET Model Builder extension in Visual Studio. This extension provides a user-friendly interface for creating, training, and evaluating machine learning models.
-
Open Visual Studio.
-
Navigate to Extensions > Manage Extensions.
-
In the “Manage Extensions” window, select the Online tab.
-
Search for “ML.NET” and locate the ML.NET Model Builder extension.
-
Click Download and follow the prompts to install the extension.
-
Restart Visual Studio to complete the installation.
Once the extension is installed, you're ready to move on to the next phase of building your image recognition application.
Step 2: Designing the WPF Application
Next, create a simple Windows presentation Foundation (WPF) application to serve as the user interface for image selection and display.
- Create a new project in Visual Studio.
- Select the WPF App (.NET Core) template.
- Name your project and click Create.
- In the WPF designer, add the following controls:
- A Button control labeled “Load” to select an image.
- An Image control to display the selected image.
- A Button control labeled “Classify” to trigger the image classification.
- Two TextBox controls to display the predicted label and accuracy.
- Adjust the layout and appearance of the controls as desired.
This basic WPF application provides the framework for integrating the image recognition model.
Step 3: Building the AI Model with Model Builder
Now, let’s use the ML.NET Model Builder to create the AI model for image recognition.
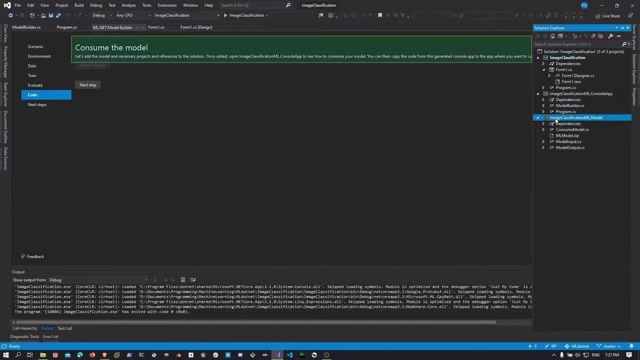
- Right-click on your project in the Solution Explorer.
- Select Add > Machine Learning.
- The ML.NET Model Builder UI will open.
- Choose the Image Classification scenario.
- Select Local (CPU) as the training environment.
- Specify the location of your image dataset folder. The folder should contain subfolders, each labeled with the category name, containing the corresponding images.
- Click Train to start the model training process. The Model Builder will automatically select the best algorithm and train the model.
The Model Builder simplifies the complex process of model creation and training.
Step 4: Coding the Application
With the AI model built, it’s time to incorporate it into the .NET Core application code.
- In the Model Builder UI, click Code.
- Add the necessary projects and references to your solution.
- Copy the code for consuming the model from the generated console application.
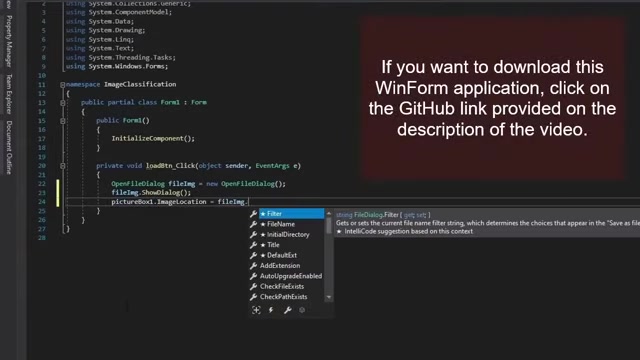
- In your WPF application, add a click event handler for the “Classify” button.
- Paste the copied code into the event handler, modifying it to use the selected image from the Image control.
- Update the code to display the predicted label and accuracy in the TextBox controls.
Remember to include the appropriate namespaces for the ML.NET components.
Step 5: Running the Application and Classifying Images
Now, let's run the application and test the image recognition functionality.
- Build the solution in Visual Studio.
- Run the application.
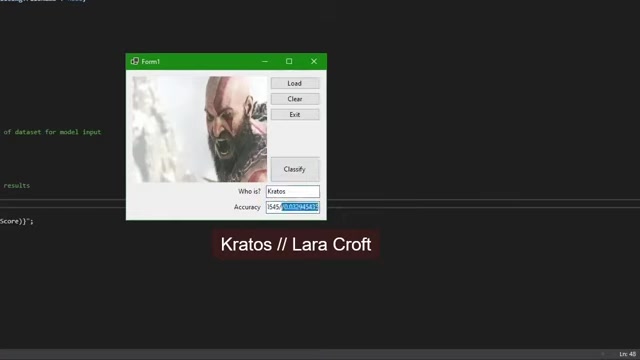
- Click the “Load” button to select an image.
- The selected image will be displayed in the Image control.
- Click the “Classify” button to trigger the image classification.
- The predicted label and accuracy will be displayed in the TextBox controls.
By following these steps, you’ll have a functional image recognition application built with ML.NET in .NET Core.
Pricing for ML.NET
Cost Considerations
ML.NET is a free and open-source framework, eliminating licensing costs. However, the real cost lies in infrastructure and data preparation. Consider the following:
- Compute Resources: Training complex models requires significant CPU or GPU power, especially when dealing with large datasets. Cloud-based compute services like Azure can provide scalable resources but incur costs based on usage.
- Data Storage: Storing and managing large image datasets can be expensive, particularly if you require high availability and redundancy. Cloud storage solutions like Azure Blob Storage offer cost-effective options.
- Data Preparation: Preparing and labeling image data is a labor-intensive process. You may need to hire data scientists or labelers, adding to the overall cost.
Carefully evaluate your resource needs and data requirements to estimate the true cost of implementing image recognition with ML.NET.

Core Features of ML.NET for Image Recognition
Key Capabilities
ML.NET offers a range of features that make it well-suited for image recognition tasks:
-
Automated Machine Learning (AutoML): AutoML automates the process of selecting the best machine learning algorithm and tuning hyperparameters, saving developers time and effort.
-
Model Builder UI: This intuitive UI simplifies the model creation and training process, making it accessible to developers without extensive machine learning expertise.
-
Pre-trained Models: ML.NET supports the use of pre-trained models, allowing developers to leverage existing knowledge and reduce training time.
-
Customizable Pipelines: Developers can create custom pipelines to tailor the image recognition process to their specific needs.
-
Cross-Platform Support: ML.NET runs on various platforms, including Windows, Linux, and macOS, making it easy to deploy applications across different environments.
These features make ML.NET a powerful and versatile framework for building image recognition solutions.





Most people like





































Report
Please select a reason for reporting
- 13 Reasons to Switch from Snapchat to Text Messaging
- 7 Powerful Speech to Text Apps to Boost Productivity
- 10 Best Speech to Text Tools for Effortless Transcription
- 13 Free Tools to Easily Transcribe Audio to Text
- 15 Surprising Ways Google's Speech-to-Text Boosts Productivity
- 7 Best Free Online Audio to Text Transcription Tools
- 9 Tips to Transcribe Speech to Text Faster and Better
- 13 Best Speech to Text Software for Windows 10 in 2023
- 7 Tips for Choosing the Best Transcriber for Audio to Text
- 11 Reasons Why Dragon Speech-to-Text Apps are Game-Changers
- 6 Secrets to Enhance Your Speech to Text Transcription
- 6 Brilliant Ways to Boost Productivity with Talk-to-Text on Your MacBook
- 6 Ways Transcription Software Converts Audio to Text
- 8 Tips to Transcribe Speech to Text Like a Pro
- 6 Reasons IBM Watson Speech to Text is a Game-Changer
- 14 Powerful Ways Talk-to-Text Improves Your Workflow
- 12 Top Windows Speech-to-Text Software for Efficient Transcription
- 12 Game-Changing Benefits of Apple's Speech to Text Technology
- 9 Powerful Use Cases for AWS Speech to Text Technology
- 10 Easy Steps to Transcribe YouTube Videos to Text
- transcription audio en texte
- online audio transcription
- free audio file transcription
- free ai audio transcription
- audio transcription service
- audio transcription online free
- audio transcription free online
- audio to transcription software
- audio and transcript
- ai audio transcription free
- voice recording to text converter
- translate voice recording to text
- record voice to text
- audio recording to text converter
- voice recording and transcription
- chatgpt voice to text
- gmail voice to text
- speech to text reader
- speech to text ai free
- speech to talk
- Meshy AI: How to Create 3D Models from Text and Images
- How SEO and Marketing Dashboards Empower Agencies to Drive Results
- How to Use AI Tools to Find Internal Linking Opportunities Across a Business Website
- Discover Your Perfect Haircut with AI Hairstyle Apps
- Free Reputation Calculator Tools: How They're Adapting to Score AI Visibility, Not Just Rankings
- Design Professional Flyers for Free on Your Phone
- Best Free Flyer Maker Apps for Android: Design Like a Pro
- How to Know If Your Business Is Ready for an AI Customer Service Agent
- Revolutionizing Storytelling: From Novels to Screenplays with AI
- Create Engaging Animated Explainer Videos with a Free AI Tool
- Meshy AI: How to Create 3D Models from Text and Images
- ASOMobile Helps Teams Benchmark App Store Screenshots Against Competitors
- How to Match LMS Software With Your Organization's Training Plan
- Revolutionizing Email Marketing Agency with AI
- How to Convert BTC to HNT
- Unleashing the Power of AI: Cognizant's Roadmap for Transformation
- Frame to Video Review: A Practical Look at Turning Two Still Frames Into Motion
- NVIDIA NIM: Revolutionizing Supply Chain Data Analysis with AI
- Top AI Tools That Help Brands Stand Out Offline (Not Just Online)
- Top 5 Cold Email Software: Maximize Your Outreach in 2025

Copyright ©2026 toolify